Using The Deployment Manager
Configuration of target systems on the sending
system
Configuration of Web Services security on each
target system
Web
Service Security on the target system
Designer
Security on the sending system.
Introduction
The Deployment Manager allows a
previously created export file to be deployed to one or more target Ebase
systems. The target systems can be running on the same server or can be running
remotely. The export file is sent to each target system and is then imported; a
further option supports the automatic deployment of any components contained in
the export file.
Configuration
The following configuration steps
are required before using the Deployment Manager:
1.
Configuration of target systems on the sending
system
2.
Configuration of Web Services security on each
target system
Configuration of target systems on the sending system
This is done on the sending system.
Create file deploymentManagerConfig.xml
in directory WEB-INF/classes of the Ebase web application. This XML file
contains one <RemoteSystem> element for each target system as
shown in the following example.
<?xml
version="1.0" encoding="UTF-8"?>
<!--
Deployment
Manager configuration file. Use this file to define
remote systems
which can be chosen as target systems using the Deployment
Manager. WebServiceUser
and WebServicePassword specify the
user and password of the Web Service listener
and must match the corresponding values for the WebServiceServlet in the web.xml
file
of the remote system.
-->
<DeploymentManagerConfig>
<RemoteSystems>
<RemoteSystem>
<Name>Dev1</Name>
<Hostname>ebt600</Hostname>
<Webapp>ufs</Webapp>
<Port>3030</Port>
<WebServiceUser>ebaseuser</WebServiceUser>
<WebServicePassword>ebaseuser</WebServicePassword>
</RemoteSystem>
<RemoteSystem>
<Name>Test1</Name>
<Hostname>ebt601</Hostname>
<Webapp>ufs</Webapp>
<Port>3030</Port>
<WebServiceUser>ebaseuser</WebServiceUser>
<WebServicePassword>ebaseuser</WebServicePassword>
</RemoteSystem>
<RemoteSystem>
<Name>Live1</Name>
<Hostname>ebt602</Hostname>
<Webapp>ufs</Webapp>
<Port>3030</Port>
<WebServiceUser>ebaseuser</WebServiceUser>
<WebServicePassword>ebaseuser</WebServicePassword>
</RemoteSystem>
</RemoteSystems>
</DeploymentManagerConfig>
The meaning
of each element within <RemoteSystem> is as
follows:
|
Name: |
The name of the target system. This can be any name and does not relate to anything configured on the remote system. All names must be unique. The name is displayed to the designer in the Deployment Manager dialog. A security authorization check is issued against each name. |
|
Hostname: |
Hostname or ip address of the target system. Hostname, Webapp and Port are used together to create a URL used for the web service connection between the sending and target servers. |
|
Webapp: |
Web application of the target system - this is the normal web application used to run Ebase forms (see Hostname) |
|
Port: |
Port of the target system - this is the normal Http port used to run Ebase forms (see Hostname) |
|
WebServiceUser: |
The userid of the web service on the target system |
|
WebServicePassword: |
The password of the web service on the target system |
Configuration of Web Services security on each target system
On each
target system, edit the web.xml
file and set the web service username
and password in the ImportAndDeployServlet as shown in the following example:
…
<servlet>
<servlet-name>ImportAndDeployServlet</servlet-name>
<servlet-class>com.ebasetech.ws.core.cxf.server.CXFImportAndDeployServlet</servlet-class>
<init-param>
<param-name>debug</param-name>
<param-value>true</param-value>
</init-param>
<init-param>
<param-name>username</param-name>
<param-value>ebaseuser</param-value>
</init-param>
<init-param>
<param-name>password</param-name>
<param-value>ebaseuser</param-value>
</init-param>
<load-on-startup>9</load-on-startup>
</servlet>
…
Using
the Deployment Manager
The
Deployment Manager is an optional feature and must be explicitly activated. Add
the following to the start_ebase_designer.bat file in
the UfsClient folder. This should be done for each
designer user who needs access to the deployment manager. This should be added
to the line beginning set JAVA_PROPERTIES..
-DuseDeploymentManager=true
e.g.
set JAVA_PROPERTIES=%JAVA_PROPERTIES% -Dawt.useSystemAAFontSettings=true -Dsun.java2d.noddraw=true
-Dlog4j.configuration=file:/%~dsp0/properties/log4j.properties -DuseDeploymentManager=true
The
Deployment Manager is accessed from the Ebase Designer via Tools --> Migration --> Deploy.
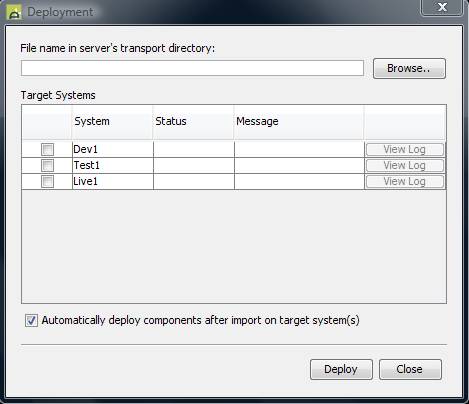
First
select an export file to be deployed by entering a file name or clicking the Browse button.
Then select
the target systems by clicking in the checkbox to the left of the system name.
Note if a target system cannot be selected, this is because the security authorization check has failed.
Check the Automatically deploy components after import
on target systems() checkbox to indicate that the
system should deploy components after import. If selected, the deployment of
components is propagated upwards on each target system until all components
have been deployed to all containing forms e.g. component A is contained in
component B which is in turn contained in forms F1 and F2; after component A
has been imported, it will be deployed to component B which will in turn be
deployed to forms F1 and F2.
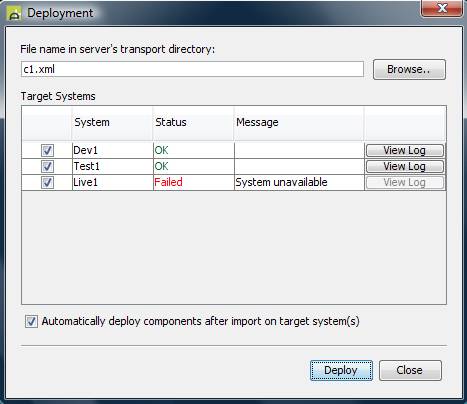
Click the Deploy button.
When the
deploy has completed, the Status
column will contain either ‘OK’ or ‘Failed’ to indicate whether the deployment
has been successful. If successful, the View
Log button will display the import log on the target system when clicked.
If unsuccessful, the Message column
will display a detail reason.
Configuring Security
There are two levels of security that can be configured:
Web Service Security on the target system
This supplies a username and password to the Web Services listener on each target system as describe above.
Designer Security on the sending system
The export function is separated from the deploy function to allow a clear delineation of job
responsibilities; this function delineation is implemented using Ebase designer
security. For example, a developer might be authorized to perform exports, but
not to deploy export files to target systems. Similarly, an administrator might
not be authorized to perform exports, but is authorized to deploy export files
to target systems.
The deploy function is protected by
the DESIGNER_DEPLOY authorization as described below:
The system checks the following authorization for each target system displayed in the Deployment Manager:
Type: DESIGNER_DEPLOY
Name: The target system name (e.g. Live1 in the example above)
Function: Deploy
If the security check fails, ‘Not Authorized’ is displayed in the Message column and the target system cannot be selected.