Web Services Security
Adding Web Service Security Header
Sending Username and Timestamp UserTokens
Removing a Web Service Security Header
Ordering Web Service Security Headers
Using Http Basic Authentication
Using Http NTLM Authentication
WS-Security
Introduction
The Ebase Web Services Adapter supports Username
Tokens and Timestamps from the OASIS
WS-Security specification
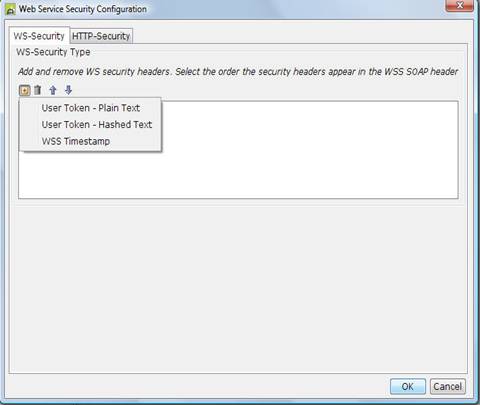
Adding Web Service Security Header
It is
possible that one or more security headers are required when enabling web
service security (wss). To add a web service security
header to the document header:
1)
Select the Web Service Resource in the designer tree.
2)
Select the Web Services Adapter
3)
Select the ‘Configure WSS’ Button. The WS-Security
Configuration Dialog will appear.
4)
Click
the ![]() icon
icon
5)
Select
the wss header to add
6)
Click
on the wss header in the list to configure wss header attributes.
7)
When
the header appears in the list, it will automatically be enabled.
A wss header can only be added to a document once. Once a
header is added to the headers list, it will become disabled when clicking on the ![]() .
.
Configuring Username Token
The username token adds the username and password to
the SOAP Header. The password can be sent as either plain text or hashed. If
the username/password does not match the servers’ username/password the request
message will be rejected, usually with a SOAP Fault.
To configure WS-Security Username Token Authentication
on the Web Services Resource: -
1)
Add the User Token wss header :-
2)
User Token – Plain Text - for plain text password
3)
User Token – Hashed Text - for hashed password
4)
Select the User Token in the list to configure the
username and password attributes.
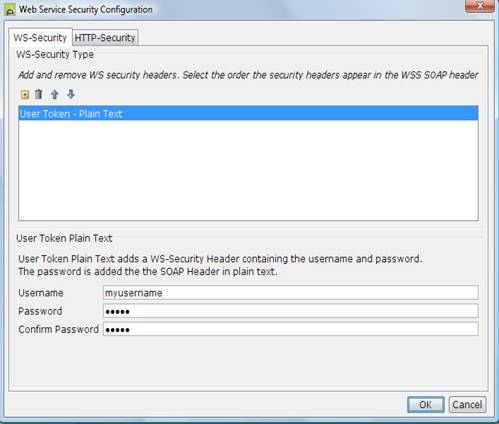
5)
Enter the username.
This value supports substitutable parameters. See substitutable
parameters section for more details.
6)
Enter the password This value supports
substitutable parameters. See substitutable
parameters section for more details.
7)
Confirm the password
8)
Once finished add wss
headers, click OK.
The example below shows the SOAP Message sent to the
server using hashed password User Token Authentication:
<soap:Envelope xmlns:soap="http://schemas.xmlsoap.org/soap/envelope/"
xmlns:xsd="http://www.w3.org/2001/XMLSchema"
xmlns:xsi="http://www.w3.org/2001/XMLSchema-instance">
<soap:Header>
<wsse:Security soap:mustUnderstand="1"
xmlns:wsse="http://docs.oasis-open.org/
wss/2004/01/oasis-200401-wss-wssecurity-secext-1.0.xsd">
<wsse:UsernameToken wsu:Id="UsernameToken-21382323"
xmlns:wsse="http://docs.o
asis-open.org/wss/2004/01/oasis-200401-wss-wssecurity-secext-1.0.xsd"
xmlns:wsu="http://docs.oasis-open.org/wss/2004/01/oasis-200401-wss-wssecurity-utility-1.0.
xsd">
<wsse:Username xmlns:wsse="http://docs.oasis-open.org/wss/2004/01/oasis-2004
01-wss-wssecurity-secext-1.0.xsd">username</wsse:Username>
<wsse:Password
Type="http://docs.oasis-open.org/wss/2004/01/oasis-200401-wss
-username-token-profile-1.0#PasswordDigest" xmlns:wsse="http://docs.oasis-open.o
rg/wss/2004/01/oasis-200401-wss-wssecurity-secext-1.0.xsd">XiznkRuKWEkq0hdHL/nzL
S2XojI=</wsse:Password>
<wsse:Nonce xmlns:wsse="http://docs.oasis-open.org/wss/2004/01/oasis-200401-
wss-wssecurity-secext-1.0.xsd">9C3KP/T0s7vQlXHcfgN4VQ==</wsse:Nonce>
<wsu:Created xmlns:wsu="http://docs.oasis-open.org/wss/2004/01/oasis-200401-
wss-wssecurity-utility-1.0.xsd">2006-12-08T16:00:04.297Z</wsu:Created>
</wsse:UsernameToken>
</wsse:Security>
</soap:Header>
<soap:Body>
……
</soap:Body>
</soap:Envelope>
Timestamp
The timestamp sets a time in either seconds or
milliseconds that the Web Service call is valid for. A Timestamp is used to
determine the freshness of a SOAP Message. Sometimes SOAP Messages can be received that
are out of date and are not applicable anymore. Setting a timestamp sets an
expiry date on the message. If the SOAP Message received has already expired
then the Server will reject the request usually with a SOAP Fault.
To Configure Timestamp Token Authentication on the Web
Service Resource:
1)
Add the WSS Timestamp header :-
2)
Select the Timestamp header in the list to configure
the timeout attributes attributes.
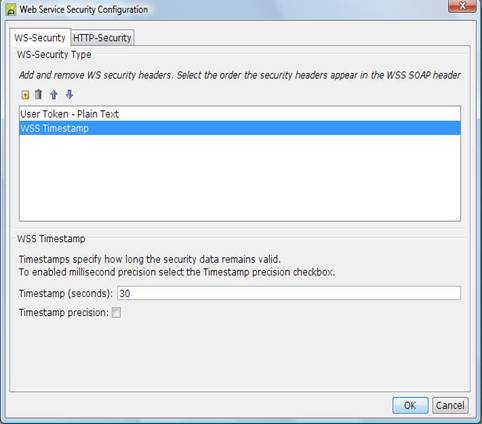
3)
Enter Timestamp number of seconds or milliseconds to
configure the expiry time.
4)
Select the Timestamp precision checkbox to change the
expiry time from seconds to milliseconds.
5)
Once finished adding wss
headers, click OK
The example below shows the SOAP Message sent to the
server using Timestamp authentication set to 10 seconds before expiry:
<soap:Envelope xmlns:soap="http://schemas.xmlsoap.org/soap/envelope/"
xmlns:xsd="http://www.w3.org/2001/XMLSchema"
xmlns:xsi="http://www.w3.org/2001/XMLSchema-instance">
<soap:Header>
<wsse:Security soap:mustUnderstand="1"
xmlns:wsse="http://docs.oasis-open.org/ wss/2004/01/oasis-200401-wss-wssecurity-secext-1.0.xsd">
<wsu:Timestamp wsu:Id="Timestamp-9611746"
xmlns:wsu="http://docs.oasis-open.o
rg/wss/2004/01/oasis-200401-wss-wssecurity-utility-1.0.xsd">
<wsu:Created xmlns:wsu="http://docs.oasis-open.org/wss/2004/01/oasis-200401-
wss-wssecurity-utility-1.0.xsd">2006-12-08T17:02:51.287Z</wsu:Created>
<wsu:Expires xmlns:wsu="http://docs.oasis-open.org/wss/2004/01/oasis-200401-
wss-wssecurity-utility-1.0.xsd">2006-12-08T17:03:01.287Z</wsu:Expires>
</wsu:Timestamp>
</wsse:Security>
</soap:Header>
<soap:Body>
……
</soap:Body>
</soap:Envelope>
Sending
Username and Timestamp UserTokens
It is possible to send both Username token and
Timestamp UserTokens. To enable both, follow the
steps in Username
Token and Timestamp
sections. The UsernameToken and Timestamp security
XML elements will be added to the Security element within the XML SOAP Request.
N.B. You can only specify
one Username token at a time, either Plain Text or Hash Text, specifying both
could produce unpredictable results.
Removing
a Web Service Security Header
To remove a
wss header from the list:-
1)
Select
the header to remove from the list
2)
Click
the ![]() icon
icon
3)
The
wss header will be removed from the list and it will
not appear on the web service document.
Ordering
Web Service Security Headers
The WSS
headers will appear in the web service document in the order they appear in the
list. To change the order: -
1)
Select
the wss header to move.
2)
Click
the ![]() icon to move the wss
header up the list.
icon to move the wss
header up the list.
3)
Click
the ![]() icon to move the wss
header down the list.
icon to move the wss
header down the list.
Http Security
Introduction
The Ebase web services adapter supports HTTP Basic
Authorization security in accordance to the W3C Http/1.0 Protocol.
Using Http Basic Authentication
Http Basic authorization is a HTTP/1.0 standard used
by web servers to authenticate a client to allow access to particular web
applications. Http basic authentication adds the username and password as an
encrypted string to the HTTP Header. If the username is ‘bill’ and the password
is ‘mypass’, the following HTTP Header is added to
the HTTP Request:
Authorization: Basic YmlsbDpteXBhc3M=
To configure HTTP Basic Authentication on the web
service adapter:
1)
Select the Web Service Resource on the designer tree.
2)
Select the Web Services Adapter.
3)
Select the ‘Configure Web Services’ Button.
4)
Select the HTTP-Security tab.
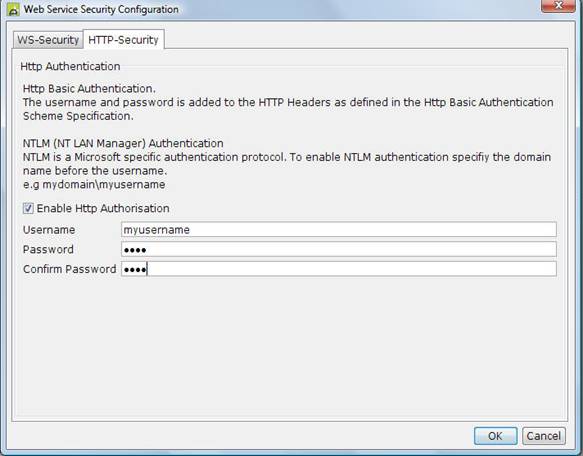
5)
Select Enable Http Security.
6)
Enter the username. This value supports substitutable parameters.
See substitutable
parameters section for more details.
7)
Enter the password This value supports
substitutable parameters. See substitutable
parameters section for more details.
8)
Confirm the password.
9)
Click OK Button.
Using Http NTLM Authentication
NTLM (NT LAN Manager)
is a Microsoft authentication protocol.
NTLM authentication
is configured in exactly the same as Http Basic Authentication,
except that the domain name is included as part of the username. The username
must be entered as <domain-name>\<username>.