Designer Tree
See also: Introduction to using the Designer, Introduction to Designing Forms
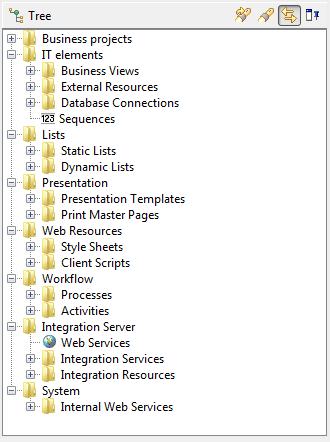
The Designer Tree is initially displayed on the left-hand side of the Ebase Xi Designer window, but it can be dragged to other locations if required. The tree shows all elements that exist in the system. Existing elements can be opened by navigating to them by opening tree nodes, or using the Search or Quick Search icons on the tree panel’s toolbar. New elements are created by right-clicking at the appropriate place in the tree structure, then right-clicking. Additional functions are also available via right click.
Tree
elements
Ebase Xi
consists of a number of different element types e.g. form, script, list etc.
and these all interact to produce a fully functioning form, integration service
or workflow process. These elements are organized into a tree structure which,
at the top level, consists of:
·
Business projects: a project consists of
forms, scripts and messages. The scripts and messages are shared by all forms
within the project, but cannot be used by forms in a different project. Scripts
and messages in the GLOBAL project are available to all forms.
·
IT elements: this contains all external
resource definitions (database resources, email resources, XML resources etc)
plus business views, sequences and databases. These elements can be used by all
forms.
·
Lists: this contains static and dynamic
lists. These elements can be used by all forms.
·
Presentation: this contains presentation
templates and print master pages. These elements can be used by all forms.
·
Web Resources: this contains style sheets and browser script files (usually
JavaScript)
·
Workflow: this contains workflow processes and workflow
activity definitions. It is only visible when the Ebase Workflow module is
installed.
·
Integration Server: similar to Business projects, this contains implementations of published web
services. It is only visible when the Ebase Integration Server module is
installed.
·
System: contains internal system web services
Toolbar
|
|
Ctrl-Q |
|
|
|
Ctrl-Alt-F |
|
|
|
|
Link with editor. The tree panel is synchronized with the editor panel. The tree opens to display the element currently being edited. |
|
|
|
Toggle auto-hide. When a panel is auto-hidden, the panel content is not shown and its title tab is displayed on the edge of the docking manager area. Clicking once on the auto-hidden panel tab restores the panel to its previous location. |
Right Click Menu
|
Create |
Create a new element. |
|
Open |
Opens the element using the appropriate editor. Same as double-clicking on the element. |
|
Run |
Runs a form. This option is only available for forms and components. |
|
Delete |
Delete the element. |
|
Rename |
Rename the element. |
|
Move |
Moves an element to another project. This option is only available for forms and scripts. |
|
Export |
Invokes the migration dialog to export selected elements as XML. |
|
References |
Shows references to the selected element in the References Panel. This is normally displayed beneath the tree panel but can be dragged to another location. |
Quick Search
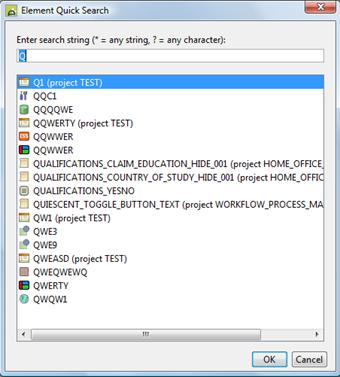
The Quick Search panel is accessed from the Tools menu or by shortcut key Ctrl-Q and displays the panel shown below. As characters are entered into the search box, elements starting with these characters are shown in the list display. Wild cards * (any number of characters) and ? (a single character) can be used.
Double clicking on a displayed element will open it.
Search
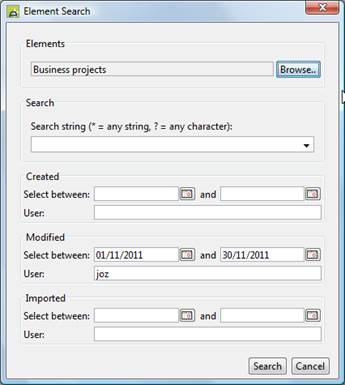
The Element Search panel is accessed from the Tools menu or by shortcut key Ctrl-Alt-F and displays the extended search panel shown below.
Any combination of the following search criteria can be specified:
- Elements: which areas of the tree are searched
- Search: the name of the elements to be searched. Wild cards * (any number of characters) and ? (a single character) can be used.
- Created date range: displays elements created within this range
- Created user: the user id that created the element(s)
- Modified date range: displays elements modified within this range
- Modified user: the user id that last modified the element(s)
- Imported date range: displays elements imported within this range
- Imported user: the user id that last imported the element(s)
The search results are displayed in the References Panel which is normally displayed beneath the tree panel, but can be dragged to another location. Double clicking on a displayed element in the References Panel will open it.