Migration - Using Import and
Export
See also: Ebase
Scheduler
Single File Migration
You can use the import/export function to migrate all Ebase elements
between systems. The data is exported as a xml file
which is placed in the transport directory on the server. This is specified in
the UFSSetup.properties file, parameter Ufs.transportDirectoryName.
If you are migrating data between systems, you will need to manually
copy the export xml file to the target system’s transport directory. (See Ebase Startup Parameters for more
information)
Export
The export function is invoked from the Tools menu (Tools
--> Migration --> Export)
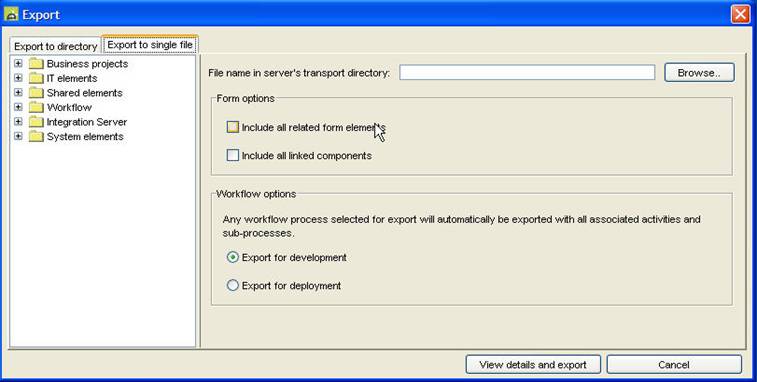
In the hierarchy tree panel in the left side of the display,
select all the elements you wish to export (Hold down the CTRL key for multiple selections). If you are
exporting an entire application, select the form(s) then click the include
all related form elements checkbox - this will automatically select all the
elements used by the form(s) with the exception of sequences which
always need to be explicitly selected.
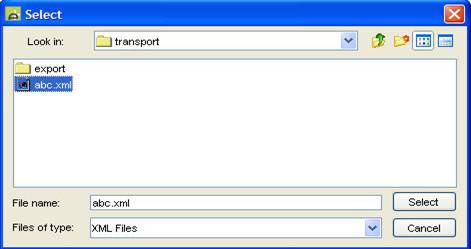
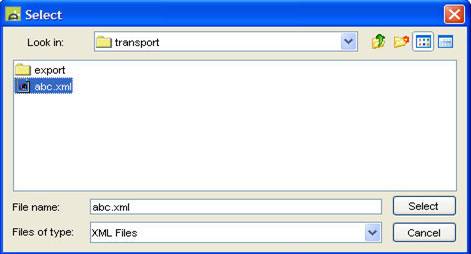
Press the
‘Browse..’ button and select the file you would like
to export to or enter the new name of the file of the export file into
the file chooser dialog. You can navigate or create sub-directories within the
export base directory (Ufs.transportDirectoryName) if you wish to organize your export files into
folders.
You may also choose to export any component which may have
been linked into the forms in which case you will also need to click the Include
all linked components
checkbox as well.
Note that you may need to open any projects to be exported
before you invoke the export function. When you have made your selections,
click the View details and export button. This displays a tabular list of all
elements selected for export as shown below. If the file already exists a
warning message will be displayed prompting whether you would like to overwrite
the file.
Please take care when exporting and importing sequences as an import will import the next
document id from the source system. This can result in duplicate or lost
documents if the form already exists in the target system. (See Working with Sequences for more
information)
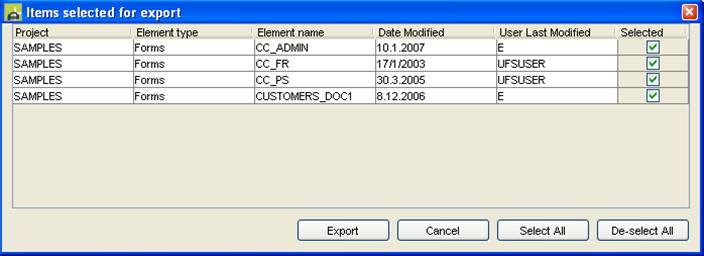
From this screen you can amend the selections you have made.
Then click Export to perform the export - this may take a few seconds to
respond.
If an error
occurs whilst performing the export a dialog will be displayed asking you
whether you would like to ignore the error. Select:
·
Yes to ignore the error, this will not be exported as the element
contains errors.
·
Yes to all to ignore any other
errors.
·
Retry to try to export that item again; this will give the user
the option to try to rectify the problem.
·
Cancel to cancel the export.
·
Note also that it is not essential to export linked
components when exporting a form. Forms will run without the components
present. The only limitation will be that any linked component instances in the
imported forms will not be editable until the source components themselves have
been imported.
Import
The import function is invoked from the Tools menu (Tools
--> Migration --> Import)
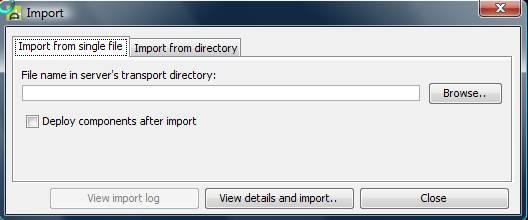
Enter the file to be imported (use the Browse button if required and select the file for import from the file chooser dialog).
Select the deploy components after import to indicate that any components in the import file should be deployed to containing components or forms. If selected, the deployment of components is propagated upwards until all components have been deployed to all containing forms e.g. component A is contained in component B which is in turn contained in forms F1 and F2; after component A has been imported, it will be deployed to component B which will in turn be deployed to forms F1 and F2.
Press the View details and import button. This displays a tabular
list of all elements selected for import as shown below.
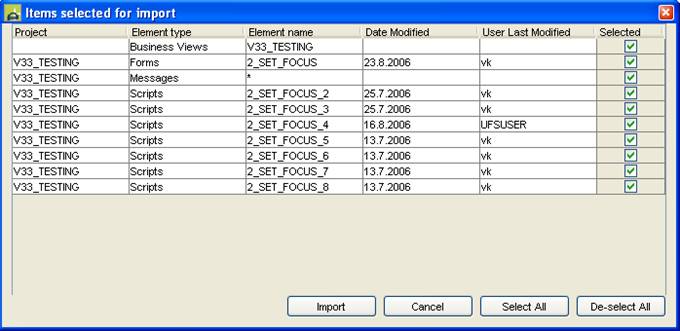
You can amend the selections if necessary. Then click Import.
The import process will create any new elements required
including projects. If the element already exists, it will be replaced by the
import system. If any of the elements to be imported are currently open on your
system, please close them prior to the import to avoid confusion - the system
will not refresh these with the imported versions.
If an error
occurs whilst performing the import a dialog will be displayed asking you
whether you would like to ignore the error. Select:
·
Yes to ignore the error, this will not be exported as the element
contains errors.
·
Yes to all to ignore any other
errors.
·
Retry to try to import that item again; this will give the user
the opportunity to try to rectify the problem.
·
Cancel to cancel the import.
·
Other errors
may occur such as: Duplicate UID, Component Version error or Missing Component
error. If one of these errors occurs, a warning dialog will display asking
whether to fix the error. Select:
·
Yes fixes the single item.
·
Yes to all fixes all items that may
contain the error.
·
No cancels the import.
After an import has completed, click the View import log button to view the log. This will contain a list of all imported items, plus details of component deployment if this option is selected.
Directory Migration
Ebase supports the ability to export all Ebase elements into
a specified directory structure on the Ebase Server. The directory mirrors the
tree view displayed in the left hand side of the export panel. Each Ebase
element is written to a directory location based on its position in the tree
view. The base directory for import and export is specified in the UFSSetup.properties file, parameter Ufs.export.location=<base-export-directory-location>
(See Ebase Startup Parameters
for more information). Subdirectories can be created within this directory to
allow customized exports and imports. If you are migrating between different
systems then you will need to copy over the entire directory from the root
directory of the export.
Export
The export
function can be invoked using the same menu item as the single file migration
described above. If the Ufs.export.location is populated within the
UFSSetup.properties, the export dialog will display two tabs. The export dialog
defaults to the directory export as described below. The second tab contains
the single file migration described in the above
section.
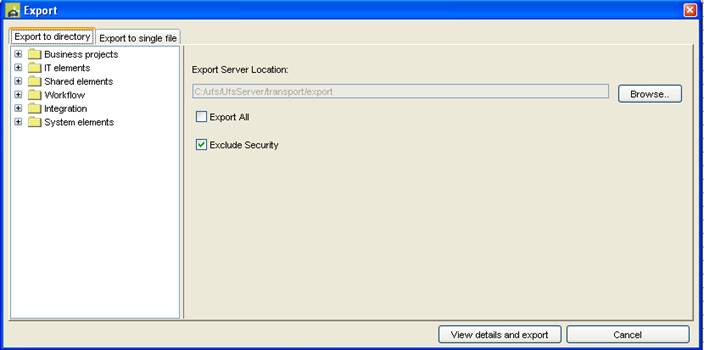
The Export
Server Location defaults to the value Ufs.export.location parameter value
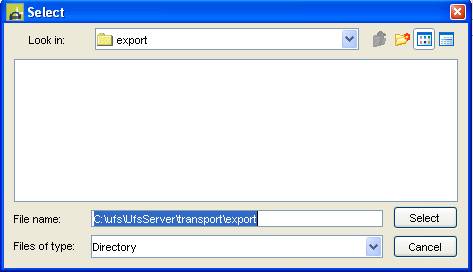
specified. To select a different directory to write the system elements to,
click the browse button. You can either create a new subdirectory or select an
existing directory to write the system elements to. You cannot select a directory
within a previous export directory structure and directories cannot be created
outside the default export location. Multiple subdirectories can be created if
an existing export does not exist in that location. The directory location
cannot have spaces within them. It is recommended to use _ to separate words in
directory names.
The export
options default to Export All unchecked and Exclude Security checked. This option will export
selected tree elements in the left hand pane, similar to single file migration
described above and will not export the Security data: Users, Profiles
and Encryption. Other options include:
·
Export All selected – Exports the entire tree except the security
data. This option removes all data from the export directory if one already
exists.
·
Export All deselected – Exports only selected elements in the
hierarchy tree and does not include the security data, even though the tree
node is selected, This option updates files located within the export or adds
new files to the export directory and leaves any other exported data intact.
·
Exclude Security selected – Does not include the security data.
·
Exclude Security deselected – Include the security data with
export.
Use the check
boxes to select the appropriate export. To export all the elements including
the security data, select Export All and deselect Exclude security.
Press View
details and export button to
preview the elements to be exported. To remove any elements, deselect the
item(s). If Export All is checked, then the select and deselect all
buttons are disabled. Also removing items from the table view is disabled. If
an existing export resides within the selected export location, a warning
message will be displayed to ask whether you wish to export to that directory.
Click the
Export button once the selections have been reviewed.
If an error
occurs whilst performing the export a dialog will be displayed asking you
whether you would like to ignore the error. Select:
·
Yes to ignore the error, this will not be
exported as the element contains errors.
·
Yes to all to ignore any other errors.
·
Retry to try to export that item again;
this will give the user the option to try to rectify the problem.
·
Cancel to cancel the export.
·
When the
export is complete a dialog box will display stating whether the export is
successful.
Import
The import
function can be invoked using the same menu item as the single file migration
described above. If the Ufs.export.location is populated within the
UFSSetup.properties, the import dialog will display two tabs. The import dialog
defaults to the directory import from as described below. The second tab
contains the import migration described in the above
section.
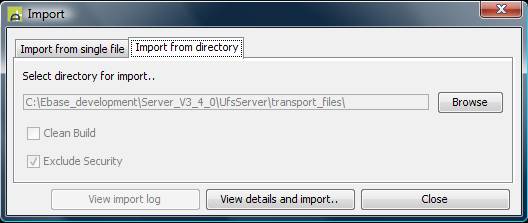
Click the Browse
button to select a previous import directory. You may only select the base
directory of an existing import. A directory import does not allow
partial import by selecting a subdirectory of export. This can be achieved by
removing selected items as described in the Importing System items section. It
is not possible to select exported locations outside the default location set
using Ufs.export.location parameter. Migration from another system must be
copied into the default directory or a subdirectory of the default directory.

If the import
directory selected was created by Export All, the Clean Build option is checked. This
option is selected as default and assumes a clean build as described below.
Otherwise the clean build option will be disabled. This will leave all the
existing data in the database and only update or add system elements.
If the import
included security data, then the Exclude Security option will be enabled and selected as
default. To include security data with the import, deselect the Exclude
Security option. Other options include:
·
Clean Build selected – Removes all data from the database and
replaces with import data. This does not include security data.
·
Clean Build deselected – Updates or adds the imported data. Any
existing data that is not updated will be ignored.
·
Exclude Security selected – Does not import security data,
·
Exclude Security deselected – Includes Security data as part of
the import.
·
Exclude Security deselected and Clean Build selected –
Removes all data and Security data from the database.
Clean build
removes all data from the database and replaces it with the selected items
shown in the import preview. If exclude security is checked, the Users,
Profiles and Encryption table will not be replaced.
Use the check
boxes to select the appropriate import. If you require removing elements from
import, them the Clean Build must be deselected.
Press View
details and import button
to review the system elements for import. If the Clean Build option is
not selected, items may be removed from the selections view.
Press the Import
button to perform the import once reviewed.
If an error
occurs whilst performing the import a dialog will be displayed asking you
whether you would like to ignore the error. Select:
·
Yes to ignore the error, this will not be exported as the element
contains errors.
·
Yes to all to ignore any other
errors.
·
Retry to try to export that item again; this will give the user
the opportunity to try to rectify the problem.
·
Cancel to cancel the export.
·
Other errors
may occur such as: Duplicate UID, Component Version error or Missing Component
error. If one of these errors occurs, a warning dialog will display asking
whether to fix the error. Select:
·
Yes fixes the single item.
·
Yes to all fixes all items that
may contain the error.
·
No cancels the export.
·
After an import has completed, click the View import log button to view the log.
Scheduled
Export
Ebase
supports the ability to export from an external script. Ebase has a
preconfigured export schedule. The schedule allows customisable exports using
the ebasetrigger.bat file. (See Ebase Scheduler for
more information)
To
configure the export triggered schedule, open the scheduler menu option on the
tools menu (Tools --> Scheduler).
A
preconfigured export task is predefined within Ebase. To customize the export
task, select the export task located in the table view by either double-clicking
or selecting the item and selecting Edit
task. A dialog will
be displayed with predefined parameters required to run the task.
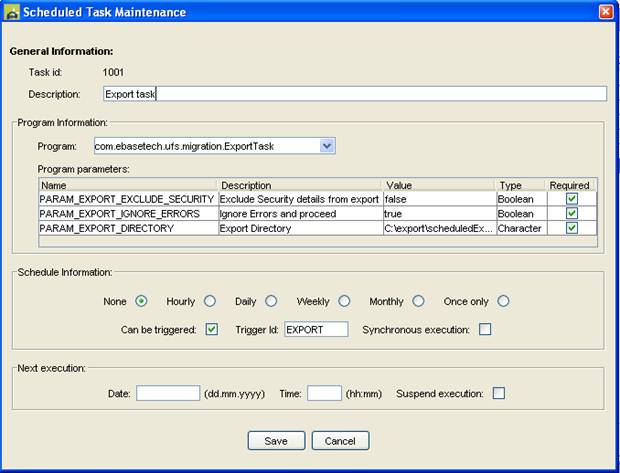
Export Schedule Options
Export schedule task request 3 parameters:
PARAM_EXPORT_EXCLUDE_SECURITY -
valid value of true or false. Flag whether to exclude security data when
performing the export. This parameter is required.
PARAM_EXPORT_DIRECTORY – valid value of base directory for
export. This parameter is required.
PARAM_IGNORE_ERRORS – valid value of true or false.
If set to true the export task ignores all errors and proceeds onto next item
found within the directory without logging the value. If set
to false the item error is logged and the item is excluded from export.
This parameter is required.
·
This task
should be set to trigger only as a clean build will remove all previously
exported data from the export directory if it already exists.
Configure the
task to best suit your requirements and click Save.
Open up a
command window and navigate to the location of the ebasetrigger.bat file.
Execute the ebasetrigger.bat file supplying the appropriate trigger id. As
default this is set to export, but can be changed when editing the task.
Export
Summary
After the export
is complete, a summary will be written to the export task log. If the task has
been executed with –sync –verbose option, the summary will be displayed in the
command window. The summary displays the following data:
·
The directory the process exported the files
to.
·
Whether the export included security data (true
or false)
·
Total number of items found to export
·
Total number of items exported
·
Total number of warnings - items not exported
·
Summary of Warnings – Item name, Item Type and Item Project.
Create New
Schedule Export Task
To create a
new schedule export task, open the scheduler dialog and select New task.
In the
program field type in: com.ebasetech.ufs.migration.ExportTask
This will
load the schedule task.
Configure the
required parameters as described above and save. Execute the task using
the Trigger Id configured.
Scheduled Import
Ebase supports the ability to import from an external script.
Ebase has a preconfigured import schedule. The schedule allows customisable
imports using the ebasetrigger.bat file. (See Ebase
Scheduler for more information)
To configure the import triggered schedule, open the scheduler
menu option on the tools menu (Tools --> Scheduler).
A preconfigured import task is predefined within Ebase. To
customize the import task, select the import task located in the table view by
either double-clicking or selecting the item and selecting Edit task. A dialog box will be displayed
with predefined parameters required to run the system task.
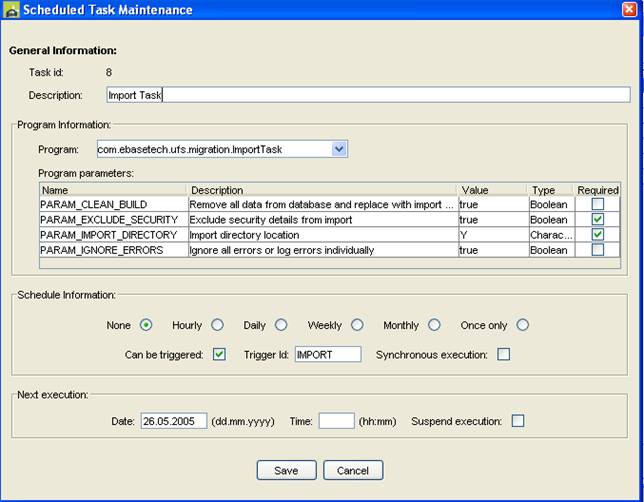
Import Schedule Options
Import Schedule Task request 4 parameters:
PARAM_CLEAN_BUILD – valid value of
true or false. Flag whether to perform a clean build that removes all
data from the database and replaces with the import data. This option is set to
false as default if not supplied.
PARAM_EXCLUDE_SECURITY - valid
value of true or false. Flag whether to exclude security data when
performing the import. This parameter is required.
PARAM_IMPORT_DIRECTORY – valid
value of base directory for import. This parameter is required.
PARAM_IGNORE_ERRORS – valid value of true or false.
If set to true the import task ignores all errors and proceeds onto next item
found within the directory without logging the value. If set
to false the item error is logged and the item is excluded from import.
This option is set to true as default if not supplied.
This task should
be set to trigger only as a clean build will remove all data from the database
before replacing the data.
Configure the
task to best suit your requirements and click Save.
Open up a
command window and navigate to the location of the ebasetrigger.bat file.
Execute the ebasetrigger.bat file supplying the appropriate trigger id. As
default this is set to import, but can be changed when editing the task.
Import Summary
After the
import is complete, a summary will be written to the import task log. If the
task has been executed with –sync –verbose option, the summary will be
displayed in the command window. The summary displays the following data:
·
The directory the process will import the files
from.
·
Whether the import included security data (true
or false)
·
Total number of items found to import
·
Total number of items imported
·
Total number of warnings – items not imported
·
Summary of Warnings – Item name, Item Type and Item Project.
Create New
Schedule Import Task
To create a
new schedule import task, open the scheduler dialog and select New task.
In the
program field type in: com.ebasetech.ufs.migration.ImportTask
This will
load the schedule task.
Configure the
required parameters as described above and save. Execute the task using
the Trigger Id configured.
Deployment Manager
The Deployment Manager is an optional feature that allows a previously created export file to be deployed to one or more target Ebase systems. The target systems can be running on the same server or can be running remotely. The export file is sent to each target system and is then imported; a further option supports the automatic deployment of any components contained in the export file. See Deployment Manager for further details.