Tutorial: display and update
of table with foreign keys
Add
a Dynamic List to the table
Add
the ability to update the data to the database
Create
a Dynamic List for sections
Add
Immediate Validation to departments column
Appendix
A: Using your own database
See also: Tables, Dynamic Lists, Tutorials index
The aim of this tutorial is to show you how to fetch and update relational data from a database without having to write complex SQL to join database tables.
Relational data
Relational databases use the concept of primary keys to uniquely identify a row of data, these keys can be used as foreign keys in other database tables to create a relationship:

In the above example we have a list of languages identified by a unique number (id) in the Languages table. The Users table has a languageId column which contains a number, this number specifies a language using the unique id of a language in the Languages table. The languageId column is a foreign key.
This way of organising data has many benefits but adds complexity when displaying the data within an application. If you want to display a list of users from the above example with their associated language, you would have to write a SQL statement that joins the two tables using the foreign key. This tutorial will show you how to do this more simply using Ebase Xi.
Example 1
This example uses two database tables, users and departments. The users table stores information relating to each user, for example
their name. The departments table
stores the user’s department details. Each user belongs to a department which
is stored in the users table as a
foreign key. This foreign key’s value is an id that relates to the departments table. These tables are
supplied in the EBASE_SAMPLES database schema provided with Ebase and some test
data has been loaded for this exercise. If you need to create the ebase_samples database yourself scripts
can be found here: <Ebase_Installation_directory>\UfsServer\databaseSchemas
Fetch Users data into a form
· Create a new Database Resource: right click on IT elements in the tree panel, select Create new > External Resources > Create Database Resource and name the new database resource USERS.
· In the Database Connection dropdown of the Database Resource, select EBASE_SAMPLES.
·
Click the Database
Schema Wizard icon ![]() from the toolbar, then
click the Yes alert to open the wizard.
from the toolbar, then
click the Yes alert to open the wizard.
· Click next on the wizard’s opening page and then select EBASE_SAMPLES from the SCHEMA selection and click Next (note, this step might not be required depending on which database you are using)
· On the next page of the wizard, select the USERS table and click Next.
· On the final page select the Tables Only checkbox, click on ID under the Columns For Where Clause heading and deselect the ID column, click OK and then Finish.
·
The new Database Resource will be displayed in
the designer. To make it available to forms, we have to add it to a Business
View: click on the Add Resource to new
Business View link via the ![]() icon on the toolbar. Name the new Business
View USER_BV and click OK.
icon on the toolbar. Name the new Business
View USER_BV and click OK.
· If you do not already have a Business Project called USER right click on Business Projects in the tree panel and select Create New > Business project and name the new business project USER.
·
Right click on the USER project
in Business Projects in the designer tree and create a new
form named RD_EXAMPLE
·
Associate the form with the Business
View by clicking Form Properties ![]() on the form toolbar and selecting USER_BV
from the Business View dropdown on the General tab. Click OK.
on the form toolbar and selecting USER_BV
from the Business View dropdown on the General tab. Click OK.
·
Create a new table by clicking the ![]() icon in the
Tables View. In the Resource Name dropdown select USERS. Click the Import Columns from Resource button and
click the Select All button, then
click OK twice and you will have a table with four columns.
icon in the
Tables View. In the Resource Name dropdown select USERS. Click the Import Columns from Resource button and
click the Select All button, then
click OK twice and you will have a table with four columns.
·
Drag
this table onto the page (either in the WYSIWYG view or the Outline view) and
hide the section_id column (right click the table column controls
and select Hidden). Drag the department_id column to the right hand
side of the name column so the order
of table column controls is: id, name, department_id, section_id (hidden).
·
Right click on PAGE_1 in the Pages
View and select the Events option.
Select the Before Page tab and click
on New Script. Call this
script RD_FETCH. There is a choice of programming languages, so select
the language you prefer from the dropdown when creating a new script. Scripts
are shown below for FPL (the Ebase
built-in Form Processing Language) and
Javascript:
In the newly displayed script enter the text:
|
FPL: |
API based language
(Javascript): |
|
fetchtable
USERS; |
tables.USERS.fetchTable(); |
·
Navigate
back to the RD_EXAMPLE form, then
run this form by clicking on the ![]() icon on the
Form’s toolbar. This should open the form in a browser and display the table
with data:
icon on the
Form’s toolbar. This should open the form in a browser and display the table
with data:
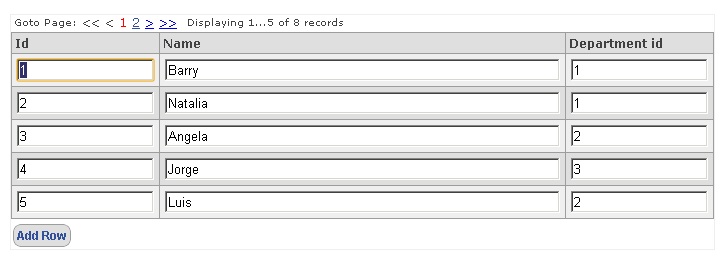
Now we can see the data in our table, which is great. However most people will struggle to know
what the Department id value actually means…
What we want to do is display the language’s description text
rather than the ID, but retain the id value in the table in case we decide to update
the data. To do this we create a Dynamic List which has the ability to display
one value yet return another (the text description and department id
respectively).
Add a Dynamic List to the table
- First of all we want to create another
Database Resource, as we did above with the USERS resource. Click on IT elements in the tree panel, select Create new > External
Resources > Create Database
Resource and name the new Database Resource DEPARTMENTS. Set
the database connection to EBASE_SAMPLES and click on the Database Schema Wizard icon
 . Follow the same steps as above but select
the DEPARTMENTS table (check the for
Tables Only checkbox and deselect the id column in the Columns For Where Clause section)
. Follow the same steps as above but select
the DEPARTMENTS table (check the for
Tables Only checkbox and deselect the id column in the Columns For Where Clause section) - From the newly created Database Resource we can
create a Dynamic List by clicking on the Build Dynamic List icon
 on the toolbar. Accept the default name of DEPARTMENTS and
click OK. On the next page of the wizard do not select any fields for the
where clause, simply click the Next button. Click the Select All button to highlight the two fields and then click
OK to create the Dynamic List.
on the toolbar. Accept the default name of DEPARTMENTS and
click OK. On the next page of the wizard do not select any fields for the
where clause, simply click the Next button. Click the Select All button to highlight the two fields and then click
OK to create the Dynamic List. - Now we need to link our new Dynamic List with
the department_id table field in the form. Navigate in the designer back
to the RD_EXAMPLE form and select the USERS-DEPARTMENT_ID column in the
Tables view, this will display the column’s
properties in the Properties View.
Change the Display Type setting from Text to Drop Down.
- In the same set of properties set the Dynamic
List drop down value to be the newly created DEPARTMENTS dynamic list,
doing so will pop up the mappings dialog. Set the List Display Field value to be
DEPARTMENTDESCRIPTION and the List
Return Field to be ID. Click OK.
- Run
the form again by clicking on the
 icon on the form’s toolbar. Now the data will
look like this:
icon on the form’s toolbar. Now the data will
look like this:
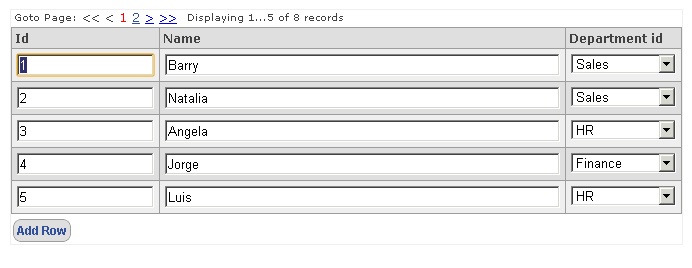
In the Department_id
column, we now see that the department description is displayed instead of the
id – for each row, the Dynamic List is displaying the department description
using the corresponding language id.
·
Add the ability to update the data to the database
·
·
From
the Palette View ![]() drag a
Button Control on to the page below the table. Double click the Button control
and add the text “Update” and click OK.
drag a
Button Control on to the page below the table. Double click the Button control
and add the text “Update” and click OK.
·
Right click on the new button and
select the Events option. Click New Script, call the script
RD_UPDATE and click OK. In the newly displayed script enter:
|
FPL: |
API based language (Javascript): |
|
updatetable
USERS; |
tables.USERS.updateTable(); |
·
Navigate
back to the RD_EXAMPLE form, then run the form again by clicking on the
![]() icon on the
form’s toolbar, edit some of the data and click the new Update button. Your
edited data should be stored in the database.
icon on the
form’s toolbar, edit some of the data and click the new Update button. Your
edited data should be stored in the database.
·
Example 2
Example 2 will build on Example 1 above. We will add one more Dynamic List to display the user’s department’s section. The difference this time is that the contents of the Section dynamic list will depend on the department_id. This is a common requirement when manipulating hierarchical data.
·
The Users database table that we used previously has a hidden column containing user data, section_id. This id refers to primary key data in the database table Sections which contains the description for the sections. (Each department has a number of related sections, so each user has a department and a section). Here are the two database tables:
·

Show the section ids
·
If it
is not already open, open the RD_EXAMPLE form create in Example 1 above.
·
On
PAGE_1 there is a Table Control with four columns, one of which are set to hidden. Unset it so it is now visible by right
clicking and deselecting the Hidden
attribute.
·
Run the
form ![]() to confirm
you can see this column and that they contain data
to confirm
you can see this column and that they contain data
·
Create a Dynamic List for sections
· Create a new Database Resource: right click on IT elements in the tree panel, select Create new > External Resources > Create Database Resource and name the new Database Resource SECTIONS.
· In the Database Connection drop down of the Database Resource select EBASE_SAMPLES.
·
Click the Database Schema Wizard icon ![]() ,
click the Yes alert to open the wizard.
,
click the Yes alert to open the wizard.
·
Click next on the wizard’s opening page and then
select EBASE_SAMPLES from the SCHEMA selection and click Next (note, this step
might not be required if you are using a database other than
· On the next page of the wizard select the SECTIONS table and click Next.
· On the final page, select the Tables Only checkbox, click the Columns For Where Clause and deselect the ID field, click OK and the Finish.
·
Save the displayed Database Resource and then create
a Dynamic List by clicking on the Build Dynamic List icon ![]() .
Accept the default name of SECTIONS and click OK.
.
Accept the default name of SECTIONS and click OK.
· On the next page of the wizard select the DEPARTMENTID field for the where clause and click the Next button.
· Click the Select All button to highlight the two fields and then click OK to create the dynamic list.
· Navigate in the designer back to the RD_EXAMPLE form and SELECT the USERS-SECTIONID column in the Tables View, this will display the column’s properties in the Properties view. Change the Display Type setting from Text to Drop Down.
· In the same set of properties set the Dynamic List dropdown value to be the newly created SECTIONS Dynamic List, doing so will pop up the mappings dialog. Set the List Display Field value to be SECTIONDESCRIPTION and the List Return Field to be ID. Confirm that the required mapping for the list field DEPARTMENTID is mapped to form field USERS-DEPARTMENT_ID (this should be set automatically, if not select the field USERS-DEPARTMENT_ID from the dropdown). Click OK.
·
Run the form again by clicking on the ![]() icon on the form’s toolbar, note that the
section id drop down is set to a descriptive value and only those values from
the appropriate department are shown. This is due to the where clause on the
Dynamic List mapped in the List Mappings dialog. Note: If you changed and saved department
data in Example 1 some users may not have a section set for them.
icon on the form’s toolbar, note that the
section id drop down is set to a descriptive value and only those values from
the appropriate department are shown. This is due to the where clause on the
Dynamic List mapped in the List Mappings dialog. Note: If you changed and saved department
data in Example 1 some users may not have a section set for them.
·
Add Immediate Validation to departments column
·
Right
click the column USERS-DEPARTMENT_ID in the WYSIWYG view and select the Immediate Validation option. This will
make the page update automatically when the department id column changes value.
·
Select
the USERS-SECTIONID column in the Tables View and set the When list is built setting to Each display.
·
Run the form again by clicking on
the ![]() icon on the
form’s toolbar, change the value of a user’s department, the form should
refresh the page and the corresponding sections column will rebuild the list to
have the relevant sections in it for the selected department.
icon on the
form’s toolbar, change the value of a user’s department, the form should
refresh the page and the corresponding sections column will rebuild the list to
have the relevant sections in it for the selected department.
Display Only
The above
example displays data that can be edited and updated,
often you only want to display data. To
do this simply right click the USERS table control in the WYSIWYG or Outline
view and select the Display Only
option. Run the form again to see the
data displayed differently.