How to use Dynamic Lists
Creating
and maintaining lists manually
Creating a list from a database
resource
Creating and using a simple list - a
worked example
Adding variables to dynamic lists
See also: Working with Databases
Comparing dynamic lists and database resources
Display and update of table
with foreign keys tutorial
What is a dynamic list?
A dynamic
list is a list of values extracted dynamically from a database at runtime. A
simple example might be a list of customer names. Additional criteria can also
be applied to a list, e.g. a list of customer names in a certain region or with
turnover greater than a specified amount. The region and turnover could be
other fields in the form where the end-user has entered information.
Each list
contains two sections: a database section, and a list of fields. The database
section contains information on the SQL statement that will be issued and the Database Connection to which it will be
targeted. The List fields section contains a list of all the
columns in the database which are included in the list: this includes both
columns that will be retrieved from the database and columns that will be used
to restrict the rows returned (i.e. will be part of the SELECT statement's WHERE clause).
When a list is associated with a form field, the fields of the list are linked with the form fields via Dynamic List Mappings. These mappings support configuration of:
· the list field to be displayed to the user
· the list field returned (retained as the field’s value)
· any input fields required to build the list i.e. form part of the SQL where clause
·
any additional fields
in the form to be populated with values from the list when the end-user makes a
selection. For example, when the end-user selects a customer name, we might
also want to retrieve other information about the customer. The mappings are
normally created automatically by the system but can be edited manually if
required.
Dynamic
lists are elements that are shared within the Ebase system and, once created,
can be used by any number of forms.
How to create and use a list
To create
the list manually, use the dynamic list editor.
To create the list automatically from a Database Resource using the
build dynamic list icon on the Database
Resource toolbar.
To associate the
list with a form field, use the lists section of the Field Properties panel. At this time, the
mappings between the list fields and the form fields are generated
automatically and can be changed by clicking on the Dynamic List Mappings property.
Creating and
maintaining lists manually
A dynamic list is created and maintained using the dynamic list editor within Ebase Designer. This is opened either by clicking on an existing list from the hierarchy tree panel (Lists --> Dynamic List) or by creating a new list from the file menu (File --> New --> List --> Dynamic List). The dynamic list editor looks like this:
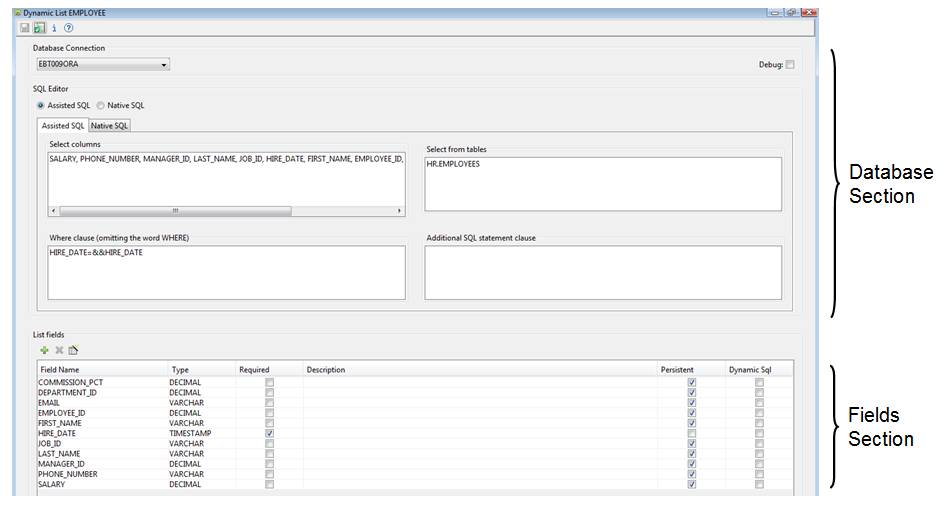
Database Section
The top section is the database
section that is used to set the target database and to build the SQL statement.
The Database Connection dropdown is a list of the defined Database Connections to which the Ebase
system has access. The special entry **Dynamic can be chosen to indicate
that the database name will be supplied dynamically at runtime (See Using dynamic databases for
more information)
The Debug checkbox will log all SQL statements issued to the database to the execution log.
There are two options for the
creation of SQL statements: Assisted SQL (the default) and Native SQL:
·
Assisted SQL
refers to the dynamic generation of SQL select statements by the system
using the four boxes select columns, select from tables, where
clause, additional SQL clauses. All four boxes can contain variables
to be substituted from a form.
·
Native SQL allows the use of more complex SQL
statements and is for more advanced use.
Note the syntax used in the where
clause in the example above: HIRE_DATE = &&HIRE_DATE
The &&HIRE_DATE indicates to
the system that this value is to be dynamically substituted at runtime from the
form field that is mapped to the HIRE_DATE list field. A form field variable
can be specified using two possible syntaxes &&VAR1 or &&{VAR1}. As the SQL statement for this list cannot
be executed unless a value exists for HIRE_DATE, the Required
checkbox for the HIRE_DATE list field must be checked as shown above.
The Build Fields icon ![]() is a labour-saving device. If you have
completed the four SQL statement boxes, you can click this button and the
system will create the list field definitions for you. You will then need to
set the field types correctly. Note that this function will only work correctly
if the select columns box consists of a simple comma delimited list of
columns.
is a labour-saving device. If you have
completed the four SQL statement boxes, you can click this button and the
system will create the list field definitions for you. You will then need to
set the field types correctly. Note that this function will only work correctly
if the select columns box consists of a simple comma delimited list of
columns.
The Verify icon ![]() on the toolbar can be used to check that the
list fields have been correctly defined.
on the toolbar can be used to check that the
list fields have been correctly defined.
Fields Section
The lower section is the fields
section. You must create one field definition for each field that you want to
map to a form field - in practice this will be all the fields in the select
columns box plus any substitutable fields in the where clause box.
The name of each field must exactly match the corresponding column name or
alias in the select columns or where clause boxes including case.
If you are using table joins and have table prefixes on the column names or if
you are using database functions, then assign an alias to the column and use
the alias name for the name of the list field.
The Build fields from select columns icon on the toolbar ![]() will create a list field for each column in
the Select columns box. It also
deletes all existing list fields so should be used with caution. This icon
creates all fields with type VARCHAR, so the types should be adjusted manually.
will create a list field for each column in
the Select columns box. It also
deletes all existing list fields so should be used with caution. This icon
creates all fields with type VARCHAR, so the types should be adjusted manually.
The field Type should be set
to match the database column type. The values available in the dropdown lists
are the types from the JDBC standard. See your database JDBC driver
documentation for how these map to your database types. The system makes use of
these types when converting the value received from the database to the mapped
field within the form. If an illegal mapping is detected, you will receive an
error message.
The Required checkbox indicates that the list cannot be built unless
this field has a non null value. A list mapping
is required for all fields flagged as Required.
The Description can be used
to enter meaningful information about the field. This information is visible
within Ebase Designer when building the list mappings.
The Persistent checkbox indicates that a column of the same name exists in the database. The system will attempt to retrieve all columns from the database which are flagged as persistent and are not flagged as required. Uncheck this option to stop the system retrieving the column from the database.
The Dynamic Sql checkbox indicates that this field contains part of a SQL statement. Selecting this option automatically sets a number of other options: Persistent is unchecked, Required is set, Type is set to CHAR. See Using Dynamic SQL for more information.
Modes of operation
A list can operate in one of two
modes depending on the type of form field with which the list is associated:
·
List mode:
the list is used to display a list of values that are displayed to the end-user
for selection. In this case, the list is built automatically by the system when
the page is prepared for presentation. This is the most common use for a
dynamic list and it is used when the display type for the field associated with
the list supports the display of multiple values, i.e. a dropdown list, radio
button or checkbox. When the end-user makes a selection, any additional mapped
fields are populated with values from the list.
·
Validation mode: the list is used to validate data entered by the end-user. This is
designed for the situation where the list of values is very large and it is not
practicable to download all the values to the end-user. When the end-user
enters information, it is automatically validated against the list and an error
message is issued if the record was not found in the underlying database. This
mode is used when the display type for the field associated with the list does
not support the display of multiple values, e.g. a text entry field. (See Configuring validation mode)
Note that validation mode is not supported with
native SQL and will produce a runtime error.
Creating mappings
Mappings are used to link the
dynamic list fields to the fields of a form and they are initially created when
a dynamic list is associated with a form field. At this time, the system will
automatically create a mapping between list fields and form fields that have
the same name. This feature is designed to minimize the effort needed to create
and implement a dynamic list - see the example below.
The mappings can be edited by
clicking the Dynamic list mappings property in the Lists group of the field properties; this dialog is also displayed
when a dynamic list is associated with a field and the system cannot create all
default required mappings.
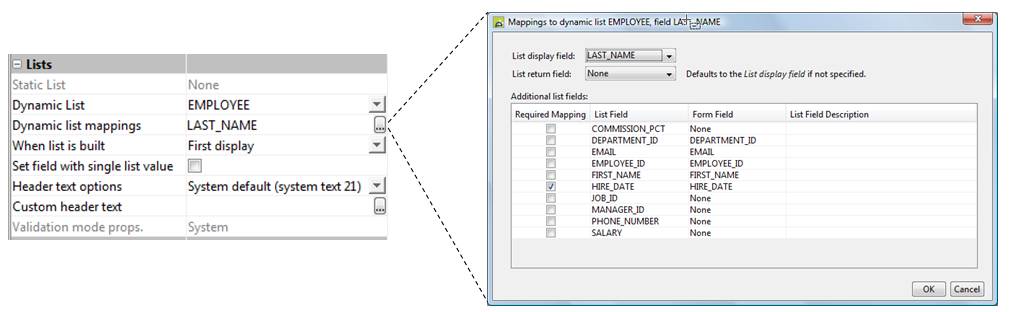
List display field: this is mandatory and allows you
to select the list field which should be displayed to the user. The selection
dropdown will include a list of all fields in the dynamic list.
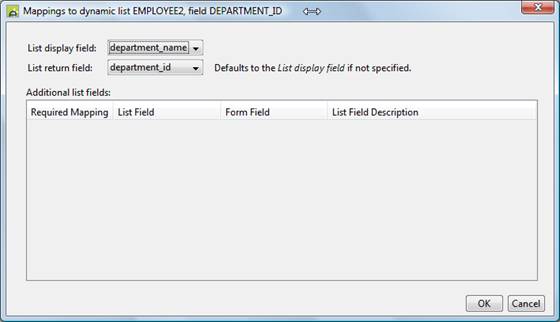
List return field: this is optional and specifies the value returned when a selection is made by the user. Specifying a return field allows you to display one database column to the user (the List display field) while retaining another column as the field’s value (the List return field). For example, if displaying a page containing employee details, department_id (containing a numeric id) might be the return field and department_name (containing the descriptive department name) might be the display field as shown below. If not specified, the display field is used as the return field. Click here for a tutorial showing the use of display and return fields.
Additional list fields: shows a list of all remaining fields from the dynamic list. These can
be mapped to form fields as required. Any fields shown as Required Mapping must be mapped.
|
·
Required Mapping: |
A read-only checkbox that
indicates that the list field is marked as Required, meaning that the list cannot be built unless a value is
provided (usually this will be because the field appears in the list’s WHERE
clause) |
|
·
List Field: |
All fields in the list omitting
the fields selected as the display field and return field appear here |
|
·
Form field: |
Click here to select a form field
from the dropdown list – this creates a mapping |
|
·
List Field Description: |
Shows the description of the list
field as configured in the dynamic list |
The system will automatically create
mappings for form fields and list fields with the same names, but these can be
changed as required.
Please note that these mappings -
more accurately, dynamic list field mappings - should not be confused with the field mappings which are used to
associate form fields with external resource fields, such as database
resources, and are accessed using the Field Mappings button on the form
toolbar.
Configuring validation mode
Note that validation mode is not
supported with native SQL and will produce a runtime error.
When the list is operating in
validation mode, the system will check whether the value entered by the
end-user exists in the database. The value entered by the end-user is assumed
to be the field mapped as the display field in the mappings.
Two options are available on the
form field properties Lists tab to configure system behaviour when a not
found situation occurs:
·
List error message: This option can be either System, None,
or the number of an error message within the project. If System is
chosen, system message 1 is issued. The default is System.
·
Error message type: This can be set to Error or Warning, with Error being the
default. Error forces the end-user to correct the entry whereas Warning
allows them to continue once the warning message has been acknowledged.
In addition to these options, the
system variable $FOUND is set to value 'Y' or 'N' and can be queried by a
validation script. It is expected that validation will be done using this
method if error message None is selected. This
variable can be used to create more sophisticated validation processes, if
required. An example of a simple validation script might be:
|
FPL: |
API based language
(Javascript): |
|
if [
$FOUND = 'N' ] message E, 1234, CUSTOMER_NAME; endif |
if (system.variables.$FOUND.value
== "N") { event.owner.addErrorMessage(1234, [fields.CUSTOMER_NAME.value]; } |
When are dynamic
lists built?
When lists are built (i.e. loaded
from database) is controlled by the When
list is built property of the field with which the dynamic list is associated.
There are three options:
1.
First display: the list is built when the field
is first displayed. If the list contents do not change as a result of form
processing, this option should be used. This is the default option.
2.
Each display: the list is built each time the
page is displayed, but with some exceptions – the list is not built when an
error message is displayed or when a page is navigated to using the previous
page button.
3.
Never: the list is not built
automatically by the system. A function such as buildlist() or
buildlistfromtable() should be used to build the list under program control.
For all three options, the buildlist() or buildlistfromtable() functions can be used to
build the list under program control.
For the first two options, the
system will build the list after all event processing has been completed, and
just before the page is displayed to the user.
If the list contents do not change as a result of form
processing, option first display
should be used. When the list contents do
change as a result of form processing e.g. the form inserts or deletes database
records or the list is dependent on another form field, there are two practical
choices:
1.
Use
option first display, then use the buildlist() function when the list should be rebuilt. This
will give the best performance as the list is only rebuilt when necessary.
2.
Use option each
display. This removes the need to use the buildlist()
function so less program code is needed. However, the list will probably be
rebuilt in circumstances where this is not strictly necessary, so this
represents a performance overhead.
When a dynamic list is associated
with a table column, the system will only build the list once (subject to the
rules above) and then share the list values between all rows in the tables. An
exception to this rule occurs when a table column dynamic list is dependent on
another column in the same table; in this circumstance, the list is built for
each row in the table.
How
are dynamic lists built?
A dynamic list is built as follows:
1.
Any
form field variables represented by && are substituted (See Adding variables to dynamic lists).
2.
Checks
if any form field variables required to build the list have no value – in this
case the list is not built.
3.
The
SQL select statement is generated.
4.
The
select statement is issued to the database.
5.
All
“output fields” are extracted from the result set using the names specified for
the list fields. An output field is a dynamic list field that is not marked as required, is marked as persistent and has a
mapping to the list field in the form.
Creating and using
a simple list - a worked example
Here are the steps to create a
simple dynamic list from scratch. The only assumption we have made here is that
you have already created a database definition to access your database. This
example uses all the labour-saving devices provided by the system:
Import a database resource from the
database by:
1. Click the Import from schema
button from within the database editor
2. Navigate to the table you want to
use and select it
Build a dynamic list by selecting
the database resource you have just created:
3. Click the Build Dynamic List
button
4. Complete the dialogs to create the
dynamic list
5. Create a new Business View, add the
newly-created Database Resource, then save the Business View
6. Create a new form, and associate the
Business View with the form (via Form properties)
7. Click the Import fields from
External Resource icon on the the fields view toolbar, select the new
database resource from the dropdown, then select all fields
8. Click on the field to display its
properties
9. In the Presentation group,
set the display type to radio button, drop down or checkbox.
10. In the Lists group, set the dynamic
list property by selecting the list from the dropdown
When the field is placed on a page
and the form is run, you will see the database table values displayed as a
dropdown list.
Debugging
dynamic lists
If your
dynamic list is not behaving as you expect:
1.
Is
the form field of type radio button, dropdown or checkbox? If not, the
list will be operating in validation mode. (See Modes of operation)
2.
Click
Verify on the dynamic list editor
3.
Check
the execution log (View --> Execution log) to see if there are any errors.
The system logs the situation where it is unable to build the list because of
missing required fields or other reasons.
Restrictions
Please note that at present any LONG
or BINARY database column types are not supported in dynamic lists.
Validation
mode is not supported with native SQL and
will produce a runtime error.
Advanced
uses
Using Native SQL
Native SQL is used when the Native
SQL radio button is selected. When this option is selected, a select SQL
statement can be entered manually.
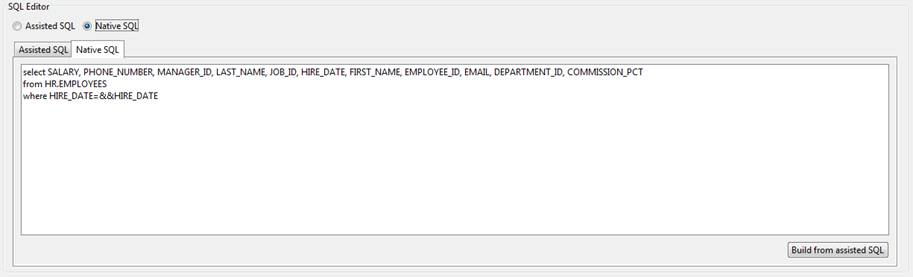
The Build from assisted SQL
button generates basic SQL from the Assisted SQL boxes. Note that
this button will replace any existing SQL without warning.
Substitution
of form field variables into the SQL follows the same rules as for Assisted
SQL.
Note that validation
mode is not supported with native SQL and will produce a runtime error.
Creating 'linked' lists
In this section, we will show a
worked example of two lists where the second list is dependent on the value
selected in the first list. The two fields to be displayed to the end-user are
COUNTRY and CITY. The COUNTRY field will show a list of countries and the CITY
field will show a list of cities within the chosen country. As the end-user
changes the selection of country, the cities list will automatically be
re-built.
To support these lists, the database
contains two tables COUNTRIES and CITIES. The cities table has 2 columns,
COUNTRY and CITY.
Step 1: create the two dynamic lists
Here is the COUNTRIES list:
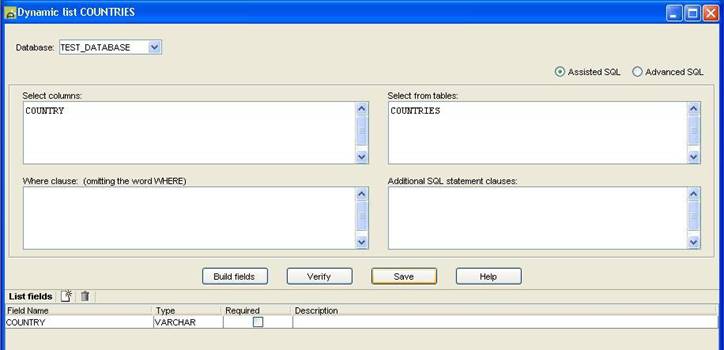
and here is the CITIES list:
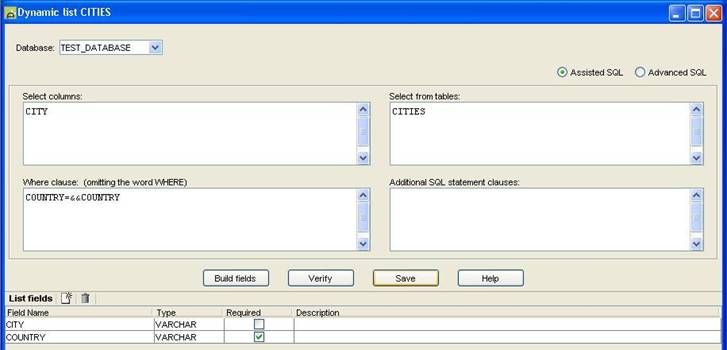
Note that the WHERE clause includes
a reference to the substitutable COUNTRY field.
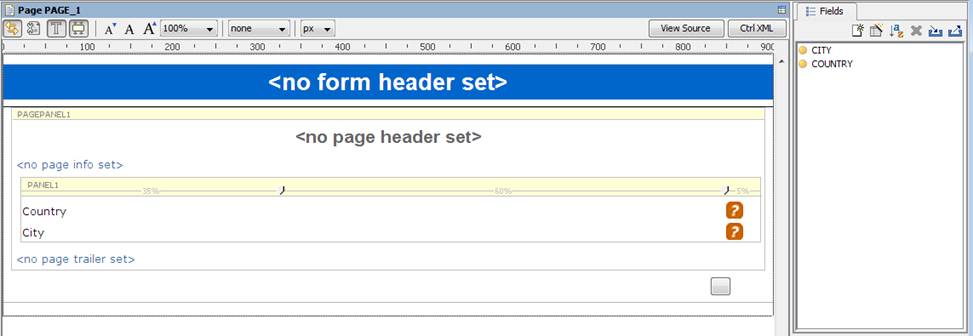
Step 2: map the lists to a form
Shown below is an extremely simple
form containing one page and just two fields COUNTRY and CITY; these fields are
both configured with a display type of Drop
Down.
The Immediate Validation
property has been set for the COUNTRY field control on PAGE_1. This is a
critical part of this exercise as it causes control to be passed to the Ebase
Server when a selection is made from the COUNTRY list;
the Ebase Server then builds the CITY list using the new COUNTRY value.
Here are the dynamic list mappings
for the COUNTRY field:
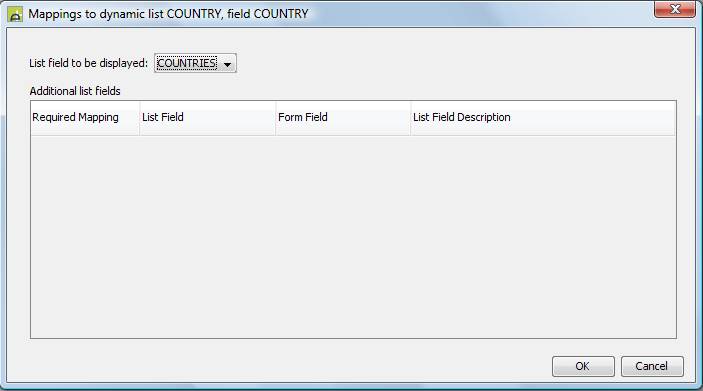
and for the CITY field:
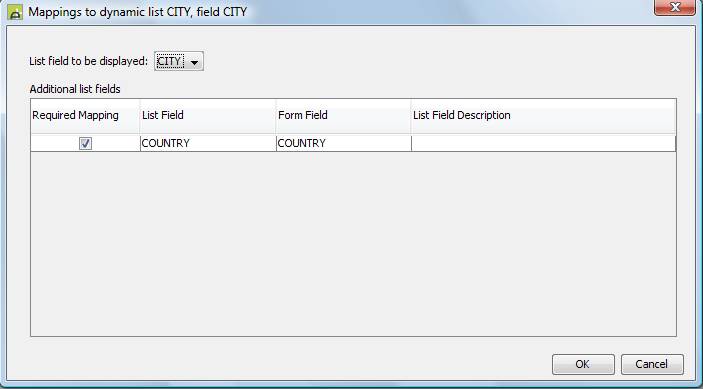
For the CITY list, the mappings have
been built automatically by the system as the list field names are the same as
the form field names.
That
completes the building process. When we run the form, we see the COUNTRY field
with a dropdown list of countries. The CITY field is initially blank - this is
because at this stage, the system was unable to construct the CITIES list as
the required field COUNTRY has no value. When we make a selection from the list
of countries, the immediate validation on the COUNTRY field fires and the
system tries again to build the CITY list, and this time is successful. The
end-user will now see the country that has been selected and, below that, a
dropdown list of the cities within that country. The same process is repeated
when we select a different country from the first list.
Using Dynamic SQL
There may be occasions when you want to build up a SQL statement dynamically. For example, to implement a search application, you might set the where clause to a variable such as &&WHERE and then build this up programmatically in a script e.g.
|
FPL: |
API based language
(Javascript): |
|
.. if [CITY != null] set
WHERE = WHERE + ' AND CITY = &&CITY'; endif if [POSTCODE != null] set
WHERE = WHERE + ' AND POSTCODE = &&POSTCODE'; endif |
.. fields.WHERE.value = ""; if (fields.CITY.value) { fields.WHERE.value
+= "AND CITY = &&CITY"; } if (fields.POSTCODE.value) { fields.WHERE.value
+= "AND POSTCODE = &&POSTCODE"; } |
To achieve this, the Dynamic SQL option on the WHERE list field is checked. When this option is checked, the system performs two subtitution phases as follows:
1. Dynamic SQL statements are substituted. In the example above, “&&WHERE” is substituted with “… AND CITY = &&CITY AND POSTCODE = &&POSTCODE”
2. &&
variables are then substituted. In the example above, “… AND CITY =
&&CITY AND POSTCODE = &&POSTCODE” is then substituted with “…
AND CITY =
WARNING!
Building a SQL statement dynamically can open the system to SQL Injection attack. To ensure that this is not possible, please follow these guidelines:
1. Always set any list fields that will contain dynamic SQL to use the Dynamic SQL option.
2. In the script that builds the SQL dynamically, include references to form field variables by referring to them as variables prefixed with && (as illustrated in the example above).
Do NOT write your code like this: (this might be susceptible to a SQL Injection attack)
|
FPL: |
API
Language (Javascript): |
|
//
DO NOT DO THIS!! //
DO NOT DO THIS!! //
DO NOT DO THIS!! if [CITY != null] set
WHERE = WHERE + ' AND CITY = \'' + CITY + '\''; endif if [POSTCODE != null] set
WHERE = WHERE + ' AND POSTCODE = \'' + POSTCODE + \''; endif |
//
DO NOT DO THIS!! //
DO NOT DO THIS!! //
DO NOT DO THIS!! if (fields.CITY.value) {
fields.WHERE.value += " AND CITY = '" + fields.CITY.value +
"'"; } if (fields.POSTCODE.value) {
fields.WHERE.value += " AND POSTCODE = '" +
fields.POSTCODE.value + "'"; } |
Adding variables to dynamic lists
Values from
a form can be dynamically substituted into any of the boxes used to create the
SQL statement: select columns, select from tables, where
clause, additional SQL clauses. A variable can be specified using
two possible syntaxes &&VAR1 or &&{VAR1}.
&&VAR1
syntax: when using
this syntax, replacement values for all character field types are
enclosed in single quotes when constructing the SQL statement. e.g. : where
EMPLOYEE_NAME = &&EMPLOYEE_NAME will be resolved as something like where
EMPLOYEE_NAME = ‘SMITH’, whereas for numeric types where
EMPLOYEE_ID = &&EMPLOYEE_ID will be resolved as something like where
EMPLOYEE_ID = 12345 assuming that the resource field for EMPLOYEE_ID is a
numeric type.
&&{VAR1}
syntax: when using
this syntax, replacement values are never enclosed in single quotes. This
syntax can be used to concatenate two variables together, e.g.
&&{VAR1}&&{VAR2} or when the quoting of variables is not
required, e.g. LIKE ‘%&&{VAR1}%’ might be used in a WHERE clause to
perform a search.
In both
cases, the field variable name is interpreted as meaning a resource field name,
and the value is obtained from the form field mapped to that resource field.