Integration Web Services
What
are Integration Web Services?
Configuring Integration WS-Security
See also:
What are Integration
Web Services?
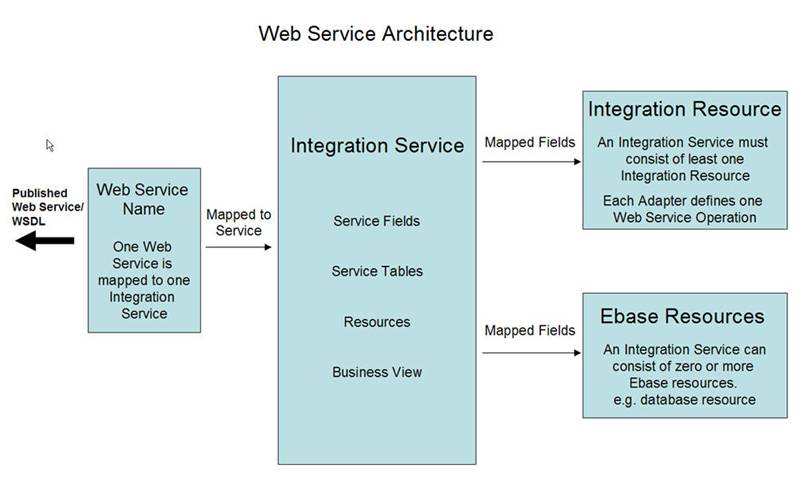
An Integration Web Service is an Integration Service published as an external web service. All the fields and tables contained within the Integration Service are added to the WSDL and mapped through an Integration Resource. The Integration Resource is responsible for creating the operation(s) available to the web service.
A Web Service is invoked using the following URL:
http://<domain-name>:<port>/ufs/integration/<ws_name>
The WSDL can be viewed by invoking:
http://<domain-name>:<port>/ufs/integration/<ws_name>?wsdl
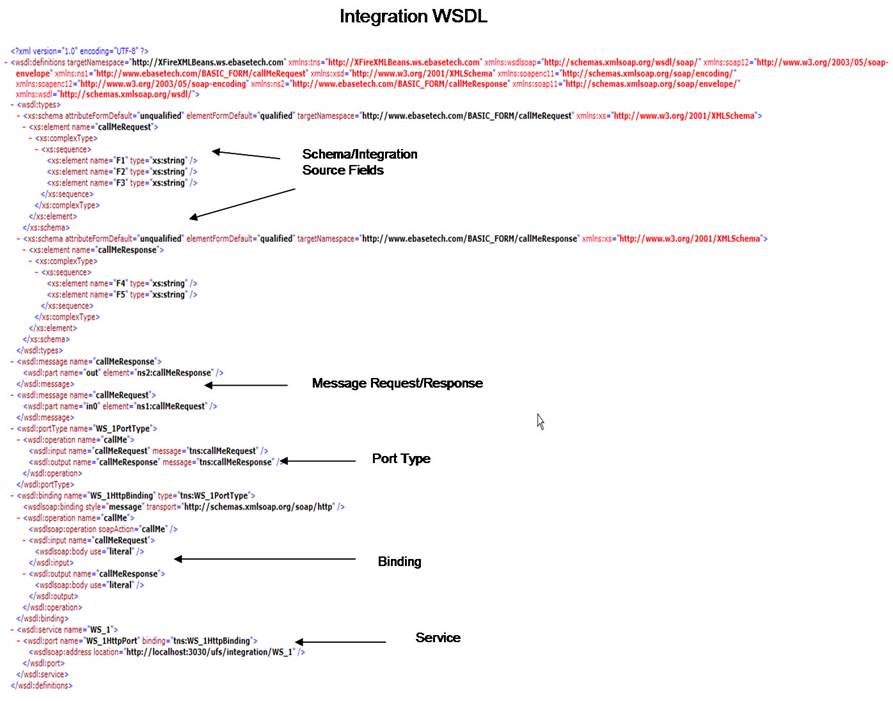
An Integration Web Service uses document encoding and consists of the following:
− Service Description – Defines the Web Service name and port name and SOAP address
− SOAP Bindings – Defines the type of web service call, request/response style and document literal types
− Port Type – Defines the operations available in the Web Service. These are generated from the Integration Resource/Adapters associated to the Integration Service
− Message Types – Input and Output messages for each operation
− Types – Schema types associated to the Input and Output Messages. These will be associated to Integration Resource Source Fields.
To qualify as a valid Web Service, an Integration Service must contain at least one Integration Resource that contains at least one Integration Adapter. A Web Service can only be mapped to one Integration Service. The operations are configured through the Integration Resources which are associated to the Integration Service. This determines the operations available to the Web Service. To remove an operation from a web service, it must be removed from the Integration Service (by removing the associated Integration Resource).
The Web Service is created dynamically when the Integration Service is published as a web service. It gathers up all the information from the associated Integration Resources and builds all the operations and schema types available to the web service from the Integration Resources.
Creating a New Web Service
A Web service can be created by opening the Web Services node within Integration Services on the Ebase Designer Tree.
To add a web service click the ![]() icon on the toolbar. This will insert a new
line into the web services table. Double-click the Web Services name and enter
a name for the web service – this can be any name of your choice.
icon on the toolbar. This will insert a new
line into the web services table. Double-click the Web Services name and enter
a name for the web service – this can be any name of your choice.
Select an Integration Service from the drop-down list. Only valid Integration Services that contain at least one Integration Resource will be shown.
To enable the web service, check the Enabled checkbox. To disable the web service (i.e. un-register), uncheck the Enabled checkbox.
You can select the Soap Version used to publish the web service. This is useful when client applications will only work with a certain version of the Soap specification. Note that if Soap 1.2 is selected, the web service can be used by either a Soap 1.1 or Soap 1.2 client. But if Soap 1.1 is selected, only Soap 1.1 clients can be used. This selection also affects the WSDL that is generated; if you need to publish both Soap 1.1 and Soap 1.2 WSDL, create two web services definitions both using the same Integration Service.
To activate the web service, you must save the changes by clicking the Save icon on the Web Services toolbar at the top of the panel. The web service will become active when it is first called from an external client (if enabled).

Removing a Web
Service
To remove a web service, select the web service that you
want to remove and click the ![]() icon on the toolbar. Click the Save icon at the top of the panel.
icon on the toolbar. Click the Save icon at the top of the panel.
Alternatively, you can select the web service, uncheck the Enabled checkbox, and then click the Save icon at the top of the panel. This will un-register the web service from the Integration Server and it will no longer be available to external callers. If a web service is disabled, it is still possible to generate a WSDL file by clicking the Generate WSDL toolbar icon and list the operations by clicking the View Operations toolbar icon.
Re-deploy Web
Service
If any changes have been made to the Integration Service or an Integration Resource associated with the Integration Service, then the web service must be redeployed.
Select the web service that you want to re-deploy and click
the Redeploy icon ![]() on the toolbar at the top of the panel. This
un-registers the web service, which will become active again when the next call
comes in from an external client.
on the toolbar at the top of the panel. This
un-registers the web service, which will become active again when the next call
comes in from an external client.
Designer Note: The Web Service does not need to be re-deployed if an Integration Script has been modified. This is because the structure of the Web Service has not changed.
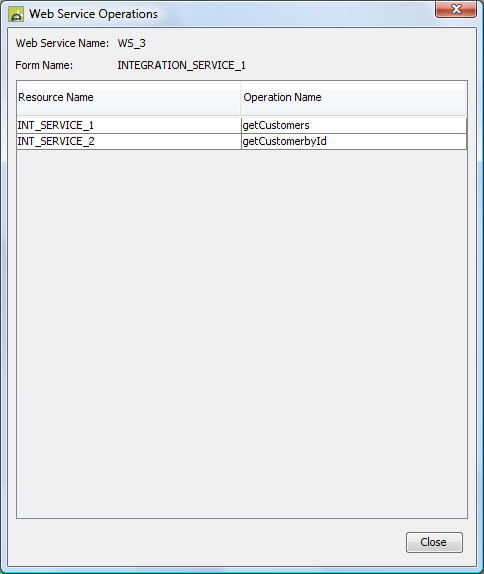
View Operations
To view the operations associated with the web service, select
the web service, then click the View
Operations icon ![]() on the toolbar. This shows a list of all the
operations available by gathering a list of all the Integration Adapters in all
the associated Integration Resources contained within the Integration Service.
on the toolbar. This shows a list of all the
operations available by gathering a list of all the Integration Adapters in all
the associated Integration Resources contained within the Integration Service.
In the example below, the web service WS_3 is associated with the INTEGRATION_SERVICE_1 Integration Service. This contains two operations – getCustomers and getCustomerbyId. The Integration Service contains two Integration Resources with one Integration Adapter configured in each resource.
Generate WSDL
To preview the WSDL generated for a particular web service,
select the web service and click the Generate
WSDL icon ![]() on the toolbar. This will show the WSDL in a
preview panel; a client application can use this to connect to the Integration
Service. You can generate a WSDL even if the web service is disabled. Generating
a WSDL shows the same information as calling http://<domain-name>:<port>/ufs/integration/<ws_name>?wsdl
from a browser window.
on the toolbar. This will show the WSDL in a
preview panel; a client application can use this to connect to the Integration
Service. You can generate a WSDL even if the web service is disabled. Generating
a WSDL shows the same information as calling http://<domain-name>:<port>/ufs/integration/<ws_name>?wsdl
from a browser window.

Validate Web
Services
Click the Verify web
service configurations icon ![]() on the toolbar at the top of the panel to
validate all configured web services. This validation checks that
each web service contains a valid Integration Service and the Integration
Service contains at least one Integration Resource. If the Web Service is not
valid, an error message will be displayed.
on the toolbar at the top of the panel to
validate all configured web services. This validation checks that
each web service contains a valid Integration Service and the Integration
Service contains at least one Integration Resource. If the Web Service is not
valid, an error message will be displayed.
Configuring
Integration WS-Security
Select the web service and click the WS_Security configuration icon ![]() on the toolbar to configure Web Services
Security options. Integration web services support two basic WS-Security Token
types:
on the toolbar to configure Web Services
Security options. Integration web services support two basic WS-Security Token
types:
− User token – Username and Password Authentication. For more information regarding User Token Authentication see the WS-Security - User Token section.
− Timestamp token – Configurable time limit on the web service call before the request/response expires. For more information regarding User Token Authentication see the WS-Security - User Token section.
If WS-Security is enabled for a web service it enables the WS-Security for all the operations within the web service.
Integration WS-Security User Token
This token supports basic username and password authentication when a web service is invoked. If the client username and password does not match the integration web service username and password, a SOAP Fault is returned back to the client. This method of authentication supports both plain text and hashed text passwords.
To configure and enable the User Token WS-Security for a particular Integration Web Service:
1) Select
the web service then click the WS_Security
configuration icon ![]() on the toolbar.
on the toolbar.
2) Select Username Token – Plain Text or Username Token - Hashed Text. NB, both methods can handle either plain text or hashed text as the password type is specified by the client and is written into the SOAP Header information.
3) Select the enabled checkbox.
4) Enter a username and password for basic authentication.
5) Click OK.
Integration WS-Security Timestamp Token
This token supports the ability to set an expiry time on the web service call. If a request is received from the client that is ‘out-of-date’ then a standard web SOAP Fault is returned to the client stating that the web service call has expired.
To configure and enable the Timestamp Token WS-Security for a particular Integration Web Service:
1) Select
the web service then click the WS_Security
configuration icon ![]() on the toolbar.
on the toolbar.
2) Select the Timestamp Token.
3) Select the enabled checkbox.
4) Enter time in seconds/milliseconds.
5) Select the timestamp precision checkbox to change the precision from seconds to milliseconds.
6) Click OK.
For more information regarding WS-Security protocol, please refer to the OASIS WS-Security specification.
NB The request received from the client must conform to the OASIS WS-Security SOAP Headers as described in the WS-Security Section (depending of the WS-Security Token selected).
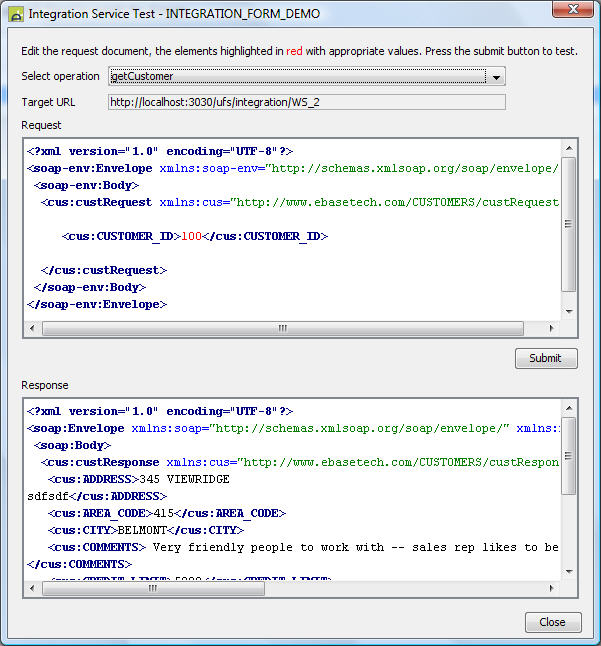
Testing
a Web Service
Select the web service then click the Test selected web service icon ![]() on the toolbar
on the toolbar
The web service test dialog lists all the available operations associated to the web service. See the view operations section for more details.
The web service test also supports WS-Security headers that are configured with the web service. This is inserted into the SOAP document after the Submit is pressed and is hidden from the user. The entire SOAP message can be viewed in the server log which includes the WS-Security headers as the test is invoked on the server. See the Configuring Integration WS-Security for more details.
NB If an integration service has been modified, it has to be re-deployed before changes will take affect for testing. See the re-deploy web service section web service for more details.
To test the web service:
1) Select the operation to test. By selecting the operation, automatically creates a request SOAP document template in the request panel.
2) Edit the request SOAP document by replacing all the element values highlighted in red, where applicable.
3) Click the Submit button to perform the test.
4) The response from the test call will automatically populate the response panel.