Tutorial: Building a Form with
Database Connectivity
Appendix
A: Using your own database
See also: Tutorial – Building your First Form,
Tutorial
– Build a Form Using Tables,
Tutorial
– Using XML and Web Services,
Introduction
In this tutorial we will build a form with database
integration, and assume that you have already completed the Building your first form tutorial and
therefore have a basic familiarity with using the Ebase Designer. In this tutorial,
we are assuming that the government has introduced an education program for
mature students. A certain number of approved courses are offered by approved
course providers. At the end of each course, the student must sit a final test.
If successful, they are issued with a certificate, and the government will
refund the cost of the course on presentation of the certificate id. This form
is an online application allowing successful students to apply for the refund.
The form will consist of three pages: applicant details, course details,
applicant bank details (for the payment).
We will save all applications in the database (table applicants)
and we will allow changing of existing applications as well as insertion of new
applications. The key for the applicants table is the national insurance
number. We will also be using two additional tables for dropdown lists: course_providers and courses. These three
tables already exist in the database ebase_samples provided with Ebase. If you need to create the
ebase_samples
database yourself scripts can be found here: <Ebase_Installation_directory>\UfsServer\databaseSchemas.
We are going to import the fields used in this form from the
database schema. This is the simplest
way to create a form with database integration as it ensures that the
correct field type and length specifications are created, creates all the
mappings between the database resources and the form fields, and it involves
the least typing!
Instructions
Check Designer
Preferences
Open the Designer Preferences Dialog by selecting File --> Preferences from the menu and click the Page Editor tab. At the bottom of the page, check both Page Panel Control and Legacy Button Control. This ensures that these two controls are added to all new pages. This can be reversed at the end of this exercise, if required.
Import the database tables into the Ebase Designer:
- Open the EBASE_SAMPLES database editor by using the designer tree (IT
Elements -> Database Connections) and double clicking on entry EBASE_SAMPLES.
- Click the
 icon on the toolbar to start the Database
Schema Wizard and click Next. If you are using Apache Derby (the
default), Oracle or SQL Server for the database system, you will need to
select the EBASE_SAMPLES schema from the next screen and click Next again. Then
select the tables applicants, course_providers and courses (hold down the CTRL key for multiple selects) and
click Next again.
icon on the toolbar to start the Database
Schema Wizard and click Next. If you are using Apache Derby (the
default), Oracle or SQL Server for the database system, you will need to
select the EBASE_SAMPLES schema from the next screen and click Next again. Then
select the tables applicants, course_providers and courses (hold down the CTRL key for multiple selects) and
click Next again. - You will be presented with a
dialog box where you can further customize the import; click Finish to accept
the defaults. The system will create a new database resource for each
table with the name of the table. If you want to, you can look at these
using the designer tree (IT Elements -> External Resources ->
Database Resources)
Create a new business view named REFUND:
- Create the Business View with (File
-> New -> Business View), and name it REFUND
- In the business view editor,
click the Add resource
 icon, and select the three database resources
(hold down the CTRL key): APPLICANTS, COURSE_PROVIDERS and COURSES. Click
OK
icon, and select the three database resources
(hold down the CTRL key): APPLICANTS, COURSE_PROVIDERS and COURSES. Click
OK - Click the Save
 icon
icon
Create a dynamic list of course providers:
·
Open the COURSE_PROVIDERS database
resource by selecting (IT Elements -> External
Resources -> Database
Resources) from the designer
tree then double clicking on the name
·
Click the Build dynamic list ![]() icon (a warning dialog box will appear - in this case it isn't a problem, so
click 'OK') and click Next to accept the default name COURSE_PROVIDERS
icon (a warning dialog box will appear - in this case it isn't a problem, so
click 'OK') and click Next to accept the default name COURSE_PROVIDERS
·
On the next window, don't select anything,
simply click Next
·
On the final window, select the COURSE_PROVIDER
field and click Finish
Note:
This list will display column course_provider
from table course_providers.
(i.e. the equivalent SQL is select course_provider from course_providers).
In certain databases, the table name will appear as
EBASE_SAMPLES.COURSE_PROVIDERS.
Create a
second list of course names:
This will
use column course_name from table courses.
This list is a bit more complicated than the last one: firstly, we want to load
more columns from the database table when the user makes a selection, and
secondly, we only want the user to see the selection of courses provided by the
particular course provider they have selected using the previous list (course
providers).
·
Open the COURSES database resource by
selecting (IT Elements -> External
Resources -> Database Resources)
from the designer tree then
double clicking on the name
·
Click the Build dynamic list ![]() icon, click 'OK' when the warning dialog
appears, and accept the default name COURSES by clicking Next
icon, click 'OK' when the warning dialog
appears, and accept the default name COURSES by clicking Next
·
On the next window, select field COURSE_PROVIDER
and click Next
·
On the last window, click Select All, then Finish
Create a new form REFUND and import the fields
- Right click on the USER project in Business Projects in the designer
tree and create a new form named REFUND
- Associate the form with the
business view by clicking Form Properties
 on the form toolbar and selecting REFUND
from the business view dropdown on the General
tab. Click OK.
on the form toolbar and selecting REFUND
from the business view dropdown on the General
tab. Click OK. - In the Fields View, click the Import fields from external resource
icon
 on the toolbar. From the dropdown at the
top of the dialog box, select APPLICANTS, then click Select All to select all fields then click OK. Repeat the
process for resources COURSES and COURSE_PROVIDERS. Click Yes to all to the message about
merging fields - this appears because the same column name appears in some
of the tables.
on the toolbar. From the dropdown at the
top of the dialog box, select APPLICANTS, then click Select All to select all fields then click OK. Repeat the
process for resources COURSES and COURSE_PROVIDERS. Click Yes to all to the message about
merging fields - this appears because the same column name appears in some
of the tables. - Importing the fields maps them
to the resource fields in the database resources, these automatically
created mappings need adjusting
- Open the Mappings Dialogue by
clicking the
 icon on the Form’s toolbar and select the
COURSES resource from the drop down
icon on the Form’s toolbar and select the
COURSES resource from the drop down - Set the COURSE_NAME and
COURSE_PROVIDER resource fields to be mapped to None (i.e. not mapped to any form fields)
- Click OK
Hint: the fields are shown in the Fields View with
the most recently added fields at the top. These can be shown in alphabetic
order by clicking on the Sort fields icon ![]() .
.
Create an additional field to ask the user if they want
to modify a previous application:
- Click
the New field icon
 in the Fields View and name the new field
PREV_APPLICATION. In the Properties View, change the Display
type (Presentation section)
to Checkbox and the Field type to Boolean (General section).
in the Fields View and name the new field
PREV_APPLICATION. In the Properties View, change the Display
type (Presentation section)
to Checkbox and the Field type to Boolean (General section).
You have now successfully created the form fields and we
will now start to customize the form display.
Create three pages APPLICANT, COURSE and BANK
- In
the Pages View, click on PAGE_1 and change the page name in the
Properties View to P_APPLICANT
- In
the Pages View, click the New Page icon and add a new page, change the name to P_COURSE
- Repeat the exercise adding a
new page named P_BANK
- Each
page contains a Page Panel Control; now add the fields to this control on
each page as shown below. You can do this in one of three ways. In each
case, select the target page by clicking on the appropriate page in the
Pages View.
- By
dragging the individual fields from the Fields View to the Outline View
or WYSIWYG View.
·
When dragging to the WYSIWYG View, drop the
first field after the <no page info set> text – a solid black line
indicates the drop position.
·
When dragging to the Outline View, a solid black
line indicates the drop position (under the target control icon means add after, to the right means add to).
- By
dragging multiple fields from the Fields View to the Outline View or
WYSIWYG View: hold down the CTRL key to multi-select the
fields, then release the CTRL
key and drag the selections. Drag and drop the Field Controls to
rearrange them.
- Right
click on the Page Panel Control in either the Outline View or the WYSIWYG
View and select Add control to Page
Panel then Existing fields.
Hold down the CTRL key, select
the fields, then click Add. Drag and drop the Field Controls to rearrange them.
|
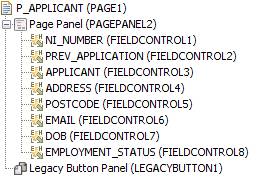
Fields for page P_APPLICANT:
NI_NUMBER PREV_APPLICATION APPLICANT ADDRESS POSTCODE DOB EMPLOYMENT_STATUS |
Outline View should look like this:
|
|
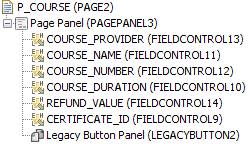
Fields for page P_COURSE:
COURSE_PROVIDER COURSE_NAME COURSE_NUMBER COURSE_DURATION REFUND_VALUE CERTIFICATE_ID |
Outline View should look like this:
|
|
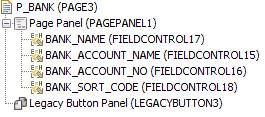
Fields for page P_BANK:
BANK_NAME BANK_ACCOUNT_NAME BANK_ACCOUNT_NO BANK_SORT_CODE |
Outline View should look like this:
|
- Ensure
the controls on each page are in the order above. They can be re-arranged
if necessary by drag and drop.
Create three scripts which we will use with this form.
Create the named scripts below by right clicking on the USER project. There is a choice of
programming languages, so select the language you prefer from the dropdown when
creating a new script. Examples are shown below for FPL (the Ebase built-in Form
Processing Language) and Javascript. Then cut and paste the script code below. If
using FPL, check the syntax by clicking the Verify ![]() icon. Then save the script
with the Save
icon. Then save the script
with the Save ![]() icon.
icon.
Script READ_APPLICANT.
This script
will be used to read in an existing application from the applicants table if
requested to by the user. If the record cannot be found, we will issue an error
message.
|
FPL: |
Javascript: |
|
if [ PREV_APPLICATION = 'Y' ] fetch APPLICANTS; if [ $FOUND = 'N' ] set PREV_APPLICATION = 'N'; message E, 1001, NI_NUMBER; else unset COURSE_NAME on P_COURSE displayonly; fetch COURSES; endif endif |
if ( fields.PREV_APPLICATION.value
) { var rows = resources.APPLICANTS.fetch(); if ( rows = 0 ) { fields.PREV_APPLICATION.value
= false; event.owner.addErrorMessage(1001, [fields.NI_NUMBER.value]); } else { fields.COURSE_NAME.getFieldControl(pages.P_COURSE).displayOnly =
false; resources.COURSES.fetch(); } } |
Script UPDATE_APPLICANT.
This script will be used to save the application to the
database at the end of form processing. If it's a new application, we use an insert
command, and if it's a modification to an existing application, we use an update
command.
|
FPL: |
Javascript: |
|
if [PREV_APPLICATION = 'Y' ] update APPLICANTS; else insert APPLICANTS; endif |
if ( fields.PREV_APPLICATION.value
) { resources.APPLICANTS.update(); } else { resources.APPLICANTS.insert(); } |
Script SHOW_COURSE_NAME. This script is used to allow
the user to select from the course names list. Because we have initially set
the COURSE_NAME field on page COURSE to be display only, we need
to make this field enterable once a selection has been made from the COURSE_PROVIDERS
list
|
FPL: |
Javascript: |
|
unset COURSE_NAME displayonly; set course_number = null; set course_duration = null; set refund_value = null; |
fields.COURSE_NAME.fieldControl.displayOnly = false; fields.COURSE_NUMBER.value = null; fields.COURSE_DURATION.value = null; fields.REFUND_VALUE.value = null; |
Customize the P_APPLICANT page
·
Return to the form editor by clicking on the REFUND
form in the open elements toolbar at the top of the page
·
In the Pages View, click the P_APPLICANT
page
- Select the Field Controls for the fields below in the WYSIWYG or Outline View, and set the following properties in the Properties View:
|
NI_NUMBER |
Mandatory |
|
PREV_APPLICATION |
Immediate Validation |
|
APPLICANT |
Mandatory |
|
ADDRESS |
Mandatory |
|
POSTCODE |
Mandatory |
|
DOB |
Mandatory |
|
EMPLOYMENT_STATUS |
Mandatory |
Hint: you can do this faster by multi-selecting the controls with the CTRL key, then using the right click menu.
- Right
click on the PREV_APPLICATION Field Control in the Outline or
WYSIWYG View, select Events, and add script READ_APPLICANT
to the On Change scripts (click Add Script(s) button and select the
READ_APPLICANT script from the resulting dialog box. Click OK twice.)
- Click
the NI_NUMBER field in the Fields View, double click on the Validators property, then set the Patten
(XML Regex) to [A-CEGHJ-PR-TW-Z]{1}[A-CEGHJ-NPR-TW-Z]{1}[0-9]{6}[A-DFM]{0,1}
This is an XML regular expression which ensures that NI number is entered
correctly. Click OK.
- Click
the ADDRESS field in the Fields View,
change the Display type to Text Area.
- Select
the Page Panel control and set the Layout
Type to Field Grid in the
Properties View.
Customize the P_COURSE page
· In the
Pages View, click the P_COURSE page
- Add
a list to the COURSE_PROVIDER field:
In the Fields View, click on the COURSE_PROVIDER field. In the Properties View, change the following properties: - Display
type (Presentation
section) to Drop Down
- Dynamic
List (Lists section)
to COURSE_PROVIDERS
- When list is built (Lists section) to Each display.
- Now do the same for the COURSE_NAME field. Set the display type to Drop Down, choose dynamic list COURSES and select option When list is built: to Each display. Note that this list is more complex – it displays all course names for the selected course provider and also loads addititional fields when the user makes a selection. This is equivalent to the following SQL:
select course_name, refund_value, course_number, course_duration from courses where course_provider = xxx
You can see the mappings between the form fields and the list by clicking the “…” button opposite the Dynamic list mappings property.

These mappings have been created automatically
by the system - any form fields are mapped to corresponding like-named list
fields when the list is first associated with the field.
- Set
these attributes for the Field Controls on this page:
|
COURSE_PROVIDER |
Mandatory, Immediate Validation |
|
COURSE_NAME |
Mandatory, Immediate Validation |
|
COURSE_NUMBER |
Display Only |
|
COURSE_DURATION |
Display Only |
|
REFUND_VALUE |
Display Only |
|
CERTIFICATE_ID |
Mandatory |
(Setting Immediate Validation
returns control to the Ebase server whenever the user changes the value of the
field. For the COURSE_PROVIDER field, this will then result in the
execution of script SHOW_COURSE_NAME (see next action point) and will
build the course names list which is dependent on the value of the COURSE_PROVIDER
field. For the COURSE_NAME field, setting Immediate Validation
means we can immediately see the additional values loaded from the list -
course number, course duration and the refund value for this course.)
- Right
click on the COURSE_PROVIDER Field Control in the Outline or
WYSIWYG View, select Events and add script SHOW_COURSE_NAME
to the On Change event.
- Select
the Page Panel control and set the Layout
Type to Field Grid in the
Properties View.
Customise the P_BANK page
- In
the Pages View, click the P_BANK page
- Set
all four Field Controls mandatory
- Select
the Page Panel control and set the Layout
Type to Field Grid in the
Properties View.
Set the database update
script to run at the end of form processing
- Click
Form properties on the
form toolbar, and on the Events tab add script UPDATE_APPLICANT
to the After Form event
(click on the After Form tab).
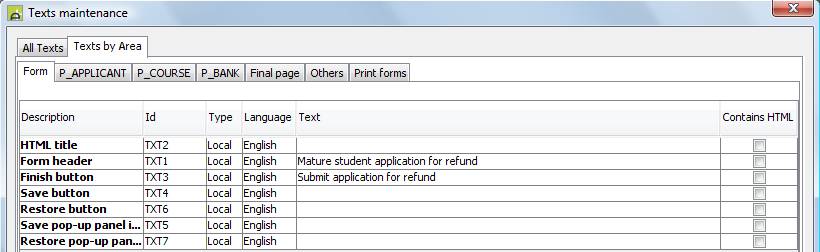
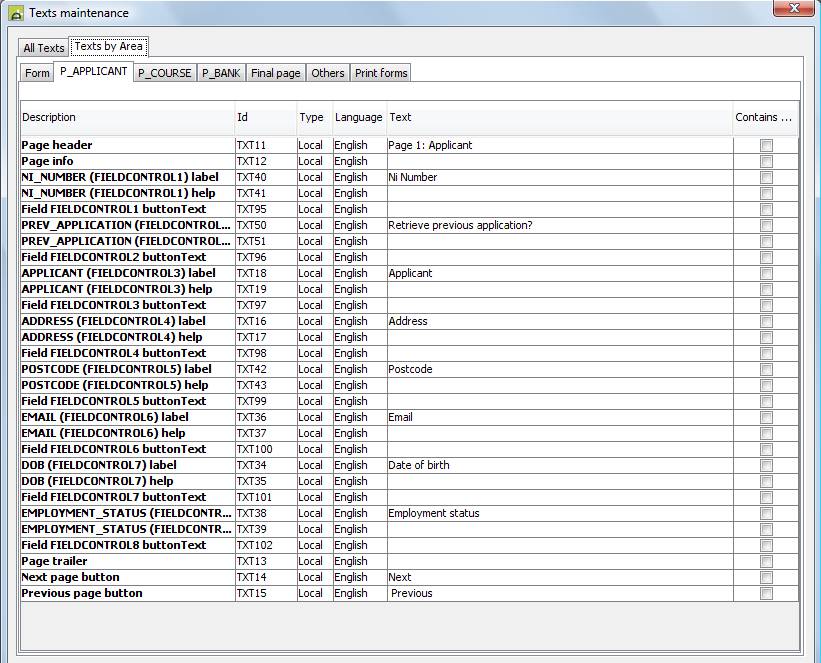
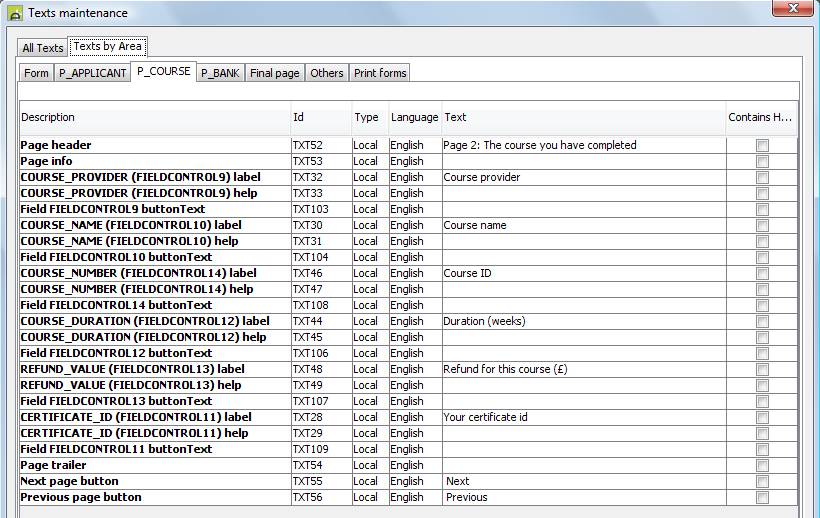
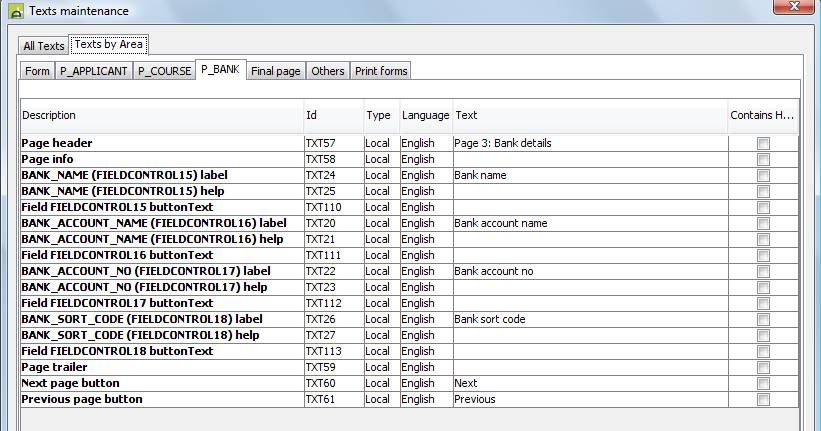
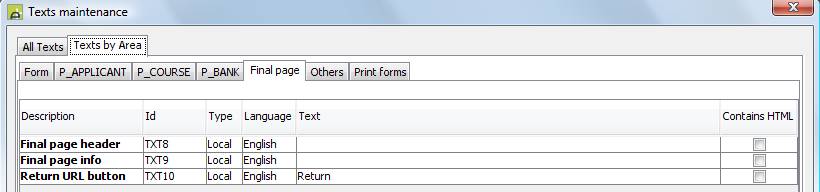
Add texts
- Click
the Maintain language texts icon
 on the form toolbar, select the language,
then click the Texts by Area
tab, and set the texts as shown below.
on the form toolbar, select the language,
then click the Texts by Area
tab, and set the texts as shown below.
Note:
this can also be done by double clicking on the individual texts in the WYSIWYG
View.
On the Form tab:
On the P_APPLICANT page tab:
On the P_COURSE page tab:
On the P_BANK page tab:
On the Final Page tab:
Configure the final
page URL
Click Form properties ![]() on the form
toolbar, and on the Final Page tab set the Return Button URL to ‘ufsmain?formid=REFUND’.
This will restart the form when the user clicks on the button.
on the form
toolbar, and on the Final Page tab set the Return Button URL to ‘ufsmain?formid=REFUND’.
This will restart the form when the user clicks on the button.
That ends the design of the form pages. Click on each page
in turn and check that the page looks OK. To see how the pages will appear in
the browser, click on the Toggle designer
view icon ![]() on the WYSIWYG toolbar. This turns off all
enhancements and assistants added by the Form Editor. Click this icon again to
return to the assisted view.
on the WYSIWYG toolbar. This turns off all
enhancements and assistants added by the Form Editor. Click this icon again to
return to the assisted view.
Add the error message
to display when we can't find a previous application
- In the designer tree, double
click on
 Messages under project USER. The message editor will
open.
Messages under project USER. The message editor will
open. - Click the Add a new message icon on the toolbar.
- Double click on the message
text and enter ‘Could
not find a saved record for NI &&’, then click the Save icon. (The && in the message will
be substituted by the NI number that the user has entered)
- Note down the number of the
created message (probably 1001)
- Re-open script READ_APPLICANT
either via the designer tree (project USER -> Scripts) or via the open
elements toolbar at the top of the page, and change the error message
- Save the script
And finally we can test the form: return to
the form editor and click the Run icon ![]() on
the form toolbar
on
the form toolbar
·
Try entering an invalid NI Number in the NI
Number field and click the Next button
(examples of valid NI numbers: AB123456C, JG103759A, WL457123)
·
What happens if you enter a new valid NI Number
and check the retrieve previous application checkbox ?
·
Run
the form, entering all the details and submit the application. Then run the
form again, entering the same NI Number in the first field and clicking the
'Retrieve previous application?' box. The details you entered initially should
be fetched from the database.
·
Note how the contents of the course names list
changes as you change course provider
·
Note how the display only values for course
number, course duration and refund value change with the course name selection
(these are being populated by the COURSES dynamic list)
·
Click
View -> Execution log on the
designer menu to see a log of form activity and scripts executed
·
If you have made a mistake following the
instructions, you may receive an error message at runtime. Hopefully the
message will be specific enough to enable you to resolve the error. If you get
error message:Naming exception error
retrieving datasource jdbc/xxxxx,
check that the dynamic lists have EBASE_SAMPLES specified as the
database
Change the error
message displayed for an invalid National Insurance number
- When we enter an invalid
National Insurance number, we get the error message: Field does not match xml regex pattern
[A-CEGHJ-PR-TW-Z]{1}[A-CEGHJ-NPR-TW-Z]{1}[0-9]{6}[A-DFM]{0,1} This is clearly not a meaningful message
to most people. So let’s be more helpful.
- In
the Fields View, click the NI_NUMBER field, then in the Properties
View click in the edit box opposite the property Help text (section Texts),
then click the
 button, check the Contains HTML box in the top right corner, then paste in the
following text :
button, check the Contains HTML box in the top right corner, then paste in the
following text :
Format of a National Insurance number is:<br><br>
AANNNNNNA - in other words: 2 letters, 6
numbers, one letter<br><br>
The 1st letter may not be D, F, I, Q, U or Z<br>
The 2nd letter may not be D, F, I, O, Q, U or Z<br>
The final letter is optional
- In the designer tree, double
click on Messages under project
USER. The message editor will
open.
- Click the Add a new message icon on the toolbar.
- Double click on the message
text and enter ‘Invalid National
Insurance number. See field level help for correct syntax.’
- Click Save icon
- Note down the number of the
created message (probably 1002)
- Re-open the REFUND form, In
the Fields View, click the NI_NUMBER field, double click the Validators
property in the Properties View, select Pattern (XML Regex), then click edit selected validator icon

- Click
the more button, then in the Server validation section,
click the use message id radio button and enter the message number just created
- Run the form again. Note the
help icon to the right of the Ni number field. Click on this and see what
happens. Enter an invalid Ni number, click the Next button
and make sure that you see the message you entered in this section
In this exercise
we have set up the basic form for this application. In real life, we would
continue to make further improvements, e.g. including a static list for
employment status, addition of many more explanatory texts and customization of
the look and feel.