XML Resource Tutorial - Quick
Start
See
also: Tutorial – Building your First Form, Tutorial – Building a
Form with Database Integration
The following documentation is available for XML and Web Service resources:
- Working with XML Resources provides
an overview of the facilities available using XML Resources and Web
Service Resources.
- XML Resource Concepts is an in depth technical
description of the operation of the XML Resources and Web Service
Resources.
- Creating and maintaining XML Resources
explains how to use the designer to create and maintain XML Resources and
Web Service Resources.
- XML Resource Adapters describes the
supplied adapters and parameters to configure them.
- Web Service Adapter how to use the XML
resource with a Web Service.
- XML Concepts
gives some general information on XML.
This page is a tutorial designed to provide a quick
introduction to using XML and Web Service resources. This is recommended as the
place to start learning about XML and Web Services resources.
Tutorial 1 - A simple Web
Service resource with two tables
Tutorial 2 - Multiple
adapters and enhanced XPath
Tutorial 1 - A
simple Web Service resource with two tables
This tutorial works with an example web service
application that is included with the Ebase distribution. Before
continuing, the web service needs to be deployed to the application
server. The example web service is a standard J2EE web application
archive called ebaseWS.war and can be found in UfsServer/samples. If you are running a Tomcat
server, copy this file into UfsServer/tomcat/webapps
and start the tomcat server. (On completing the tutorial, the web service
can be un-deployed by deleting the copied file).
Check that the web service is available by browsing
to http://localhost:3030/ebaseWS/ws/flights?wsdl
(your host name and port number may differ). You should now see the WSDL file
for the flights web service. A WSDL is an XML document that defines the
details of a web service, including the available operations and their XML type
definitions. Because this WSDL defines everything about the flights web
service, the WSDL importer can do most of the work required to make a web
service resource.
Step 1.
Start with the Ebase Server and Ebase Designer
running.
Step 2. Use the WSDL importer to set
up a new Web Service Resource
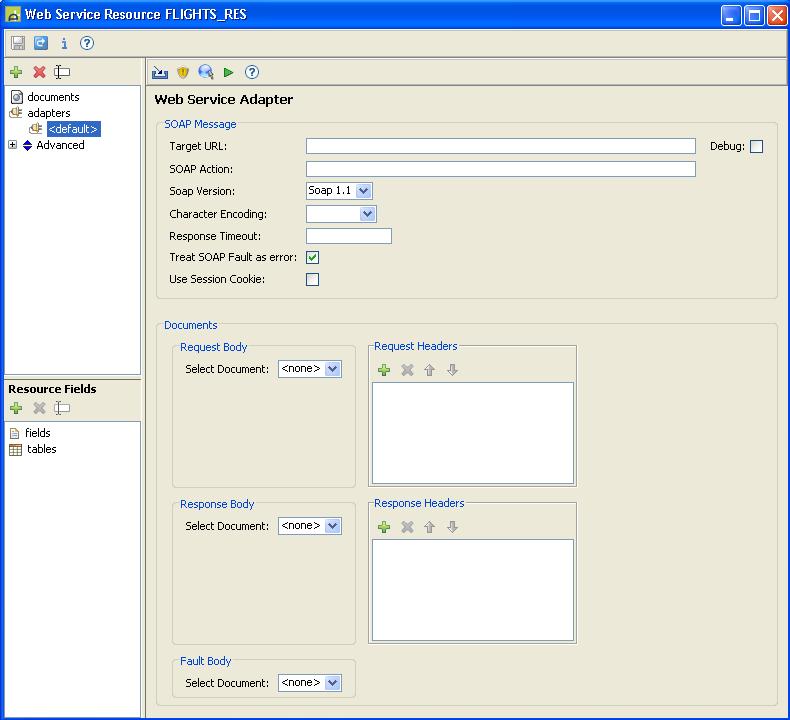
- Create
a new empty Web Service Resource using the file menu: (File -> New
-> External resources -> Web Service Resource). Enter
‘FLIGHTS_RES’ as the name of this new resource. This will create a
new empty XML resource, set up with an empty default web service adapter.
- Click
on the
 icon, which will launch the WSDL import
wizard.
icon, which will launch the WSDL import
wizard. - On
the first page, type the URL of the WSDL. It will be something like http://localhost:3030/ebaseWS/ws/flights?wsdl.
Click ‘Next’ to load the WSDL and move to the next page.
- The
next page lists all available operations in the flights web service.
This example works with the getFlights
operation, so select ‘getFlights’. The
right hand panels will display examples of what the body of the outbound
and inbound SOAP message may look like. Click ‘Next’.

- The
WSDL import wizard can optionally create fields and tables for the basic
elements of this operation. Ensure the ‘Import all fields’
option is selected and click ‘Finish’.
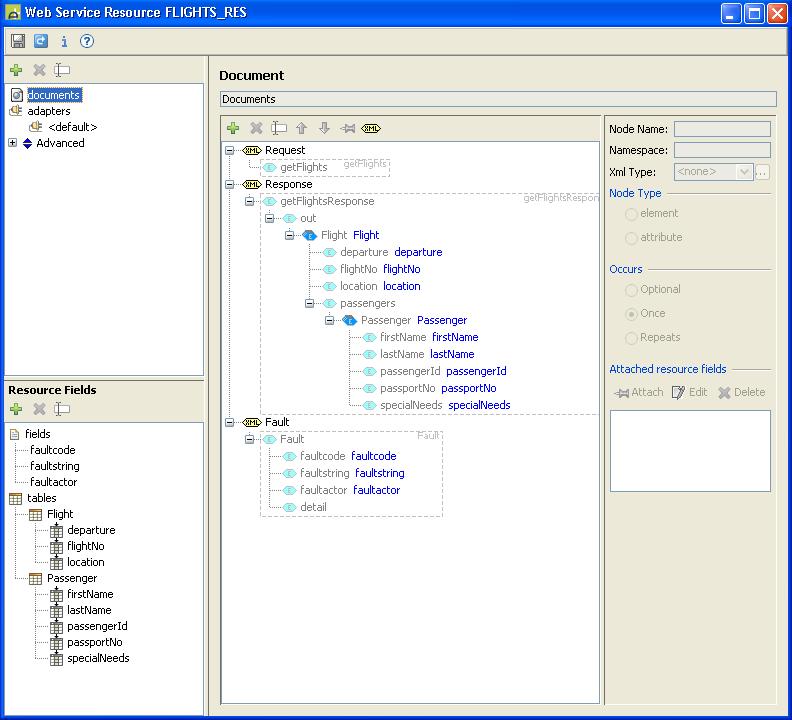
- Click
the
 icon to save this resource. The web
service resource is now operational. You can browse the left
hand navigation panels to see what the import wizard has done. Most
notable are the two resource tables, ‘Flight’ and ‘Passenger’. These
are attached to the repeating <Flight> and <Passenger>
elements.
icon to save this resource. The web
service resource is now operational. You can browse the left
hand navigation panels to see what the import wizard has done. Most
notable are the two resource tables, ‘Flight’ and ‘Passenger’. These
are attached to the repeating <Flight> and <Passenger>
elements.
Step 3. Add the resource to a business
view
- Add
a new business view using the file menu. (File ->
New -> Business View). Enter 'FLIGHTS_BV' as the name of the new
business view.
- Click
the
 icon and select 'FLIGHTS_RES' from the
list, click OK.
icon and select 'FLIGHTS_RES' from the
list, click OK. - Click
the icon to save the business view.
See Working
with Business Views for more information about business views.
Step 4. Create a new form
- Add
a new form using the file menu. (File ->
New -> Form). Select an appropriate project and enter
'FLIGHTS_FORM' as the name of the new form.
- Edit
the form properties by pressing the form properties button
 on the form toolbar. In the 'General' tab select the
'FLIGHTS_BV' business view and click OK.
on the form toolbar. In the 'General' tab select the
'FLIGHTS_BV' business view and click OK. - A
script will be needed to call the web service. Add a new script
using the file menu. (File ->
New -> Script). Select the same project and enter
'FLIGHTS_SCRIPT' as the name of the new script. There is a choice of
programming languages, so select the language you prefer from the dropdown
when creating a new script. Scripts are shown below for FPL (the Ebase built-in Form Processing Language)
and Javascript:
|
FPL: |
Javascript: |
|
call
FLIGHTS_RES; |
resources.FLIGHTS_RES.call(); |
- The
call statement
will call the web service. The XML response document will be stored in the
XML resource. Both fetchtable
statements populate their respective tables. Neither of these tables
has been created yet. Click the icon to save the script.
- The
script is going to be triggered using a button. In the FLIGHTS_FORM,
drag a Button Control from the Palette onto the page. You can change
the button display text by double clicking on the button.
- Associate
the script with the button by right clicking on the button and selecting
'Events'. Add the 'FLIGHTS_SCRIPT' script.
- The
tables can now be added to the form. In the Tables View, click the
New table icon
 .
Select 'FLIGHTS_RES' for the resource name and 'Flight' for the 'resource
repeating field'. Click the 'Import columns from resource' button
and select all resource fields.
Press OK twice. Drag the table onto the page under the button.
.
Select 'FLIGHTS_RES' for the resource name and 'Flight' for the 'resource
repeating field'. Click the 'Import columns from resource' button
and select all resource fields.
Press OK twice. Drag the table onto the page under the button. - The
previous step is repeated for the passenger table. In the Tables
View, click the New table icon .
Select 'FLIGHTS_RES' for the resource name and 'Passenger' for the
'resource repeating field'. Click the 'Import columns from resource'
button and select all resource fields.
Press OK twice. Drag the table onto the page under the FLIGHTS
table.
Step 5. Run and test the form
Click the Run button ![]() to run the form in your local
browser. When the form appears in your browser, press the button to call
the web service and populate the tables. The tables should be populated
with flight and passenger information.
to run the form in your local
browser. When the form appears in your browser, press the button to call
the web service and populate the tables. The tables should be populated
with flight and passenger information.
Tutorial 2 Multiple adapters and enhanced
XPath
Tutorial 2, enhances the
project developed in tutorial 1. A log
adapter is going to be added to the resource in order to demonstrate the use of
multiple adapters. The fields and tables
are also going to be enhanced, demonstrating the use of XPath
and input variables.
Step 1. Add a log adapter
Return to the 'FLIGHTS_RES' Web Service Resource
page (If the resource has been closed, it can be found in the designer tree
under IT elements/External Resources/Web Service
Resources/FLIGHTS_RES). Add a log adapter by clicking the ![]() icon on the resource toolbar and selecting
'Add Adapter'. Enter 'log' for the adapter's name and select 'Log
XML' from the drop down list and click OK. The log adapter is very
simple: All that needs to be configured is the document to be
logged. In our case we are going to select 'Response'. Save the resource.
icon on the resource toolbar and selecting
'Add Adapter'. Enter 'log' for the adapter's name and select 'Log
XML' from the drop down list and click OK. The log adapter is very
simple: All that needs to be configured is the document to be
logged. In our case we are going to select 'Response'. Save the resource.
Step 2.
Add the log adapter to the script.
To log the response to the server log and the
Designer’s execution log, an extra line must be added to the form's action
script. Return to the 'FLIGHTS_SCRIPT' script. At the end of the
script add the line:
|
FPL: |
Javascript: |
|
call FLIGHTS_RES 'log'; |
resources.FLIGHTS_RES.call("log"); |
Save the script.
When the form is now run again,
the response document from the resource will be written to the server log (in
the Tomcat console window, if running Tomcat) and the Designer’s execution log
(View -> Execution log).
Step 3.
Add a passenger count to the 'Flight' table
In this step, a new column is
added to the 'Flight' table. The XPath count
function is used to count the number of child passenger XML elements contained
in each flight XML element (i.e. how many passengers are on each flight).
Select the 'Flight' table icon in the 'FLIGHTS_RES' Web Service Resource page,
click the ![]() icon on the Resource Fields toolbar and select
'Add column'. Enter 'passengerCount' as the name of
the column. Enter the XPath expression count(flig:passengers/flig:Passenger) for
this new column. Set the Value Type of this field to integer -
'{http://schemas.xmlsoap.org/soap/encoding/}integer'.
icon on the Resource Fields toolbar and select
'Add column'. Enter 'passengerCount' as the name of
the column. Enter the XPath expression count(flig:passengers/flig:Passenger) for
this new column. Set the Value Type of this field to integer -
'{http://schemas.xmlsoap.org/soap/encoding/}integer'.
Step 4. Add
the flight number to each passenger row
Select the Passenger table
icon, click the ![]() icon and select 'Add column'.
Enter 'flightNum' as the name of the column.
Enter the XPath expression ../../flig:flightNo for this new
column. This gets the value of flightNo
for the parent flight XML element (i.e. passenger's flight number).
Save the resource.
icon and select 'Add column'.
Enter 'flightNum' as the name of the column.
Enter the XPath expression ../../flig:flightNo for this new
column. This gets the value of flightNo
for the parent flight XML element (i.e. passenger's flight number).
Save the resource.
Step 5.
Re-import the tables into the form
The easiest way to add the new
resource columns to the form is to delete both tables and re-import them
again. Delete the tables in the Tables View by selecting them and
pressing the Delete key. Re-import
the tables by performing Step 4. parts f and g from
Tutorial 1.
When the form is now run again,
the flights table now shows a passenger count and the passenger table shows the
flight number for each passenger.
Step 6. Add an
XPath variable
In this step, a variable will
be added to the Passenger table's XPath to only show
passengers on a particular flight.
·
Select the 'Passenger' table item in the Web
Service Resource page. Change the table's XPath
to /flig:getFlightsResponse/flig:out/flig:Flight[flig:flightNo=$flightNo]/flig:passengers/flig:Passenger.
This adds the conditional expression 'flig:flightNo=$flightNo' to
restrict the Flight elements. The value of flightNo
is taken from the current row of the Flight table, so if the form is re-run,
only passengers from the first flight will be listed. Save the resource.
·
Dynamic behaviour can be achieved by changing the flightNo form table column into a hyperlink and attaching a
script to refresh the passenger table.
o Add a
new script using the file menu. (File -> New
-> Script). Select the correct project and enter 'PASSENGERS' as
the name of the new script. Type in the following script and save it:
|
FPL: |
Javascript: |
|
fetchtable PASSENGER; |
tables.PASSENGER.fetchTable(); |
o Return
to the FLIGHTS_FORM form. In the WYSIWYG View, click on the 'flightNo' column in the Flight table and set the Hyperlink property. Add the
PASSENGERS script to the column’s On
Click event.
·
Make Flightno the first
column displayed in the Flight table by dragging the columns. Set the other
columns in the Flight table to display only.
·
Set all the columns in the Passenger table to be
display only
·
Set the table header text for the Passenger table
to ‘Passengers for flight &&FLIGHT-FLIGHTNO’.
When the form is now run again,
the passenger table now changes to only show passengers for the selected
flight.