Building a data entry form
Part
1: Building a simple form
Part
2: Introducing validation
See also: Tutorial Building a form
with Database Integration,
Tutorial
– Build a Form Using Tables,
Tutorial
– Using XML and Web Services,
Controls,
Layouts, Form Editor
This document will lead you step by step through the process
of building and testing a form with Ebase, and will familiarize you with
working with the Ebase Designer.
Part 1: Building a simple form
In this exercise, we will create a simple one-page form. We
will pretend this is to be used by the film industry to collect nominations for
the annual Oscars event. Note, if you have a problem at any time, enter Ctrl Z
to undo the most recent change.
Create a form and place fields on the page.
- Start
the Ebase Designer.
- Create
a new project: right click on Business
Projects in the tree panel, select Create
new then Business project.
Name the project USER, click OK. (Note: most element names in Ebase are
stored in uppercase, so it doesn’t make any difference whether you enter user or USER.)
- Create a new form in the USER
project: right click on the USER project, select Create new then Form. Name the form
OSCARS, click OK. The system will now
open the form editor and display page PAGE_1.
- The WYSIWYG View (this is the
main central panel) should display an empty page with a form header text
set to <no form header set>. Double click on this header text and
change it to Oscar Nomination Form.
Hint: if you can’t see the form header
text, check the Toggle Designer View icon ![]() on the WYSIWYG View toolbar – this icon should
be depressed. If you still don’t see a form header text, click on the Form
Properties icon
on the WYSIWYG View toolbar – this icon should
be depressed. If you still don’t see a form header text, click on the Form
Properties icon ![]() on the form toolbar (top of the page), select
the Presentation tab, and check that
option Display form header in the Form Header Panel section is set.
on the form toolbar (top of the page), select
the Presentation tab, and check that
option Display form header in the Form Header Panel section is set.
- We are going to divide the form
into two parts – About the
nomination and About the applicant. To achieve this we
will use Group Panel Controls which support header and trailer texts. Drag
a Group Panel Control from the Palette and drop it on the bottom of the
form header text – a black line is displayed to show the drop location.
Hint: when
dragging/dropping controls, you can drop them in either the WYSIWYG View or the
Outline View.
- Double click on the group
header text <no group header set> and change this to About the nomination.
- Now we will add fields to this
Group Control. Click on the group header text to select the control, then click the Fields Wizard icon
 on
the WYSIWYG View toolbar (at the top of the central panel). Add the
following fields (click the Add Field icon
on
the WYSIWYG View toolbar (at the top of the central panel). Add the
following fields (click the Add Field icon  in the wizard to add more fields):
|
Field
Name |
Field
Type |
Display Type |
|
NOMINEE |
Character |
Text |
|
AWARD |
Character |
Dropdown |
|
REASONS |
Character |
Textarea |
Let the Field data length and label text columns in the wizard take default values. Click OK to add the new fields.
Hint: To change the display type or field type, just click in the table cell and a dropdown list will be displayed.
Note that for each field added, both
a Field and a Field Control have been created. A Field is a form-level element that is available for display on any
page - Fields are shown in the Fields View. A Field Control represents the display of a field on a specific page,
and each Field Control is linked to an underlying Field - Field Controls are shown in both the Outline View and the
WYSIWYG View on the pages where they appear. Ebase is a little unusual in that
many presentation properties are configured on the Field, not on the Field
Control where you might expect to find them; this includes Display Type: Text, Dropdown, Textarea, Checkbox etc, Display
Length, plus other presentational properties.
8.
We
will now add the second Group Panel Control after the first one. To do this,
drag another Group Panel Control from the Palette and drop it onto the first
Group Panel Control in the Outline View;
the black line showing the drop location should be underneath the control icon – to indicate drop after as opposed to drop inside.
Hint: we could alternatively have used the WYSIWYG
View to do this: drag the new control over the group header text of the first
Group Panel Control; a small blue box is displayed at the top left of the
control – with the left mouse still held down, move the mouse pointer over this
box which then pops up a control tree panel showing all parent controls. Drop
the new control after the first Group Panel Control as described above.
- Double click on the group
header text of the new control and change this to About
you.
- Click the Fields Wizard
icon on
the WYSIWYG View toolbar again. Add the following fields:
|
Field
Name |
Field
Type |
Display Type |
|
NAME |
Character |
Text |
|
ADDRESS |
Character |
Textarea |
|
POSTCODE |
Character |
Text |
|
|
Character |
Text |
As before, let the Field data length and label text columns in the wizard take default values.
- We
will now add a submit button. Drag a Button Control from the Palette
(section General) and drop it
after the second Group Control; using the Outline View is the easiest way to do this – ensure that
the black line showing
the drop location is underneath
the target control icon.
- Double click on the button and
change the text to Submit Application.
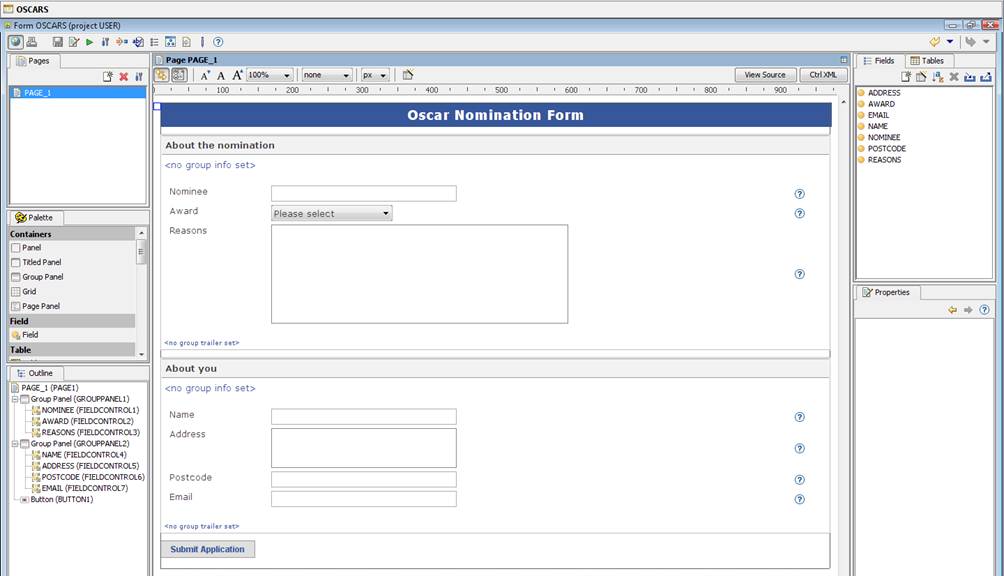
At this point, the page should look like this:
Try running the
form to see how it looks in a browser – click the run icon ![]() on
the main form toolbar. You will notice a few differences; this is
because the WYSIWYG View adds a number of things e.g. indicators for empty texts,
to make page design easier. You can see how a page will truly appear at anytime
by clicking the Toggle designer view icon
on
the main form toolbar. You will notice a few differences; this is
because the WYSIWYG View adds a number of things e.g. indicators for empty texts,
to make page design easier. You can see how a page will truly appear at anytime
by clicking the Toggle designer view icon ![]() on the WYSIWYG View toolbar. This is a
toggle switch so clicking it again returns to the assisted display.
on the WYSIWYG View toolbar. This is a
toggle switch so clicking it again returns to the assisted display.
Note: in the browser, there
is no data entry field opposite the 'Award'
text. This is because we have declared the AWARD field as a dropdown list but
have not yet told the system which values to display in the list. We’ll fix
this in a moment.
We will now make some of the fields mandatory.
- Click
on the Nominee field in the WYSIWYG View – anywhere will do, and then
click the Mandatory checkbox in
the Properties View (section Field Control).
Hint: clicking the help icon ![]() at the top of the Properties View displays the
help page for the properties currently being displayed. You can also press the
F1 key from any point in the Form Editor to get local help on the element
currently in focus.
at the top of the Properties View displays the
help page for the properties currently being displayed. You can also press the
F1 key from any point in the Form Editor to get local help on the element
currently in focus.
- Repeat
the process for fields AWARD, REASONS and NAME.
Hint: You can also do this
in one operation by holding down the CTRL key to select multiple Field Controls
and then right clicking and selecting Set
Mandatory.
Now we have the basic form, we can set about enhancing it.
- Make
the REASONS field larger: in the Fields
View, click on the REASONS field– its properties are displayed in the
Properties View. In the Presentation
section, change the Display Length
property to 50, and the Number of
Rows property to 8.
16. Create
a dropdown list of awards by first creating a static list of award values and associating the list with the AWARD
field:
·
From the file menu select (File -> New
-> List -> Static List) to open the static list editor
·
Enter oscar_awards
as the name of the list.
·
Enter values in the list by clicking the Add
static list item icon ![]() and enter the following details:
and enter the following details:
|
Language |
Display Seq |
Text |
Return Value |
|
English |
1 |
Best Actor |
A |
|
English |
2 |
Best Director |
B |
|
English |
3 |
Best Supporting Actor |
C |
|
English |
4 |
Best Music Score |
D |
·
Click the Save icon ![]() (this static list can now be used by any form)
(this static list can now be used by any form)
·
Click on the OSCARS form in the open
items panel at the top of the screen to return to the form editor (or double
click on the OSCARS form icon ![]() in
the tree)
in
the tree)
·
Click on the AWARD field in the Fields View –
its properties are displayed in the Properties View. Click on the Static List
property in section Lists and select
OSCAR_AWARDS from the dropdown.
Add some
texts:
- Drag a Text Control from the
Palette (section General) and
drop it at the top of the page – as the first child of the Page Control
PAGE1. Again this is most easily achieved using the Outline View. Cut and paste the following text into the popup:
Welcome to the new
democratic
- Drag a Text Control from the
Palette (section General) and
drop it after the EMAIL Field Control. Cut and paste the following text
into the popup:
Supplying your email
enters you in our fabulous holiday for two at the Hollywood Oscars competition.
Hint: If you use
the Outline View as the target for the drop, hover the mouse over the icon of the EMAIL Field Control – this
indicates add after the control as opposed to add
to.
Add some
styling:
- Right click on the Welcome text at the top of the page and select the Style
Assistant icon
 to open the control’s Style Assistant.
This dialog allows you to style a control.
Click the … button next to the Text property and in the displayed
dialog box set the Bold
property drop down to Bold, the
Size property to 18px and the Color property to Green. Click OK twice to see your styling
changes in the WYSIWYG view.
to open the control’s Style Assistant.
This dialog allows you to style a control.
Click the … button next to the Text property and in the displayed
dialog box set the Bold
property drop down to Bold, the
Size property to 18px and the Color property to Green. Click OK twice to see your styling
changes in the WYSIWYG view.
These styling properties can either be local values or linked from a Property Set in the form’s Presentation Template.
- Right
click on the Supplying your email…
text and select the Style Assistant icon to open the control’s Style Assistant.
Click the … button next to the Text property and in the displayed dialog
box set the Color
property to red.
Tweak the presentation.
- At
the moment the field labels Nominee,
Award, Reasons etc are quite a long way from their corresponding data
entry boxes, so we will move them closer together. Click on the About the nomination text (or
click on Group Panel Control GROUPPANEL1 in the Outline View) to select
the first Group Control. In the Properties View, you will see that the Layout type property is set to Field Grid – with this layout all
child controls are displayed in a table with each control on a new line.
Selecting the control displays a yellow box above the control and in this
box there are two slider icons which can be used to change the table
column widths used in the layout. Drag the first slider icon to the left
to change the width of the label column. Repeat this exercise for the
second Group Panel Control.
- Re-run
the form to check that it looks OK in a browser. Click the Submit
Application button and see what happens when the mandatory fields are not
completed.
Part 2: Introducing validation
None of the fields in the OSCARS form have any obvious
need for validation, so we will introduce a new field. We will ask our users
whether they work in the film industry, and if they do, we will issue an error
message saying they can't make a nomination.
Add a new field WORK_IN_INDUSTRY after the NAME
field:
- Click the New Field icon
 in the Fields View and add a new field
WORK_IN_INDUSTRY
in the Fields View and add a new field
WORK_IN_INDUSTRY - In the Properties View change
the following properties for the field:
·
Display
Type (Section Presentation) to
Checkbox
·
Field
Type (Section General) to Boolean
·
Label
Text (Section Texts) to "Do you
work in the film industry?"
- Drag the field from the Fields
View to the WYSIWYG View and drop it after the NAME field.
Add a validation check to run against this field:
- Right
click on the new field in the WYSIWYG View and select Events
- The Validation tab is already selected.
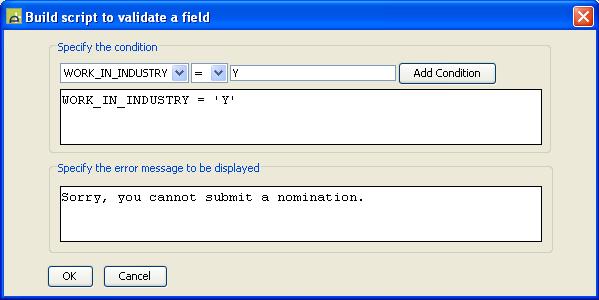
Click on the script builder wizard icon
 .
.
- Select
Add a validation check and click OK
- From
the dialog box, select the equals condition (=) from the centre
dropdown and enter Y in the right-hand box, then click the Add
Condition button
- Enter
"Sorry, you cannot submit a nomination" in the error message
field.
- Click
OK twice
Run the form and verify that it works as expected:
- Click
the checkbox for the WORK_IN_INDUSTRY
field and click Submit application
- An
error message should appear above the field
- Uncheck
the new field and try again. It should work OK.
In this example, we have used the script builder wizard to generate a simple script. In practice, you are more likely to create a new script to add whatever programming logic you require and then add this to an event. See Server-side Programming for details of available scripting languages.
That completes this tutorial. There are still quite a few things
we need to do to make this into a working application – perhaps the most
obvious is to add some programming logic to the Submit Application button to
collect the details entered and then do something with this information –
typically this would be one or more of: writing to a database, calling a web
service, sending an email. These subjects are explored further in other
tutorials (see the links at the top of this page).