Tables Tutorial
See also: Tutorial – Building your First Form,
Tutorial – Building a
Form with Database Integration,
Tutorial
– Using XML and Web Services,
Tutorial - Display and update
of table with foreign keys,
Introduction
In this tutorial we will create a form containing a table.
We assume that you have some familiarity with using the Ebase Designer. If not,
you are recommended to start with the tutorial Building your First Form.
We will build a small application for maintaining a CD
collection. It will support the following functions:
- Adding
a CD to the collection
- Removing
a CD from the collection
- Sorting
by artist, classification etc.
- Searching
This application will make use of the following database
tables which are included in the Ebase Samples Database:
|
this is the main CDs table |
|
main classifications e.g. Popular, Classical, Jazz etc |
|
sub classifications within the main classification |
Note: These three tables already exist in the
database ebase_samples provided with
Ebase. If you need to create the ebase_samples
database yourself scripts can be found here: <Ebase_Installation_directory>\UfsServer\databaseSchemas
Instructions
Open the Designer Preferences Dialog by selecting File --> Preferences from the menu and click the Page Editor tab. At the bottom of the page, check both Page Panel Control and Page Navigation Panel Control. This ensures that these two controls are added to all new pages. This can be reversed at the end of this exercise, if required.
Import the database tables
- Open
the EBASE_SAMPLES Database Connection (or UFS
Database Connection in systems that have been upgraded from earlier Ebase
versions) in the hierarchy tree panel (IT Elements -> Database
Connections).
- Click
the Import from schema
 icon to start the Database Schema Wizard
and click Next to begin.
icon to start the Database Schema Wizard
and click Next to begin. - Select the EBASE_SAMPLES schema
if you are using a database that supports schemas and click Next.
- Select
tables mycds, cd_classifications and cd_sub_classifications
holding down the CTRL key and click Next.
- In
the pop-up window, click the Tables Only checkbox for the MYCDS
table.
- For
the MYCDS table, click on CD_ID in the Columns for Where
Clause column,
then uncheck CD_ID in the pop-up window and click OK. (This removes
the CD_ID column from the where
clause for the database resource which means we will retrieve all CDs.)
- Click
Finish to create the new
resource.
Build the
classification dynamic list
This list will be used to classify a CD.
- Open
the CD_CLASSIFICATIONS database resource in the hierarchy tree
panel (IT
Elements -> External Resources -> Database
Resources).
- Click
the Build Dynamic
List
 icon.
icon. - Click OK to the warning message – where clause has no value.
- Click
Next on the
next window to accept the default name.
- Click
Next on the next window (Create Where Clause).
- On
the final window (Fetch Fields from Database) select the CLASSIFICATION
field and click Finish.
- This
will create a dynamic list called CD_CLASSIFICATIONS in the
hierarchy tree panel (IT
Elements -> Dynamic Lists).
Build the sub-classification
dynamic list
This list will be used to further classify a CD.
- Open
the CD_SUB_CLASSIFICATIONS database resource in the hierarchy tree
panel (IT
Elements -> External Resources -> Database
Resources).
- Click
the Build Dynamic
List icon.
- Click OK to the warning message – where clause has no value.
- Click
Next on the
next window to accept the default name.
- On
the next window (Create Where Clause) select the CLASSIFICATION
field and click Next.
- On
the final window (Fetch Fields from Database) select the SUB_CLASSIFICATION field and click Finish.
- This
will create a dynamic list called CD_SUB_CLASSIFICATIONS in the
hierarchy tree panel (IT
Elements -> Dynamic Lists).
Create
a business view
- Select
file menu (File -> New -> Business View) and
name the view TABLES_TUTORIAL.
- Add
the MYCDS database resource to the view using the Add resource
 icon.
icon. - Click
Save.
Create the USER project
- If
the USER project does not
already exist, create it by right-clicking on Business projects in the hierarchy tree and selecting Create new -> Business project.
Create the
form and set up table display
- Right-click
on the USER project and create
form CD_EXERCISE selecting Create
new -> Form.
- Click
the Form properties icon
 on
the form toolbar and set the business view to TABLES_TUTORIAL by selecting from the dropdown
list. Click OK.
on
the form toolbar and set the business view to TABLES_TUTORIAL by selecting from the dropdown
list. Click OK. - In
the Tables View, click the New Table
icon
 ,
enter table name
CDS, select MYCDS from the resource name
dropdown list, then click the Import columns from resource button.
,
enter table name
CDS, select MYCDS from the resource name
dropdown list, then click the Import columns from resource button. - Click
Select All in the pop-up window. Then click OK twice.
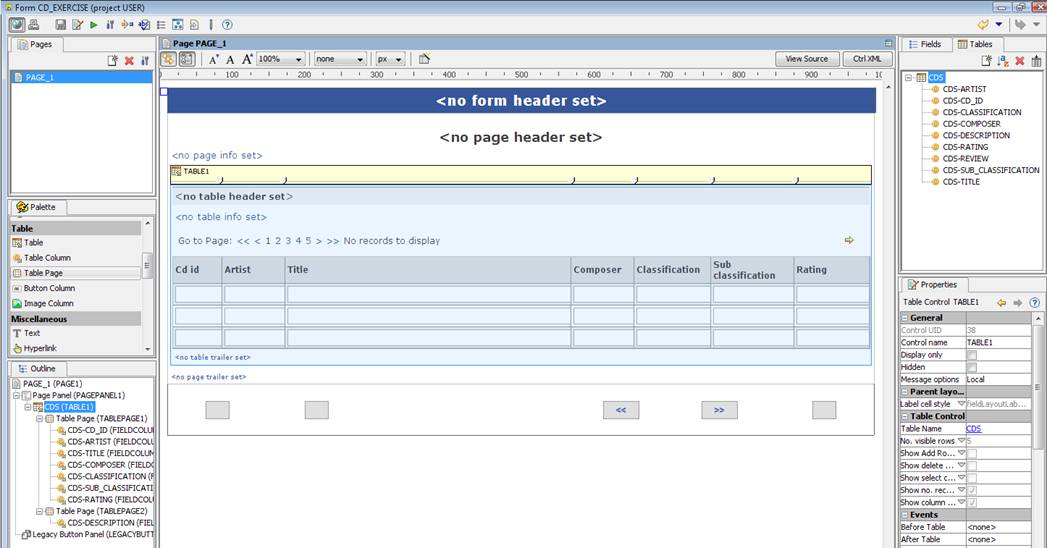
- Drag the CDS table from the
Tables View onto the page, adding it to the Page Panel Control (in the
WYSIWYG View, drop the table after the <no page info set> text).
In the Outline View, you can see that this has created a Table Control, a Table Page Control and a number of Table Column Controls. The Table Control represents a visible table, a Table Page Control represents a horizontal scroll page within this table, and the Table Column Controls represent columns.
- Delete the CDS-REVIEW column control
– select it in either the WYSIWYG or Outline View and press the Delete key
- Add
a second horizontal page: drag a Table Page Control from the Palette and
drop it in the Outline View after the existing Table Page Control – hover
the mouse over the target control’s icon so that the black line showing
the drop location is underneath the icon
– this means drop after the
target control.
- Using
the Outline View, drag the CDS-DESCRIPTION
column to the new Table Page Control – this time, hover the mouse over the
target control’s description Table
Page so that the black line showing the drop location is underneath
the text – this means drop inside the target control.
- Re-order
the columns in the WYSIWYG View by dragging them to the order shown below
(or any other order you fancy).
- Change
the column widths by clicking on the <no table header set> text –
this selects the Table Control – then dragging the column slider icons on
the yellow Table Control widget to achieve the layout shown below:
- Select
the Table Control - click on the <no table header set> then change
the following properties:
- Select Show Add Row button
- Select Show delete column
- set No.
visible rows to 10 (this change is not visible in the designer – it
always shows 3 rows)
Hint: initially, these properties are taken from default values configured in the Presentation Template associated with the form.
·
Click on the Toggle
designer view icon ![]() on the WYSIWYG View toolbar – this shows the
page as it will actually appear in the browser. Before this, the page display
was operating in assisted mode where
the system makes some small changes to make the design process easier. We can
see that the table is too wide and overflows the page – this is because the
lengths for the individual columns are too large and exceed the percentage
width specifications we have assigned. Maximise the WYSIWYG View by double
clicking on the Title Bar – this contains text Page PAGE_1 on a light blue background. There still isn’t enough
space to display the table. Double click the WYSIWYG Title Bar again to return
to normal.
on the WYSIWYG View toolbar – this shows the
page as it will actually appear in the browser. Before this, the page display
was operating in assisted mode where
the system makes some small changes to make the design process easier. We can
see that the table is too wide and overflows the page – this is because the
lengths for the individual columns are too large and exceed the percentage
width specifications we have assigned. Maximise the WYSIWYG View by double
clicking on the Title Bar – this contains text Page PAGE_1 on a light blue background. There still isn’t enough
space to display the table. Double click the WYSIWYG Title Bar again to return
to normal.
· To correct this problem, select the table columns in the Tables View one by one, and change the Display Length property (Presentation section) as follows:
|
Column |
Display
length |
|
CDS-ARTIST |
25 |
|
CDS-TITLE |
40 |
|
CDS-COMPOSER |
15 |
|
CDS-CLASSIFICATION |
10 |
|
CDS-SUB_CLASSIFICATION |
10 |
|
CDS-RATING |
1 |
- Set
the CD_ID column display only by right-clicking the CD_ID column in
the WYSIWYG View and selecting Display Only.
·
Click on the Toggle
designer view icon ![]() on the WYSIWYG View toolbar again to return to
the assisted display.
on the WYSIWYG View toolbar again to return to
the assisted display.
Add database integration
Add an FPL script to load the table from database:
- Click
the table header text to select the Table Control, then right click and
select Events, select the Before Table tab (it should already
be selected) then click the Script builder wizard icon
 .
. - Select
load a table from resource, click OK, click OK again.
Add an update table button and an FPL script to perform the
updates:
- Drag a Button Control from the
Palette (section General) and
add it after the table
- Double click on the button in the
WYSIWYG View and change the text to Update CD database.
- Right
click on the button, select Events,
then click the Script builder wizard icon .
- Select
update resource with table contents, click OK, click OK again.
Add a sequence to number the CDs as we enter them:
- Open
the sequences in the designer tree (IT Elements -> Sequences).
- Click
the New sequence icon, enter CDS under sequence name, click Save.
- Close
the Sequences editor – click the Window close icon in the top right hand
corner
Add a script to use the sequence
- Create
a new script named ASSIGN_CD_ID
(right-click on the USER
project and select Create new -> Script). There is a
choice of programming languages, so select the language you prefer from
the dropdown when creating a new script. Scripts are shown below for FPL (the Ebase built-in Form Processing Language)
and Javascript:
|
FPL: |
Javascript: |
|
sequence CDS; set CDS-CD_ID =
$NEXT_SEQUENCE_ID; |
var next =
system.sequenceManager.sequence("CDS"); tables.CDS.CD_ID.value
= next; |
- If
using FPL, click the Verify
 icon. Click the Save
  icon.
icon. - Return
to the form editor by clicking the CD_EXERCISE
button in the open
elements toolbar at the top of the page.
- Select
the Table Control, click the “…” button of the Add Row property (section Events)
then click the Add Scripts button.
- Select
ASSIGN_CD_ID from the dropdown. Click OK twice.
Set up the classification lists
- Classification – this is a simple list that shows a list of main classifications
In the Tables View select the CDS-CLASSIFICATION
column and change the following properties in the Properties View
- Dynamic
list (Lists section)
to CD_CLASSIFICATIONS
- Display type (Presentation section) to Drop Down
- Sub-classification – this list is
more complicated: it shows a list of sub-classifications within the main
classification. The list is re-built each time the main classification
list is changed.
Select the CDS-SUB_CLASSIFICATION
column and change the following properties in the Properties View
- Dynamic
list (Lists section)
to CD_SUB_CLASSIFICATIONS.
The list mappings popup dialog is then displayed – map the CLASSIFICATION
list field to form field CDS-CLASSIFICATION by selecting it from
the dropdown. Click OK
- Display type (Presentation section) to Drop Down
- When list is built (Lists section) to Each display
- Click
the CDS-CLASSIFICATION column in the WYSIWYG View and check the Immediate
Validation property (Table
Column Control section). This means that the server is
contacted each time this list is changed, and will result in the
rebuilding of the sub-classification list.
Run the form
- Click the run form icon
 on the form toolbar.
 - Click
the Add Row button a few times and add some test data. Observe the
behaviour of the classification lists.
- Scroll
to the right and enter something in the Description column.
- When
you are ready, click the Update CD Database button.
- Now re-run the form and the
entered CDs should be displayed.
Final touches
- Set
some of the columns as mandatory by holding down the CTRL key then clicking on the column
header texts for columns CDS-ARTIST, CDS-TITLE and CDS-CLASSIFICATION. Then right-click and select Set
Mandatory.
- Enable
sorting on CDS-CD_ID, CDS-ARTIST, CDS-COMPOSER and CDS-CLASSIFICATION. Click the column
header for each of these fields and set the Sortable property. Sort icons are displayed on the
right-hand side of the column header text. When we run the form, clicking
these icons will sort the table by the appropriate column. Repeating the
sort then acts as a toggle to sort in ascending or descending order and
the sort icon changes correspondingly.
- Sort
the initial display by cd id in the database resource. Open the MYCDS database resource (IT
Elements -> External Resources -> Database Resources à MYCDS), then add 'order by
CD_ID' to the Additional SQL
statements box. (We
could also achieve the same result by sorting the table using a script).
Click Save.
- Return
to the form editor by clicking the CD_EXERCISE button in the open
elements toolbar at the top of the page.
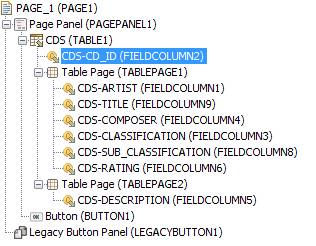
- In
the Outline View, move the CDS-CD_ID column so it is an immediate child of
the CDS Table Control – see below. Note that any columns that are
immediate children of a Table Control, and therefore are not included in a
Table Page Control, are designated as fixed
columns and are shown on all horizontal pages. This means that the cd id
is displayed as the left-most column as the user scrolls horizontally.
- Add
some header texts: double click the table header text - <no table
header set> - and enter 'My CD collection'. If you like, enter some
instructions in the table info text by double clicking on this. You can
also change the column header texts by double clicking on these.
- Add
validation to the rating column to ensure that any entered number is
between 1 and 5. Select the CDS-RATING
column in the Tables View,
double click opposite the Validators
property, enter '1' in Inclusive
Min. value and '5' in Inclusive
Max. value.
- Delete
the Page Navigation Panel Control at the bottom of the page
- Re-run
the form and check this new functionality performs as expected.
- The
form is now ready, so delete all the test data, and reset the CD sequence
back to 1 using the sequences editor (change the Most Recent Document Id and save the sequences again).
Optional Further Enhancements
Adding
a reviews button column
We'd like to be able to add a button on each row which, when
clicked, takes us to another page which allows the user to enter a review of
the CD. This could be done as follows:
- Select the CDS-REVIEW column in the Tables View and change the following
properties:
- Display type property to Text
Area,
- Display
length to 60
- Number
of rows to 15.
- Add
the review page
- Add
a new page after PAGE_1 by clicking the New page icon in the Pages View. Rename the page to REVIEW_PAGE
(change the Page name
property).
- Double click the previous page
button – shown as << - at the bottom of the new page and change the
text to ‘Return to main table’.
- Drag the following fields from
the Tables View onto the new page: CDS-CDID, CDS-ARTIST, CDS-TITLE and CDS-REVIEW. Add more column fields if you like.
- Set all fields in the WYSIWYG View
except CDS-REVIEW display only: select the fields holding down the
CTRL key, right-click and select Set Display Only.
- Set the Layout type property of the Page Panel to Field Grid
- Add
the review button column to the table
- Return
to PAGE_1 – click PAGE_1
in the Pages View.
- Drag a Button Column Control
from the Palette and add it after the CDS-RATING column.
- Click
on the new column header and enter ‘edit..’ as the button text in the
Properties View.
- Add
a script to the new button to send the user to the REVIEW_PAGE:
- Create
a new script GOTO_REVIEW_PAGE (right-click on the USER project and select Create new
-> Script)
- In
the script editor, enter:
|
FPL: |
Javascript: |
|
goto page
REVIEW_PAGE; |
form.gotoPage(pages.REVIEW_PAGE); |
- If
using FPL, click the Verify icon. Click the Save icon.
- Return
to the form editor by clicking the CD_EXERCISE button in the open
elements toolbar at the top of the page.
o
Right-click
on the new button column, select Events, then click the Add
Scripts button and add the
GOTO_REVIEW_PAGE script. Click OK twice.
- Re-run
the form and check everything performs as expected. Enter some reviews and
verify that they are recorded against the correct CD.
Making
the table searchable
- Add
the input search field
- Click
the New field icon on the Fields View toolbar and create a
new field named SEARCH_FIELD_INPUT.
Drag it to the top of the page.
- Double
click on the field’s label text and change it to ‘Search artists’.
- Drag a Button Control after
the new field
- Double
click on the button and change its text to ‘Search’.
- Add
the DB Search fields
- Click
the New field icon on the Fields View toolbar and create a
new field named SEARCH_FIELD_FOR_DB. Change property default
value to be ‘%’.
- Click
the New field icon on the Fields View toolbar and create a
new field named WHERE_CLAUSE. Change property default value
to be ‘artist like &&SEARCH_FIELD_FOR_DB’.
- Add
the script for triggering the search
- Create
a new script APPLY_SEARCH_CRITERIA (right-click on the USER project and select Create new
-> Script)
- In
the script editor, enter:
|
FPL: |
Javascript: |
|
if [ SEARCH_FIELD_INPUT != null ] set
SEARCH_FIELD_FOR_DB = '%' + SEARCH_FIELD_INPUT + '%'; else set
SEARCH_FIELD_FOR_DB = '%'; endif fetchtable CDS;
|
fields.SEARCH_FIELD_FOR_DB.value = "%"; if ( fields.SEARCH_FIELD_INPUT.value ) {
fields.SEARCH_FIELD_FOR_DB.value += fields.SEARCH_FIELD_INPUT.value +
"%"; } tables.CDS.fetchTable(); |
- If
using FPL, click the Verify icon. Click the Save icon.
- Return
to the form editor by clicking the CD_EXERCISE button in the open
elements toolbar at the top of the page.
o
Right-click
on the the Search button, select Events, then click the Add
Scripts button and add the
APPLY_SEARCH_CRITERIA script.
- Edit
database resource MYCDS
- Open
the MYCDS database resource by navigating using the designer tree (IT Elements -> External Resources
-> Database Resources -> MYCDS).
- Add
a new resource field by clicking the icon. Name it SEARCH_FIELD_FOR_DB
and uncheck its Persistent checkbox to indicate that the column
does not exist in the database and will only be used in the resource's where
clause. This field will be mapped to the SEARCH_FIELD_FOR_DB
form field (see below) so that we can restrict the rows returned by
fetching this resource to just those which match the search criteria
entered by the user.
- Add
a new resource field by clicking the icon. Name it WHERE_CLAUSE and
uncheck its Persistent checkbox. Check the Dynamic SQL checkbox.
- Add
‘&&WHERE_CLAUSE’
to the where clause section
of the resource.
- Click
Save.
- Return
to the form editor by clicking the CD_EXERCISE button in the open
elements toolbar at the top of the page.
- Open
the resource mappings dialog by clicking the
 icon in the form toolbar. Map the
resource field SEARCH_FIELD_FOR_DB to form field SEARCH_FIELD_FOR_DB.
icon in the form toolbar. Map the
resource field SEARCH_FIELD_FOR_DB to form field SEARCH_FIELD_FOR_DB. - Map
the resource field WHERE_CLAUSE to form field WHERE_CLAUSE.
Click OK.
- Re-run
the form and check everything performs as expected.
- Enter
a search string which you know appears as a substring of at least one of
your artist's names. Click Search and check that you only get the
artist names that contain the string you entered.
- Clear
the search string field, click Go and check that you get ALL your
data.
So far we have introduced searching the artist column. We could search on all columns by extending the process above.
For more information on database resources and Dynamic SQL see the Database Resources documentation.