Tutorial -
Building your First Workflow Process
Define
Activities for the Interactive Tasks
Define Workflow Process
Attributes and Mappings
Associate a Business View with
the LAPTOP Process
Define Activities for the System
Tasks
Testing the LAPTOP Process in
the Ebase Designer
Testing the LAPTOP Process
outside of the Ebase Designer
See also: Introduction
to Workflow, Workflow Concepts, Xi Assignment Handler
Prerequisites for running this tutorial:
1.
The Ebase_Workflow_Server and
Ebase_Workflow_Client modules are both licensed (in the Ebase Designer check
Help -> Licence, both modules should appear under Installed Features).
2.
Authentication of runtime users is enabled. To
enable the Ebase supplied authentication, uncomment the following statement in
the Ebase server parameters file UFSSetup.properties:
Ufs.logonExitServlet=LogonExitServlet, and restart the Ebase Server.
Hint: The UFSSetup.properties
file is located in web application root/WEB-INF/classes – in the
distributed system this will be
..Ufs/UfsServer/tomcat/webapps/ufs/WEB-INF/classes.
3.
The distributed Logon and Workflow Assignment
System Services have not been modified. If you have modified these, you can
still use this tutorial, but you will need to change the part where the
approval task is assigned to a Manager (in Part 3) – this would need to
match whatever user authentication and assignment logic has been
implemented. If you don’t
understand what this instruction means, you are almost certainly using the
distributed System Services, so carry on.
This tutorial will lead you step by step through the process
of creating a simple workflow process. The process has three steps:
1.
A user makes a request for a new laptop via an electronic
form.
2.
The request is routed to another user who is
responsible for approving or rejecting such requests.
3.
The originating user is informed of the approval
or rejection decision via an email.
In terms of workflow, this process will be implemented as
two interactive tasks i.e. the laptop request step and the subsequent
approval/rejection step, and one system task responsible for issuing the email
notification back to the requesting user. The interactive tasks will be
implemented as Ebase forms. The tutorial assumes that the reader is familiar
with Ebase development concepts such as forms, business views, resources and
the FPL scripting language.
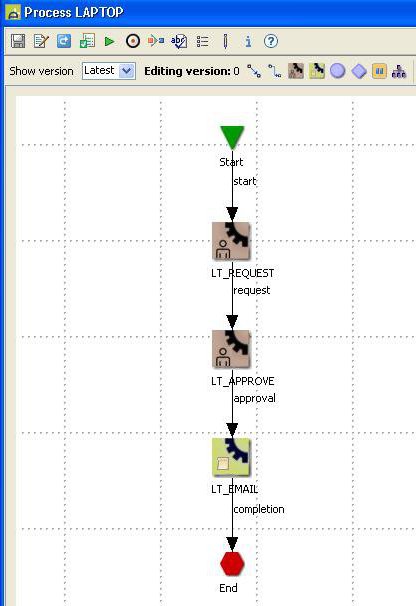
Part 1: Design the Workflow Process
- Start
the Ebase Designer
- Create
a new workflow process (File -> New -> Workflow -> Process) called
LAPTOP.
- Click
on the interactive task node icon
 .
Click anywhere on the page to add the task node. Double click on it to
change the name to LT_REQUEST. Repeat this and name the task node
LT_APPROVE.
.
Click anywhere on the page to add the task node. Double click on it to
change the name to LT_REQUEST. Repeat this and name the task node
LT_APPROVE. - Click
on the system task node icon
 and place it on the page. Double
click on it to change it’s name to LT_EMAIL.
and place it on the page. Double
click on it to change it’s name to LT_EMAIL. - Link
the tasks START -> LT_REQUEST -> LT_APPROVE -> LT_EMAIL ->
FINISH by clicking the
 icon
and dragging the arrow between the task nodes. Make sure they are linked
correctly so when you move a task node the left or right, the arrow moves
along with it. Right-click on each link and select Configure to rename the
links from the default to ‘start’, ‘request’,
‘approval’ and ‘completion’ respectively. Position
each link name in the middle of the link by right clicking on the link and
selecting Link... -> Label Link in the middle.
icon
and dragging the arrow between the task nodes. Make sure they are linked
correctly so when you move a task node the left or right, the arrow moves
along with it. Right-click on each link and select Configure to rename the
links from the default to ‘start’, ‘request’,
‘approval’ and ‘completion’ respectively. Position
each link name in the middle of the link by right clicking on the link and
selecting Link... -> Label Link in the middle.
(Hint: you can achieve vertical alignment by selecting everything – draw a rectangle around all items – then right click and choose Align… -> Align centres vertically).
Your process should now look like:
Change the task descriptions:
- Edit
the LT_REQUEST task configuration by double-clicking the icon. Set the
description to be ‘Laptop Request’
- Edit
the LT_APPROVE task configuration.
Set the description to be ‘Laptop Approval’.
Part 2: Prepare the Forms
The LAPTOP process requires two Ebase forms to operate: one to enable a user to request a Laptop and one to enable Bob (we’ll define this user in a moment) to approve or reject the request. The forms (and the sequence used) are shipped with Ebase and need to be copied from UfsServer/samples/workflow directory to the transport directory.
laptop_forms.xml
laptop_sequences.XML
Hint: the
location of the transport directory is configured by parameter Ufs.transportDirectoryName in the Ebase
server parameters file UFSSetup.properties -
in the distributed system this will be <Installation
directory>/UfsServer/transport.
Import the files (Tools -> Migration -> Import).
(See Using Import and Export for more
information)
The import will create a project folder called LAPTOP and
create two forms: LAPTOP_REQUEST and LAPTOP_APPROVAL. The forms are fully
functional but must now be enabled to work with the LAPTOP workflow process:
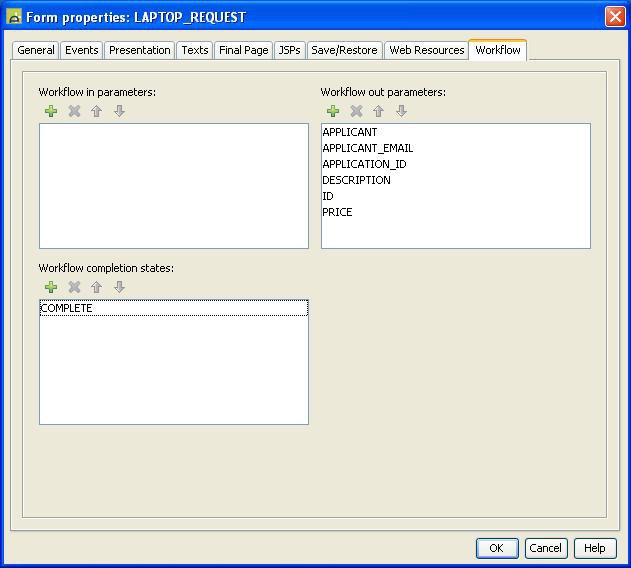
Open form LAPTOP_REQUEST. On submission the form must start
a new LAPTOP process and complete the first task defined in the LAPTOP process
at the same time. In addition, relevant data must be passed to the LAPTOP
process so it may be passed later on to other defined tasks. The form collects
the following data:
|
APPLICANT_EMAIL |
- the email address of the user making the request |
|
APPLICANT |
- the name of the user making the request |
|
APPLICATION_ID |
- a unique reference number allocated to the request |
|
ID |
- the product identifier of the selected Laptop |
|
PRICE |
- the price of the Laptop |
|
DESCRIPTION |
- the description of the Laptop |
These fields must be defined as ‘Workflow out
parameters’ i.e. their values will be passed to the LAPTOP workflow
process:
Go to Form Properties -> Workflow -> Workflow out parameters and add the above form
fields to the ‘Workflow out parameters’ box.
(Hint: You can control-click to select multiple fields).
We will also define a single
Save the form.
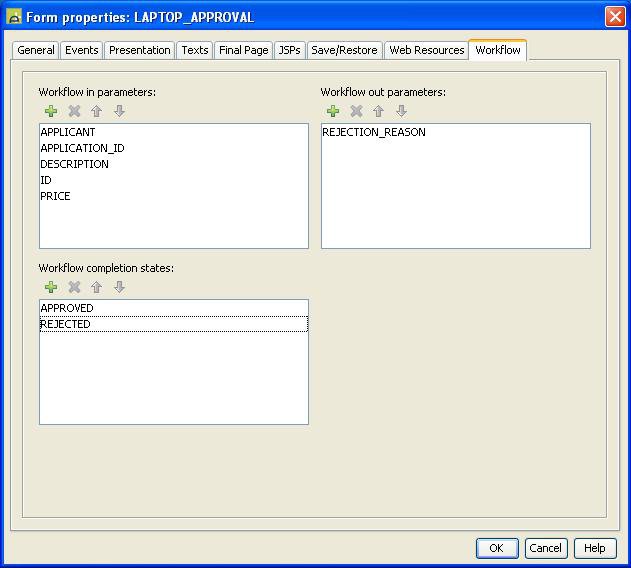
We must also workflow enable the LAPTOP_APPROVAL form. This
form receives data values from the LAPTOP process i.e. that describe the item
requested, and passes back an approved or rejected status. If the request is
rejected the form also passes back a rejection reason. To enable this we must
define:
APPLICANT
APPLICATION_ID
PRICE
DESCRIPTION
ID
as ‘Workflow in parameters’.
Also add ‘REJECTION _REASON’ as a
‘Workflow out parameter’. We will also define two ‘Workflow
completion states’: APPROVED and REJECTED.
Save the form.
Part 3: Define Activities for the Interactive Tasks
We must now define Activities to associate each of the
interactive workflow tasks LT_REQUEST and LT_APPROVE, with the LAPTOP_REQUEST
and LAPTOP_APPROVAL forms.
In the Workflow process, double-click the LT_REQUEST task.
Create a new Activity by clicking the ![]() icon
and name it ‘LT_REQUEST’.
icon
and name it ‘LT_REQUEST’.
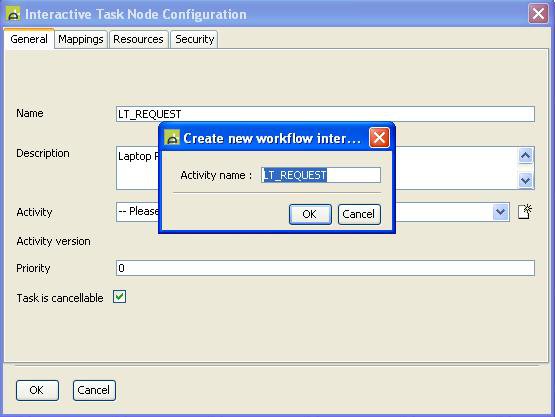
The Activity configuration screen will open. Click OK on the Task node configuration dialog to close it.
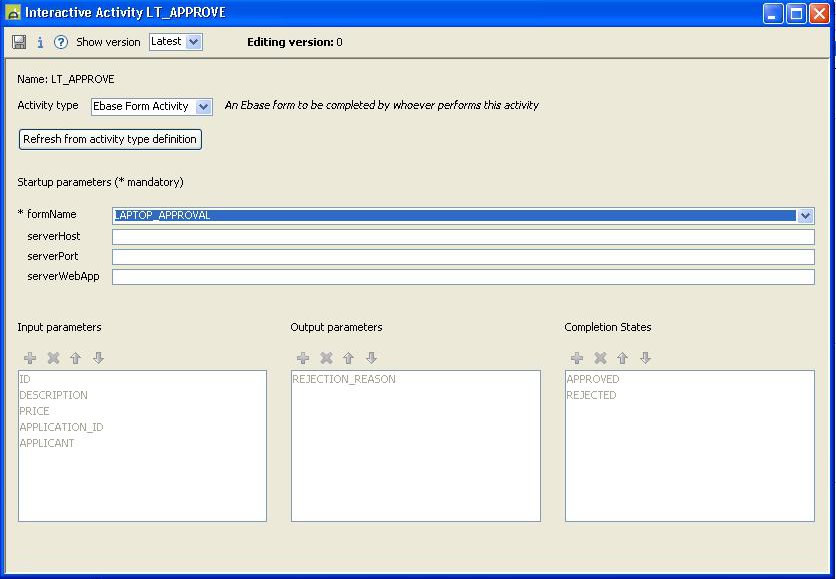
On the new Activity screen, choose the Activity Type to be
‘Ebase Form Activity’. Choose the Form Name from the list to be
LAPTOP_REQUEST. The Input Parameters, Output Parameters and Completion States
will be imported automatically from the LAPTOP_REQUEST workflow properties:

Save the Activity – click the save icon ![]() on the toolbar.
on the toolbar.
Return to the LAPTOP process and double-click the LT_REQUEST
task again and click on the Resources tab. Set the resource allocation to
‘Public’.
Repeat the activity creation step for the LT_APPROVE task.
This time, name the new Activity ‘LT_APPROVE’ and associate it with
form LAPTOP_APPROVAL.
Again, Save the Activity.
We have now associated the Ebase forms LAPTOP_REQUEST and
LAPTOP_APPROVAL with the tasks LT_REQUEST and LT_APPROVE. The association is
implemented via the interactive Activities LT_REQUEST and LT_RESPONSE
respectively.
We will now configure the assignment of the approval task.
For simplicity, we will allocate this task to a role called MANAGER. In the
real world we might want to be more specific and restrict this to just the
requestor’s line manager. This type of dynamic allocation of resources to
tasks is fully supported by the Ebase workflow system.
- Create a new security role
called MANAGER (Tools
-> Maintain Security then
click on Roles then New role). Don’t add any authorizations to the
role.
- Create
an Ebase user called Bob, password Bob (Tools -> Maintain Security
-> New User). Add roles of SUPER_USER, MANAGER.
- In the Workflow Process, edit the LT_APPROVE task configuration. Assign the task to the Manager role by clicking the Resources tab, selecting Custom and entering ‘MANAGER’ in the Assignment key field.
Assignment logic i.e. who
can perform each task, is controlled by the Resources tab for each task. When Custom is selected, the decision is
delegated to the Xi Assignment
Handler – this is a customisable Ebase script that you can change to
meet almost any assignment requirement. In this example we are using the
default behaviour of this supplied script which is to treat the Assignment key
field as a role name; any users that have this role can perform the task. Click
on the link above for more information on this.
Part 4: Define Process Attributes and Mappings
We must now define the Process Attributes that will hold the data being passed in and out of the process via the Ebase forms.
In the Workflow Process’s Attributes view tab, add
attributes as follows:
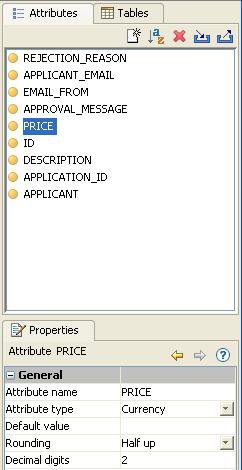
Confirm the field types of all attributes are set to Character in the Properties view tab (this is the default). Change the PRICE attribute to type Currency.
Save the LAPTOP process.
Note: the process attributes EMAIL_FROM and
APPROVAL_MESSAGE: these will be used subsequently in a System Task to issue
notification email.
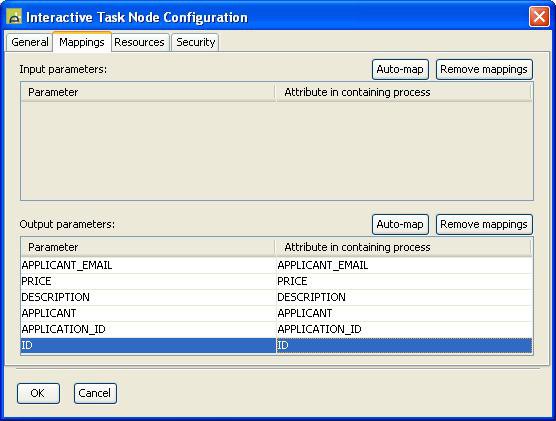
We must now map task node Input and Output Parameters to the
Process Attributes. Double-click the LT_REQUEST task node and select the
Mappings tab. Map the parameters and process attributes as follows:
Repeat the exercise for Task LT_APPROVE:
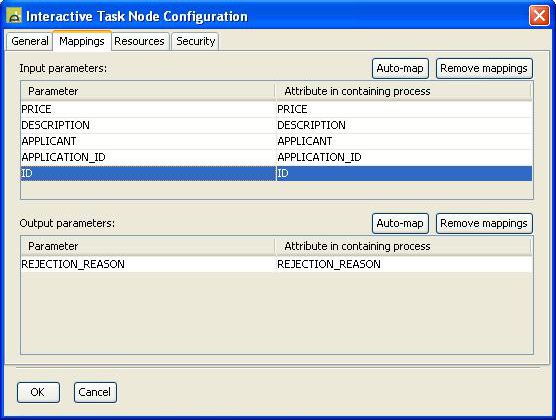
Note that the LT_APPROVE task has both Input and
Output parameters i.e. the input parameters describe the Laptop request to Bob
and the output parameter contains a rejection reason (if the request is
rejected). The LT_REQUEST task however is the starting point of the process and
therefore has no input parameters.
Part 5: Associate a Business View with the LAPTOP process
We have one System Task, called LT_EMAIL. The function of
this task is to automatically send an email notification to the originator of
the Laptop request. To implement this functionality we must create:
- A
new Business View called LAPTOP. File -> New -> Business View.
- An
Email Resource called LT_APPROVAL_NOTIFICATION defined as follows:
File -> New -> External Resources -> Email Resource.
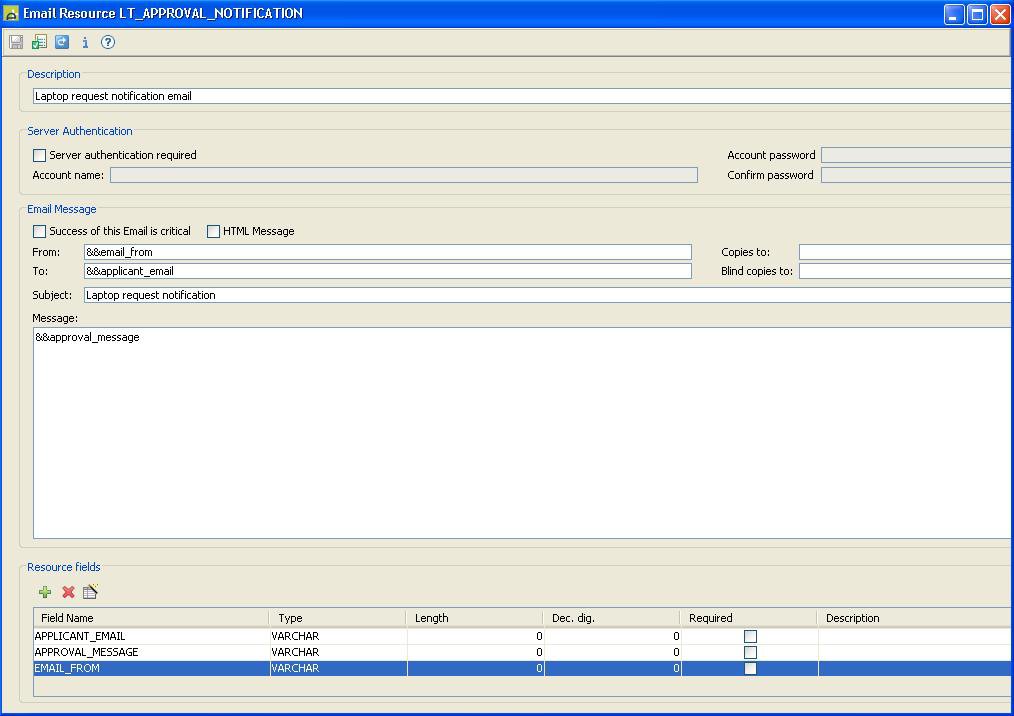
Save the Email Resource.
Add the LT_APPROVAL_NOTIFICATION Email Resource to the
LAPTOP Business View. Save and Close.
We now associate LAPTOP Business View with the LAPTOP
Process by clicking the ![]() icon
on the Workflow Process designer. Choose Business View LAPTOP from the drop
down list and click OK.
icon
on the Workflow Process designer. Choose Business View LAPTOP from the drop
down list and click OK.
Map the Email Resource fields to the Process Attributes by
clicking the ![]() icon,
as follows:
icon,
as follows:
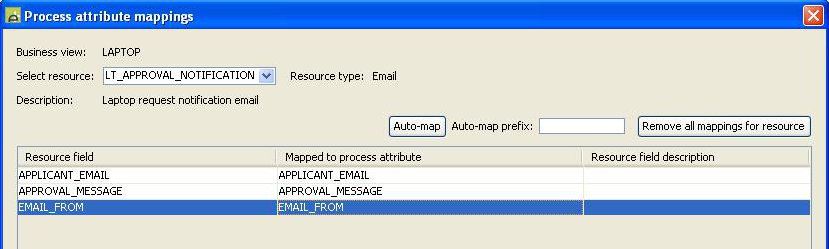
Note: The Auto-map button will do this for you.
(See Working
with Business Views and Working
with Email for more information)
Part 6: Define Activities for the System Tasks
We must define a new System Activity called LT_EMAIL.
Double-click the LT_EMAIL task and click the ![]() icon.
Enter the name LT_EMAIL, click OK and add the following FPL to the new System
Activity:
icon.
Enter the name LT_EMAIL, click OK and add the following FPL to the new System
Activity:
// send an approval or rejection email...
//
if [$COMPLETION_STATE = 'APPROVED']
set
approval_message = 'Your application Reference No. ' + application_id + ' for a
LAPTOP - ' + description + ' has been approved.';
else
set
approval_message = 'Your application Reference No. ' + application_id + ' for a
LAPTOP - ' + description + ' has been rejected: ' + rejection_reason + '.';
endif
// send a notification email...
//
sendmail lt_approval_notification;
Save the Activity.
The LT_EMAIL Activity constructs a notification message based on the Completion State returned by the LT_APPROVE task, and then sends the email.
Part 7: Testing the LAPTOP Process in the
Designer
The LAPTOP process may be tested by clicking the ![]() icon on the Workflow Process designer
toolbar. Click OK on the Process Input Parameters dialog (there are no input
parameters for the process); the Process Tester will then appear:
icon on the Workflow Process designer
toolbar. Click OK on the Process Input Parameters dialog (there are no input
parameters for the process); the Process Tester will then appear:
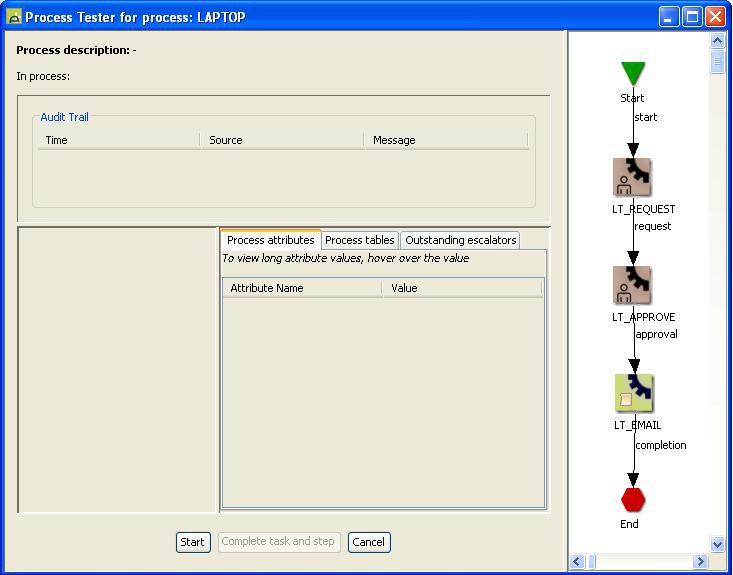
Click Start to begin the process. Each task will be
processed in turn. For each Task, you will be able to enter values for input
and output parameters, and choose Completion States.
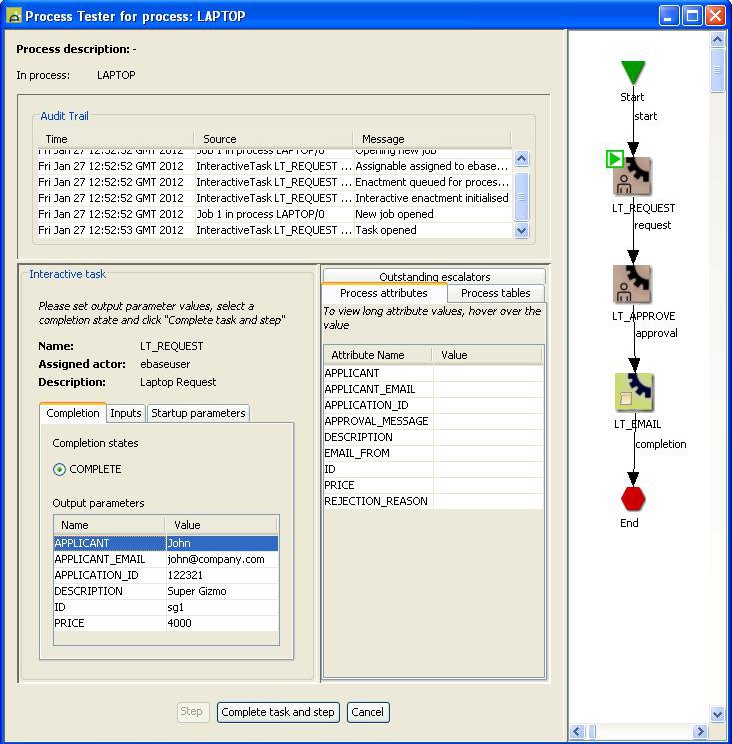
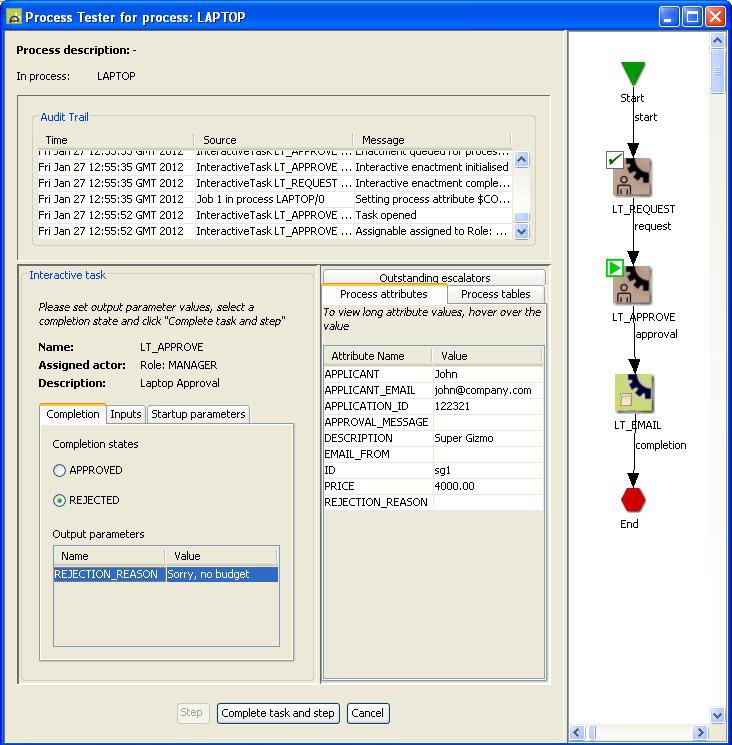
The first Task is LT_REQUEST: enter values for the output parameters as follows
and click the ‘Complete task and step’ button:
A popup will appear asking you to select the actor for the next task LT_APPROVE; this is testing the dynamic assignment logic. The dropdown list will only contain one entry showing the Manager role, so select this and click OK.
The screen for the second Task, LT_APPROVE, will appear.
Choose a Completion State of REJECT and enter a Rejection reason as
‘Sorry, no budget’. Click the ‘Complete task and step’
button.
The process now moves on to the System task LT_EMAIL.
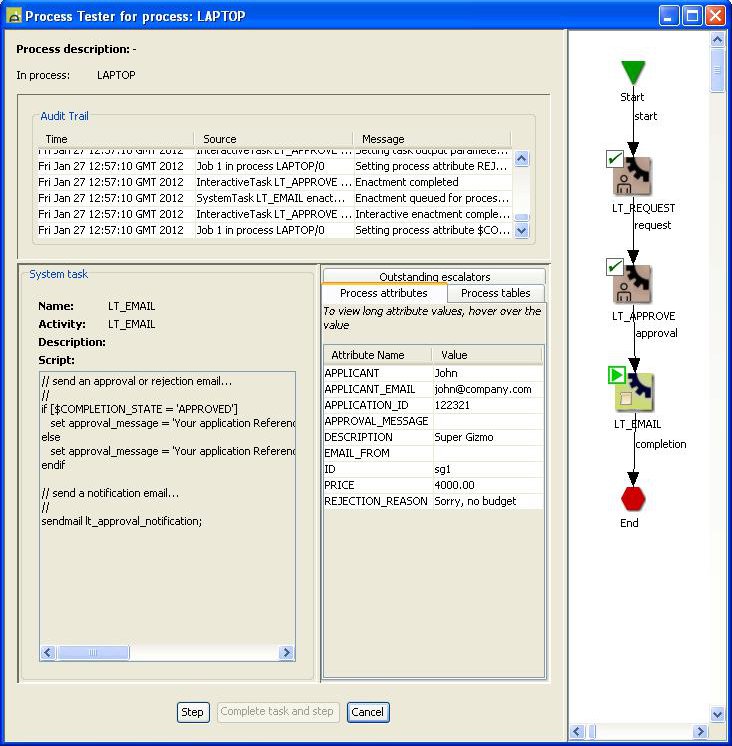
Click the Step button to continue. The LT_EMAIL task is
executed i.e. an email is sent to the originator of the Laptop request with an
appropriate notification message. The process is now complete:
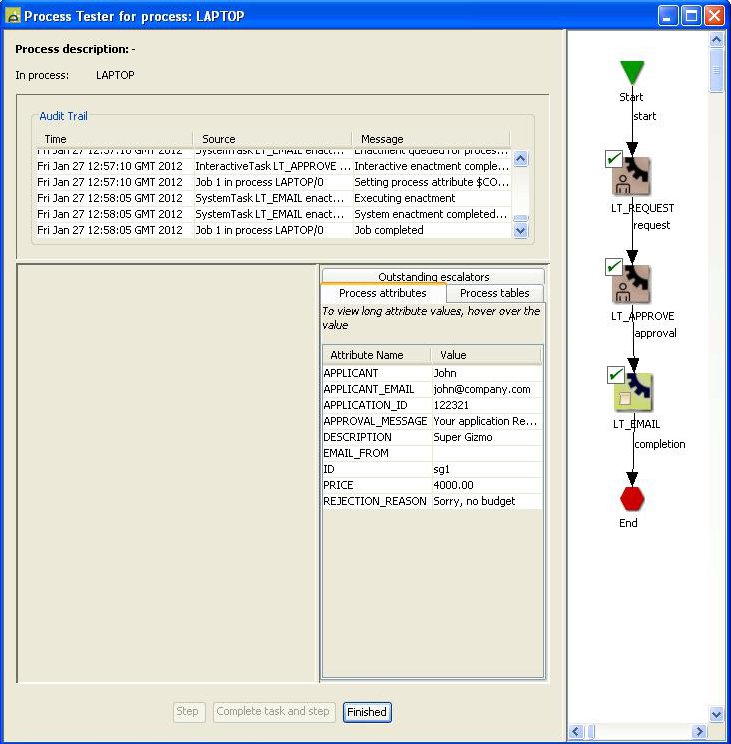
Note: The Process Tester actually executes the
process for real i.e. it is not a simulation. As a result of executing the test
an email will be despatched to the email address entered during the completion
of the LT_REQUEST task.
Part 8: Testing the LAPTOP Process outside
of the Designer
Before testing outside of the Designer, the process must be
‘Released’ by clicking the ![]() icon
on the Workflow Process designer toolbar. Click yes at the prompt to release
the process and activities.
icon
on the Workflow Process designer toolbar. Click yes at the prompt to release
the process and activities.
Important! Ebase
Workflow requires that Ebase authentication is enabled on the server. This will
prompt any new browser users to logon using their username and password. It is
configured in the UFSSetup.properties file in the
UfsServer\tomcat\webapps\ufs\WEB-INF\classes directory. Make sure that the
“Ufs.logonExitServlet=LogonExitServlet”
setting is uncommented:
#
# Security
properties
#
Ufs.logonExitServlet=LogonExitServlet
Ufs.authorisationManager=com.ebasetech.ufs.security.authorisation.EbaseAuthorisationManager
Ufs.userManager=com.ebasetech.ufs.security.authentication.EbaseUserManager
Ufs.useUserManagerForDesignerAuthentication=true
The LAPTOP process may now be tested directly from the web
browser. Start a web browser and enter a URL to run the LAPTOP_REQUEST form
e.g.
http://localhost:3030/ufs/ufsmain?formid=LAPTOP_REQUEST
At the authentication prompt enter your usual Designer
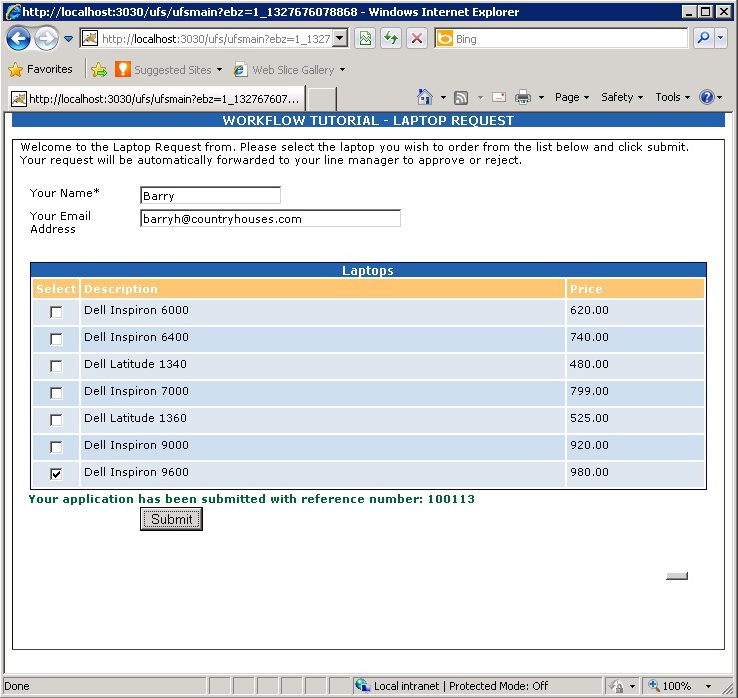
username and password. The LAPTOP_REQUEST form will appear.
Enter a value for name and email address, choose a laptop and click submit. The form starts a LAPTOP process passing in the relevant data.
Close the web browser completely – this is required
because userids are associated with browser sessions and we need to sign on
again as a different user.
The next task in the process is LT_APPROVE. This task is
assigned to the Manager role and we have created a user named Bob with this
role. This means that it will appear as a task item on Bob’s task list.
We must therefore run the WF_TASKLIST form, which is shipped with the Ebase
Workflow product as a sample task list application. Start a web browser and
enter a URL to run the WF_TASKLIST form e.g.
http://localhost:3030/ufs/ufsmain?formid=WORKFLOW_TASKLIST
At the authentication prompt we must sign in this time as user Bob (password Bob) N.B. Usernames and passwords are case sensitive. Note that the authentication prompt is only displayed for new sessions, so you may need to close all open browser windows then open a new browser and enter the URL for the WF_TASKLIST form.
The sample task list will appear containing any tasks that
can be performed by Bob:
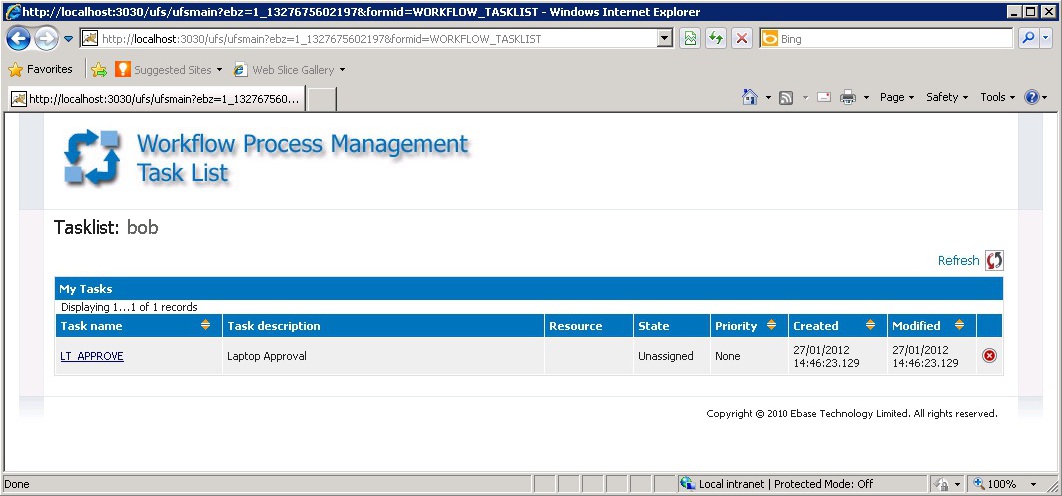
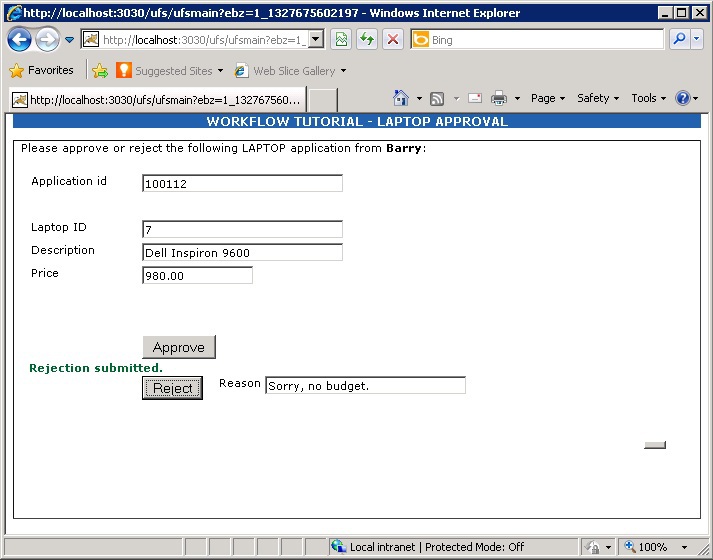
The task is waiting for a user with the Manager role to complete
it. Clicking the Task Name in the list will automatically invoke the LAPTOP_APPROVE
form, passing in the data describing the Laptop requested. Bob must now decide
whether to approve or reject the request. Enter a rejection reason of
‘Sorry, no budget.’ and click the Reject button. The form will pass
the rejection reason and a Completion State of REJECTED to the workflow
process.
The final task, LT_EMAIL, will now execute and the process
execution is complete.
Solution
The complete solution to the tutorial may be imported from
the following export files shipped with the product or by downloading it from
the Sample Apps section of the ebastech.com
website:
|
LAPTOP_FORMS_COMPLETE.XML |
- the LAPTOP_REQUEST and LAPTOP_APPROVE forms including input and output parameters, and defined Completion States. |
|
LAPTOP_SEQUENCES.XML |
- the LAPTOP sequence used by the LAPTOP_REQUEST form. |
|
LAPTOP_PROCESS_COMPLETE.XML |
- the LAPTOP process; LT_REQUEST, LT_APPROVE and LT_EMAIL Activities; LAPTOP Business View and LT_APPROVAL_NOTIFICATION Email Resource |
You will first need to copy the files from
UfsServer/samples/workflow directory to the transport directory and then import
them using the tools menu (Tools -> Migration -> Import).
(See Using Import and
Export for more information)