Creating Rich Clients Using
jQuery Tutorial
Creating the Structure of the Contact and
Initial Texts
Respond to the Mouse Moving Over the Contact
Write the Expand and Collapse Functionality
Associating the jQuery Library with the Page
Associating the Client Script with the Page
A Closer Look at the JavaScript
What are the main participants?
See also: Client Javascript and Rich Client Features, Designing Forms, Introduction to Styling
Introduction
The aim of this tutorial is to take you through the steps needed to add some dynamic behaviour to a web page, scripted using JavaScript along with the jQuery library.
We will be creating a simple contact such as you might find in an address book. The contact has a name, a job position, start date and an email address. To save space on the screen and in order to fit as many future contacts in as possible, we only want to show the contact’s name. When the mouse is moved over the contact we want the extra details to be presented.
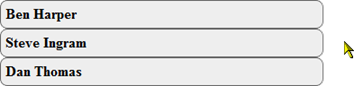
To satisfy this we will create a page which will initially present:
![]()
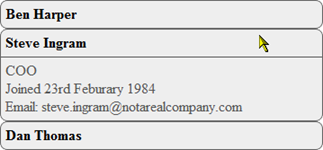
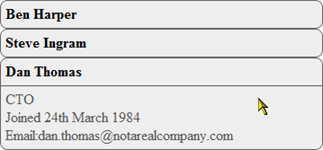
Moving the mouse pointer over it will reveal the content.
And then moving the mouse away will hide the content again.
Designing the Static Page
Creating the Structure of the Contact and Initial Texts
Create a new Form, and call it CONTACT_SHEET.
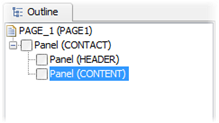
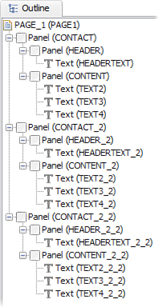
Drag 3 Panel Controls onto the page, such that the first panel contains the second two. Rename the first panel CONTACT, the second one HEADER and the third CONTENT.
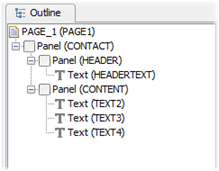
The Header is where we are going to put the name of the contact, so a drag a Text Control into that panel. Three separate pieces of information about the contact are to be added to the CONTENT panel, so drag three Text Controls in there.
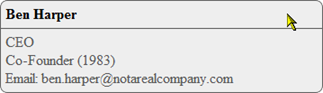
This contact is for Ben Harper, the CEO and co-founder of (the fictitious) notarealcompany.com, so add his name to the Text Control in the HEADER Panel, and the rest of the info to the Text Controls of the CONTENT panel (CEO into the first Text Control, Co-Founder (1983) in the second and Email: ben.harper@notarealcompany.com in the last one). The WYSIWYG view now looks like this:

Adding Style
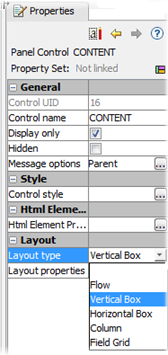
Now we will add some styling to make this look better. First we will change the way texts in the CONTENT panel are laid out, so they line up vertically: click on the CONTENT Panel Control in the outline, or WYSIYG view and in the Control’s Properties View, change its Layout type property to Vertical Box:
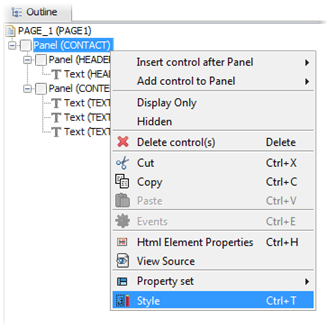
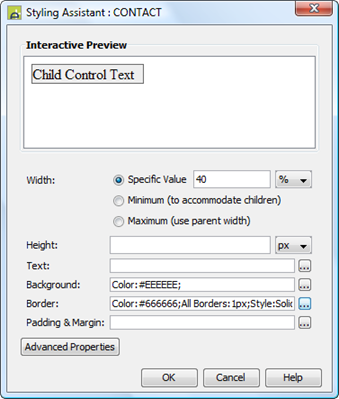
Now add a background color, restrict the width and add a (rounded cornered) border to the CONTACT panel: right-click on the CONTACT Panel Control in the outline or WYSIWYG view and open the Styling Assistant:
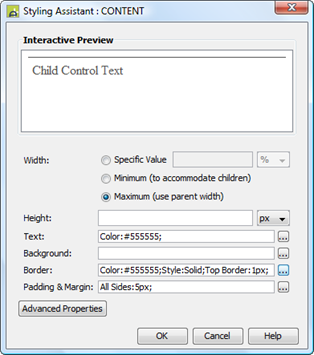
Now fill in the properties to match those in the pictures below:
|
|
|
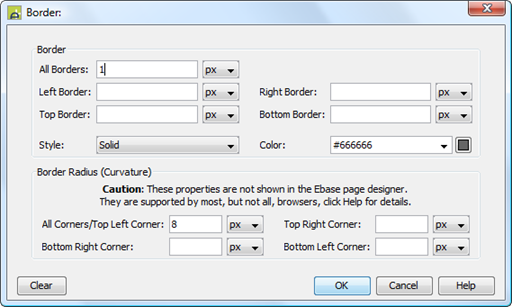
The WYSIWYG view of the designer now looks like this. Note that the Border Radius property we just set above to give us rounded corners is a runtime only property so doesn’t show up in the designer.

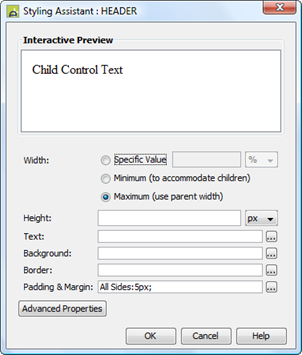
Now make the Contacts name bold, using the Styling Assistant of the HEADER panel’s Text Control.

And give the text a bit of space by adding some padding to the HEADER Panel Control itself, using its Styling Assistant.
The CONTENT Panel Control also needs this padding, to give it space and to line up with the text in the HEADER. Add a border along the top of the panel to help separate the header from the content, and change the color of the text. The CONTENT Panel Control’s Styling Assistant should now look like this:
The WYSIWYG view now looks like this – much better than before we started styling!

Adding Dynamic Functionality
Now we will make the contact more interesting, here is where we add the ‘expand and collapse’ feature where only the header is visible until the mouse hovers over it when the content is revealed.
Adding a Locator
See: Locators.
We want to be able to identify the CONTENT panel in the browser DOM, as that is the panel we want to expand and collapse. We do this in the CONTENT panel’s HTML Element Properties Assistant. There is a choice of two Locators: Id and Class. We could use the Id, but this needs to be unique on the page which is great if all we want is to show one contact, but we will probably end up showing more than one, and means we will have to be careful every time we add a new contact to make sure it’s different. Class locators are good for this as many HTML elements can use the same class name and it means we can then easily manipulate all these elements as a group; which is what we want, as any more contacts we add will need the same functionality.
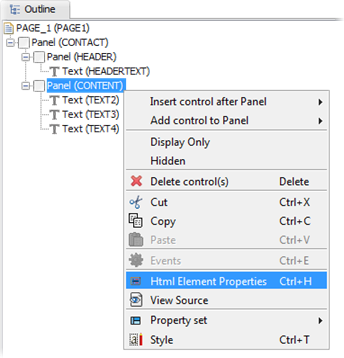
Right click on the CONTENT panel and click on Html Element Properties.
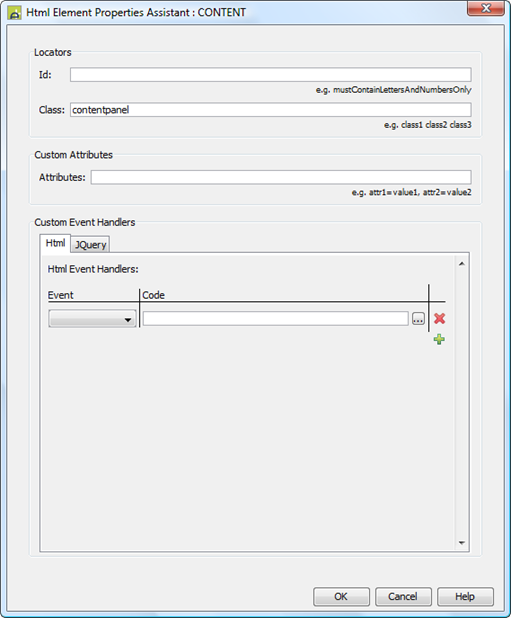
Add a Class Locator: contentpanel.
Respond to the Mouse Moving Over the Contact
When the user moves the mouse over the contact we want it to expand, showing the content, and when the mouse moves away from the contact we want it to collapse back down to the header (the name), hiding the content. We have yet to write functions that actually do the expanding and collapsing (that comes next), but we can prepare for that here. We are interested in two types of event that the jQuery library generates as a user moves the mouse across the screen: mouseenter and mouseleave.
The mouseenter event is generated when the mouse is moved into an element, and the mouseleave event is generated when the mouse is moved out of an element. The element we are interested in is the CONTACT panel, so we will set up some custom Event Handlers on the CONTACT panel to respond to these events.
Right click on the CONTACT panel and click on Html Element Properties.

Now set up the two jQuery Event Handlers as shown below, along with the contact Class Locator. This Class Locator is used by Ebase to register these Event Handers to the CONTACT element for you.
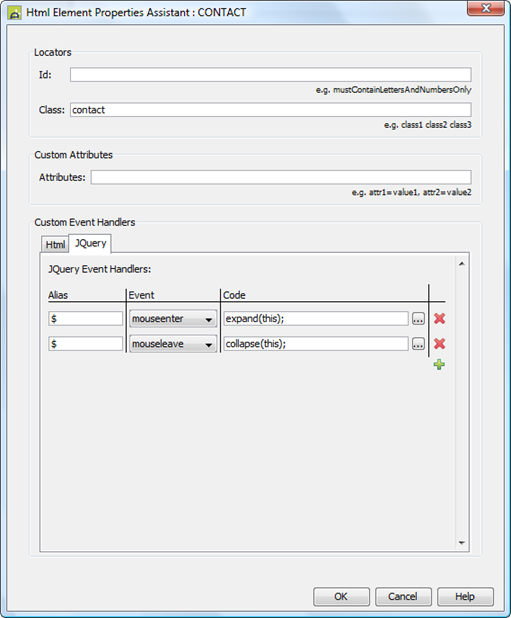
Let’s have a quick look at the first Event Handler. It says: on a jQuery mouseenter event execute the script: expand(this). As we are adding this Event Handler to the CONTACT panel, this event is generated when the user’s mouse enters the CONTACT panel. Again, as we are adding this to the CONTACT panel, the this in the expand(this) code is the CONTACT panel itself (technically it is the HTML element that represents the CONTACT panel – the div element).
Write the Expand and Collapse Functionality
See: Client Script Editor
We have now added Event Handlers which respond to the mouse entering and leaving the CONTACT panel, calling either expand or collapse as appropriate. These functions currently do not exist, so we now need to create them. This is the hard bit as writing the expand and collapse functionality requires knowledge about JavaScript and jQuery. JavaScript is (and the jQuery library is as close as makes little difference) an industry standard for writing scripts for the Browser.
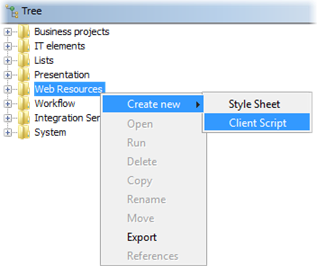
Create a new Client Script by right clicking on the Web Resources section of the Designer Tree and selecting Create New -> Client Script and then name it PANEL_EXPANDER.
This Client Script needs to provide two functions: expand and collapse. When we created the Event Handlers for mouseenter and mouseleave we called these functions and passed in the CONTACT panel that the event was raised on, so these functions must accept a parameter where the CONTACT panel can be passed in. One of CONTACT panel’s children is the CONTENT panel to which we have just added the Class Locator contentpanel (above). Both of these functions can use this Locator to find the CONTACT panel’s CONTENT panel.
In the collapse function, once the CONTENT panel has been found, we need to collapse it (i.e. shrink it until it disappears). To do this, the Client Script can make use of the jQuery function slideUp, which decreases the size of the element it is called on until it is completely hidden. Therefore in the collapse function, we need to find the CONTACT panel’s CONTENT panel and then call slideUp() on it. JQuery also provides a function called slideDown that does the opposite of slideUp; it makes an element visible and then increases it to its full size. Thus in the expand function, once it has found the CONTENT panel, calling slideDown() on it will expand it.
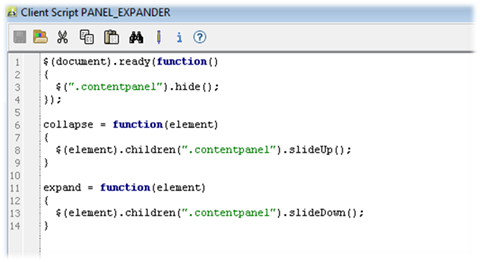
The JavaScript code to do this can be found here. You can see the two functions collapse and expand, both of which accept a parameter called element. The functions then look through the given element’s children to find the one with a contentpanel class, and they call slideUp or slideDown on that element as appropriate. Copy the JavaScript into the Client Script Editor and save it. The editor should now look like this:
Associating the jQuery Library with the Page
See: Form Properties, Adding External Scripts, Configuring Web Resources
Our Client Script uses the jQuery library, so we must associate this library with the Page (either directly or indirectly through a Form or Presentation Template). If we don’t add it to the Page, the Browser will not be able to find any of the jQuery functions we have used.
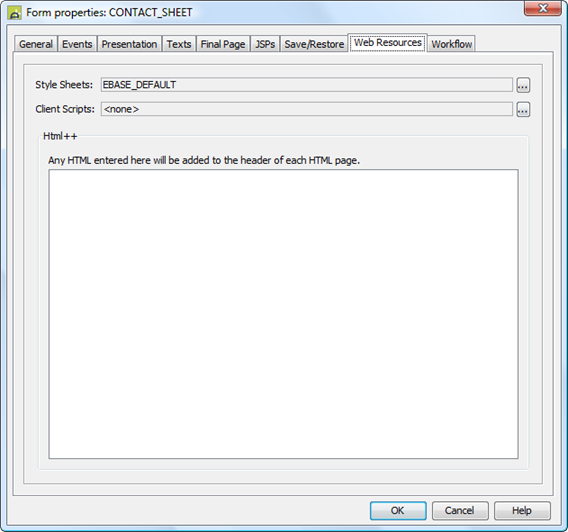
In this case we are going to add the jQuery library to the Form, which means it will be available to all the Pages of this Form. This saves adding it to every page individually (although for this form there is only one page). Open the Form Properties Dialog and go to the Web Resources tab.
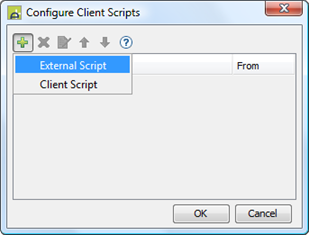
Press the Client Script’s … button to open the Configure Client Script dialog and click on the ‘add script’ button (green plus) and select External Script from the drop down menu.
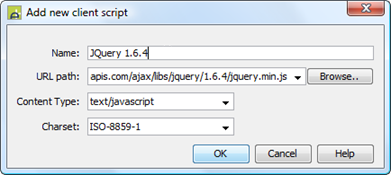
Now we will configure the jQuery library. The important line is the URL path as this is the link a browser will follow to get to the library. Google is one of several public hosts of the jQuery Library and as its convenient, we’ll use that one (full url: https://ajax.googleapis.com/ajax/libs/jquery/1.6.4/jquery.min.js - be aware though if you are not connected to the internet then your browser will not be able to follow the link and therefore will not be able to load the library).
Enter the details as shown below.
Associating the Client Script with the Page
See: Page Properties, Client Script Configuration Dialog, Configuring Web Resources
To make the functions we have written in our Client Script available we must associate it with the Page (either directly or indirectly through a Form or Presentation Template). Let’s associate it Page directly:
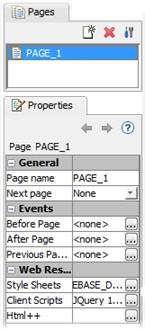
In the Pages View click on PAGE_1 to bring up the Page’s properties in the Properties View and then press the Client Script button.
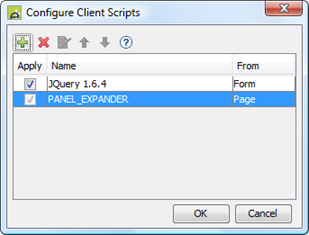
Press the ‘add script button’ (the green plus) and select Client Script from the dropdown menu. From the list of all available Client Scripts presented to you, select the one that we have just created (PANEL_EXPANDER).
Browser Behaviour
This dynamic behaviour we have created is for the Browser; the WYSIWYG view does not show it. So to see it all work run the Form.
Initially you will see:
![]()
Moving the mouse pointer over it will reveal the content.
And moving the mouse pointer away will fold the content back up so just the name is shown. This achieves our aims as stated in the introduction.
Extra Contacts
Here the CONTACT panel has been copied and then pasted into the Page twice:
Then the texts in the copied Text Controls were changed. No other changes are needed. Now running the Form looks like:
And as the mouse pointer is moved:
If you had a database table full of contacts, then the original CONTACT panel could be placed into a Repeater Control, backed by this table. The fields of this table could then be mapped in order to replace our hardwired Text Controls and so all of the contacts could be added without having to change our Client Scripts, Locators and Event Handlers.
A Closer Look at the JavaScript
Piecing it all together
What are the main participants?
- The CONTACT panel is the element the user is interacting with – when the mouse moves over it, the content must expand and collapse accordingly.
- The CONTENT panel is the element that is being expanded / collapsed (shown / hidden).
The CONTACT panel contains the both HEADER panel and the CONTENT panel. The HTML representation of the CONTACT panel is as follows (removing Ebase generated items used for styling and the Text Controls which don’t play any role in this example):
<div> (the CONTACT panel)
<div></div> (the HEADER panel)
<div></div> (the CONTENT panel)
</div>
As you can see each panel is represented by a single div element. Notice that the names we are using - CONTACT, CONTENT and HEADER - do not appear in the HTML representation; they are designer aids. This means we need a way of telling the CONTENT and the HEADER div elements apart in the Browser. This is why we have added a Locator to the CONTENT panel (above); we gave it a Class Locator of contentpanel, which in turn adds a class to the CONTENT panel’s div element:
<div> (the CONTACT panel)
<div></div> (the HEADER panel)
<div class=”contentpanel”></div> (the CONTENT panel)
</div>
Why are we using jQuery?
For this exercise, the jQuery Library helps us in two ways:
Firstly, whenever the mouse is moved around the page, jQuery generates an event every time the mouse enters and leaves an element. Actually, jQuery generates a suite of events to cover all user interactions from clicking the mouse to typing into text fields, all of which complement or enhance the HTML events the Browser generates. But in this example, we are only interested in when a mouse enters or leaves the CONTACT panel (or rather its div element).
We used this feature when we created the two Event Handlers in the CONTACT panel’s Html Element Properties Assistant above. The Event Handlers listen for mouseenter and mouseleave events on the CONTACT panel’s div element and call a function when the event is triggered, passing the CONTACT panel’s div element (i.e. the element that generated the event) into the function.
It should be noted that there is no reason why these Event Handlers couldn’t have implemented these functions themselves, rather than relying on them being defined elsewhere; the Event Handler’s code can be written in JavaScript (as we have done) and can use any JavaScript library like jQuery (as long as the library is associated with the page, like we did here). The reason we didn’t define these functions in the Event Handlers comes down to a question of reusability – if the Event Handlers defined the functions, then only those Handlers can use them, so if we want to use the expand and collapse functionality elsewhere we would have to re-implement it. However, using a Client Script, all we have to do is associate it with the Page in question (like we did here) and the functions can be used straight away.
The second reason we are using the jQuery library is that its API (http://www.jquery.com) provides two functions we can use to achieve the expanding and collapsing effect: slideUp() and slideDown(). slideUp() decreases the size of an element until it is completely hidden and slideDown() does the opposite. Because the jQuery library has been tested to be compatible with all the browsers that Ebase supports, it removes the headache of having to code in any incompatibility workarounds into our Client Script.
Writing the JavaScript
Expanding the contents
We already know the signature of the expand function as we considered this in the code of our mouseenter jQuery Event Handler, where we passed in the CONTACT panel’s div element into a function called expand. So in JavaScript, our function definition looks like:
expand =
function(element)
{
}
We want to use the jQuery slideDown() function to expand the CONTENT panel, so we need to start by finding the jQuery object representing this element: $(element). $ is an alias into jQuery. It is the same as writing jQuery(element) which is the main entry point function into the jQuery library.
Now we have a jQuery object for the CONTACT panel we need to find its child CONTENT panel and we can do this with the jQuery library function children. This function accepts an optional selector parameter, which is a way of identifying which specific children you are looking for (calling children() without a selector returns all the children – in this case both the HEADER and CONTENT panels’ div elements). As we have given the CONTENT panel a Class Locator of contentpanel we can use this as the selector. So $(element).children(".contentpanel") will give us the jQuery object representing the CONTENT panel (or technically its div element).
All that remains if to call the jQuery slideDown function: $(element).children(".contentpanel").slideDown();
And that’s it! To recap, we have created a function called expand which accepts an element which the Event Handler uses to pass in the CONTACT panel’s div element (the element the mousesenter event was triggered on). Using jQuery we then found the CONTENT panel’s div element via its Class Locator, and then called slideDown() on it.
Putting all of this JavaScript together we get:
expand =
function(element)
{
$(element).children(".contentpanel").slideDown();
}
Collapsing the contents
Now we have created the JavaScript for expanding the CONTENT panel, writing the JavaScript for the collapse function is easy. It is exactly the same as the expand script, but apart from calling the jQuery function slideDown, we call slideUp:
collapse
= function(element)
{
$(element).children(".contentpanel").slideUp();
}
Initially, hide the contents
As it stands, when the page first loads in the Browser, all the CONTENT panels will be visible because we haven’t done anything to hide them yet. There are two ways these panels can be hidden:
1. Advanced styling can be used to add a display:none CSS style to the CONTENT panel. This is probably not the best solution, as it will hide the CONTENT panel in both the Browser and in the Designer. This might be ok if you have finished designing and styling the page, but if you need to come back to it you will have to remove the style before you can see the panel again.
2. Use JavaScript to hide the CONTENT panel. This means that is still visible in the Designer but not in the Browser. However, as the content is still shown in the Designer, it becomes difficult to see what the page might look like when the CONTENT panel is hidden (as it will be in the Browser), especially when there are several contacts on the page.
So both these methods have problems and it really comes down to how you set about designing the page. As this tutorial is about using JavaScript and jQuery in Ebase we will use the JavaScript method here.
When a page loads in a Browser, the jQuery library generates a ready() event on the document as soon as the DOM is ready for scripts to manipulate it. In our Client Script we can hook into this event with the following code: $(document).ready(function(){ });. Here, we are calling ready() on the jQuery object representing the document and passing in a function (an anonymous function more precisely; i.e. one that has not been assigned a name which can then be referred to elsewhere). This function will then be executed by the jQuery library when it generates the ready event.
The first thing we need this function to do is find the CONTENT panel. We have already done something like this for the expand and collapse functions, but the difference here is that the Event Handler passed in the CONTACT panel, and we then looked for the CONTENT panel within it using the Class Locator we gave it. We can use this Locator again here: $(“.contentpanel”) to find all the elements with a contentpanel class. Now we have found all the CONTENT panels we can hide them using the jQuery hide function. So to hide all CONTENT panels we can use this JavaScript: $(“.contentpanel”).hide();.
The complete JavaScript to hide all the CONTENT panels on the page when it is opened by the Browser is:
$(document).ready(function()
{
$(".contentpanel").hide();
});
The Client Script JavaScript
Pulling in both expand and collapse functions and the code to hide the CONTENT panel, we arrive at the final code for our Client Script:
{
$(".contentpanel").hide();
});
collapse = function(element)
{
$(element).children(".contentpanel").slideUp();
}
expand = function(element)
{
$(element).children(".contentpanel").slideDown();
}
An Alternative
Instead of defining Event Handlers to call functions in our Client Script we can register events directly in it:
$(document).ready(function()
{
$(".contentpanel").hide();
$(".contact").hover(function () {
$(this).find(".contentpanel").slideDown(); },
function () { $(this).find(".contentpanel").slideUp(); } );
});
The first few lines are the same as before; all the CONTENT panels on the page are hidden when it loads in a Browser. We then register a hover event to all the CONTACT panels on the page. This hover event is configured with two functions: the first is called when a mouse enters the CONTACT panel and the second one is called when it leaves. Both of them use the jQuery find function on the current element (the CONTACT panel the mouse is moving into/out of) to get all of its CONTENT panels. Then the first function calls slideDown() to expand them whereas the second one calls slideUp() to collapse them instead.
This eliminates the need for our custom jQuery Event Handlers for mouseenter and mouseleave, but we still need to add the contact and contentpanel Class Locators to the Html Element Properties of the CONTACT and CONTENT panels respectively.