Client Javascript and Rich Client Features
Locating Controls and Html elements
Associating Scripts with a Page
Finding Specific Elements to Manipulate
Html 5 Attributes and Mobile Devices
See also: Working with Web Resources, Html Element Properties, Creating Rich Clients Using jQuery Tutorial, Client API Guide, Client API Tutorial
Introduction
Today’s web applications are becoming increasingly interactive and display more and more features that were previously only found in dedicated programs running on the user’s machine. Examples of these rich client features are:
- Popping up dialog panels
- Displaying autocomplete lists
- Panels that dynamically open and close
- Drag and drop
- Displaying additional information in mouseover tooltip boxes
- Dropdown action menus
- Automatically updating panels at timed intervals
These features, and many more, are implemented using client-side Javascript - Javascript that executes in the browser, frequently using jQuery. In this document we discuss the building blocks supplied with the Ebase Xi system that you can use to create these rich client effects.
Building Blocks
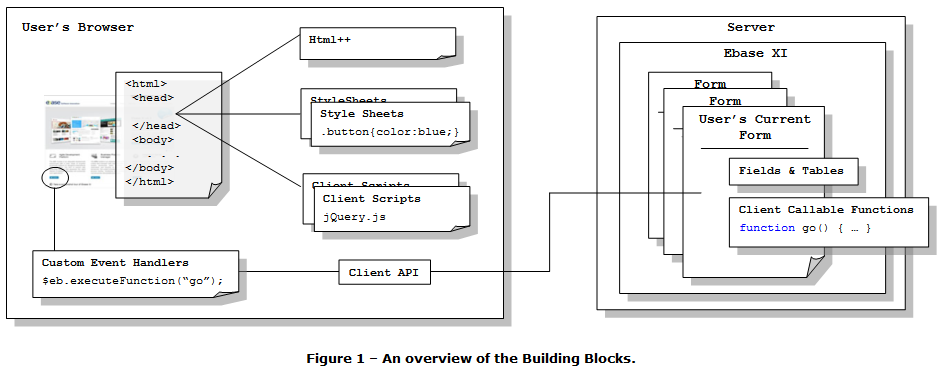
Styling the Page
Style Sheets can be attached to any page to style parts of that page. These style sheets can be either internal (created in the Ebase Xi designer) or external (loaded via a URL). More details.
They are also generated by Ebase to apply styling configured in the Ebase Xi designer using Styling Assistants. More details.
Configuring Client Javascript
There are a number of ways to create client-side Javascript and you can use these in any combination:
- Client Scripts: these are essentially Javscript script files that can be either internal (created in the Ebase Xi designer) or external (loaded via a URL). These client scripts are loaded in the Head section of an Html page. More details.
- Html++: this provides an alternative way of loading Javascript into the Head section of an Html page; this is loaded inline as opposed to be being loaded via a URL. One reason you might choose to use this option as opposed to a client script is that Html++ can contain substitutable variables: this gives you the ability to create dynamic Javascript. More details.
- Custom Event Handlers: configured in HTML element Properties, they provide the ability to create Javascript snippets that are event driven e.g. an onChange or onClick event. You can choose to include all the code you need in one of these snippets or you might choose to call functions which are contained in a client script. More details.
Locating Controls and Html elements
HTML element Properties can be used to create locators – these allow you to find one control from another control e.g. you might want to find a Panel Control so you can use it to create a popup dialog when an icon is clicked. More details.
Interacting with the Server
When creating these rich client features, you frequently want to interact with the server, either to download information or to ask the server to perform some task – update a database, call a web service etc. This is achieved by using the Client API – this is a Javascript API that allows you to retrieve or update information from Fields & Tables on the server, and also allows you to invoke server-side Javascript Client Callable Functions. More details.
Client Scripts
See: Client Scripts, Client Script Editor.
A Client Script is a script that is destined to be executed on the browser. They can be associated with any number of pages (see Associating Scripts with a Page), so a library of functions can be developed once and then used across the web site.
Associating Scripts with a Page
See: Designing Forms, Working with Web Resources, Client Script Configuration Dialog
Scripts (including Client Scripts) can be associated with a Page at three levels:
· In the Presentation Template – All scripts added here are automatically available to any Forms that are linked to it.
· In the Form Properties – Any scripts from a linked Presentation Template are inherited by the Form and scripts can also be added directly to the Form. Scripts, either inherited or added directly to the Form are available to every Page of that Form. Inherited scripts can be disabled in which case those scripts are not available to the Form’s Pages.
· In the Page Properties – Any (non-disabled) scripts from the owing Form (and its linked Presentation Template if it has one) are inherited by the Page. Extra scripts can be added directly to the Page. Inherited scripts can be disabled making them unavailable to the Page.
Scripts are associated with these levels via the Client Script Configuration Dialog. The ordering of the scripts in this dialog is important as this is the order that the scripts are added to the page; scripts can only use functions from another script if the calling script is included after the script containing the code it wants to use (i.e. Script B can only use functions from Script A if Script A is added to the page before Script B).
At each of these levels, two types of scripts can be included: any Client Scripts that have been created (see above) or External Scripts. These External Scripts live outside of Ebase and can be written in any scripting language supported by target browser(s). External Scripts are often used to bring in libraries, such as jQuery (see www.jquery.com) which provides, amongst other things, a powerful suite of cross-browser compatible APIs for selecting and manipulating elements in the HTML DOM. These libraries can then be used within Client Scripts, as long as they are associated with the page before any Client Scripts that use them. It’s often good practice to associate these libraries at the Presentation Template level so all Pages across all Forms that use the template inherit these associations by default.
Finding Specific Elements to Manipulate
See: Html Element Properties Assistant
Client and External Scripts often need to find and manipulate elements within the browser’s DOM, therefore it is important that we have the ability to identify individual HTML elements. In Ebase, every appropriate Control has an Html Element Properties Assistant that can be used to add identifiers, known as Locators, to the Control. There are two types of Locator:
· Id – is attached as the id attribute of the target element. Ids must be unique within each page.
· Class – these are appended as classes to the target element. They do not have to be unique and can be used to easily identify groups of elements.
Most Controls allow Locators to be added to their root element, which is the first HTML element of that control. By adding a Locator to these elements, each control can quickly be found and manipulated by scripts. In addition, some Controls allow Locators to be added other elements within it: usually those elements that a user interacts with e.g. the input element in the editor part of a Field Control.
Responding to User Actions
See: Html Element Properties Assistant
User actions (e.g. mouse over) are linked to scripts (usually JavaScript) via events. In response to any user action, a browser will generate a series of events on the HTML elements with which the user is interacting. For each event on each element, the browser will execute any scripting associated with the event. Custom Event Handlers are Ebase’s way of mapping these events to the scripting code (usually written in JavaScript) the browser should execute. Like Locators (see above) Event Handlers can be added to selected HTML elements of a Control via the Control’s Html Element Properties Assistant.
A given Event Handler responds to a specified event generated either on the HTML element it is added to directly, or any HTML elements it contains. For example putting an onclick Event Handler on a Panel Control means that the Event Handler runs the mapped script whenever a user clicks on (or in) that panel. If the Panel Control contains a Button Control with its own onclick Event Handler then the Button Control’s onclick Event Handler runs first, followed by the Panel Control’s onclick Event Handler.
There are two types of Event Hander:
· HTML Event Handlers - these provide a mapping for standard HTML events, for example an onclick event generated by pressing a button.
· JQuery Event Handlers – if jQuery has been associated with the page (as an External Script – see Associating Scripts with a Page above), then additional jQuery events are generated as the user interacts with the page.
Html 5
Attributes and Mobile Devices
See: Html Element Properties Assistant
The popularity of Mobile Devices has lead to draft proposals in the HTML 5 specification being implemented in mobile browsers. These proposals address issues presented by mobile devices:
- Much smaller screen sizes
- The method of interaction with the page (the user’s finger) is less precise than a mouse
Broadly, the mechanism used to address these problems is to decorate HTML elements with additional attributes: either to give the mobile browser extra context for the element (so it can be better presented), or to cut up the page into mobile device sized chunks. For example instead of giving an input the usual type attribute, additional attributes can be specified, like email, which tells the Mobile Device that this input is capturing an email address; this can be used to display a keyboard specifically optimized for that task.
In Ebase, Custom Attributes can be added to each supported element in a Control’s Html Element Properties Assistant. You can specify any number of attribute=value pairs for each, although caution should be used when using defined HTML 4 attribute names as they may cause undesirable behavior in the web page.
Client Event Map
The Client Event Map provides a very useful overview to all the configured Web Resources (Style Sheets, Client Scripts and Html ++), Html Element Properties (Locators, Custom Attributes, Custom Event Handlers) and Client Callable Function scripts for a form and all of its pages. It is opened from the form’s toolbar.
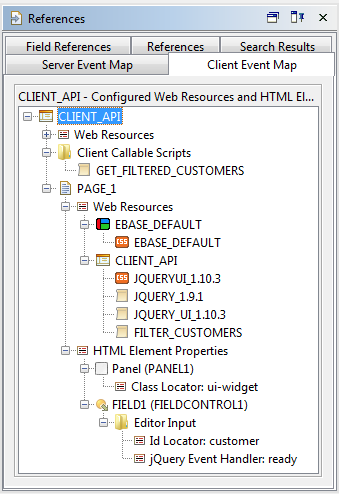
Figure 1 – Client Event Map
Figure 1 shows the client configuration for the form CLIENT_API. It has a number of Web Resources and a Client Callable Function Script called GET_FILTERED_CUSTOMERS. PAGE_1 also has Web Resources configured – EBASE_DEFAULT style sheet, defined in the Presentation Template, as well as a Style Sheet and 3 Client Scripts defined at the form level (in the Web Resources Tab of the form properties dialog). Web Resources defined on the page itself would also be presented here should they exist. Only enabled Web Resources for the form and page are shown: at both the form and page level it is possible to disable web resources inherited from higher levels (the presentation template level for forms and both the presentation template and form level for pages – see Web Resources for more information). Double-clicking on a Web Resource will open up the resource for viewing. In most cases the resource can be edited directly but for some types of web resource (e.g. external client scripts) defined at higher levels they are opened in read-only mode.
We can also see any HTML Element Properties defined on the various controls on PAGE_1: PANEL1 has a Class Locator of ui-widget and the input of FIELDCONTROL1 has both an Id Locator and a jQuery Custom Event Handler configured for the ready event.
Next Steps
The Creating Rich Clients Using jQuery Tutorial takes you through an example implementing the steps described above.